
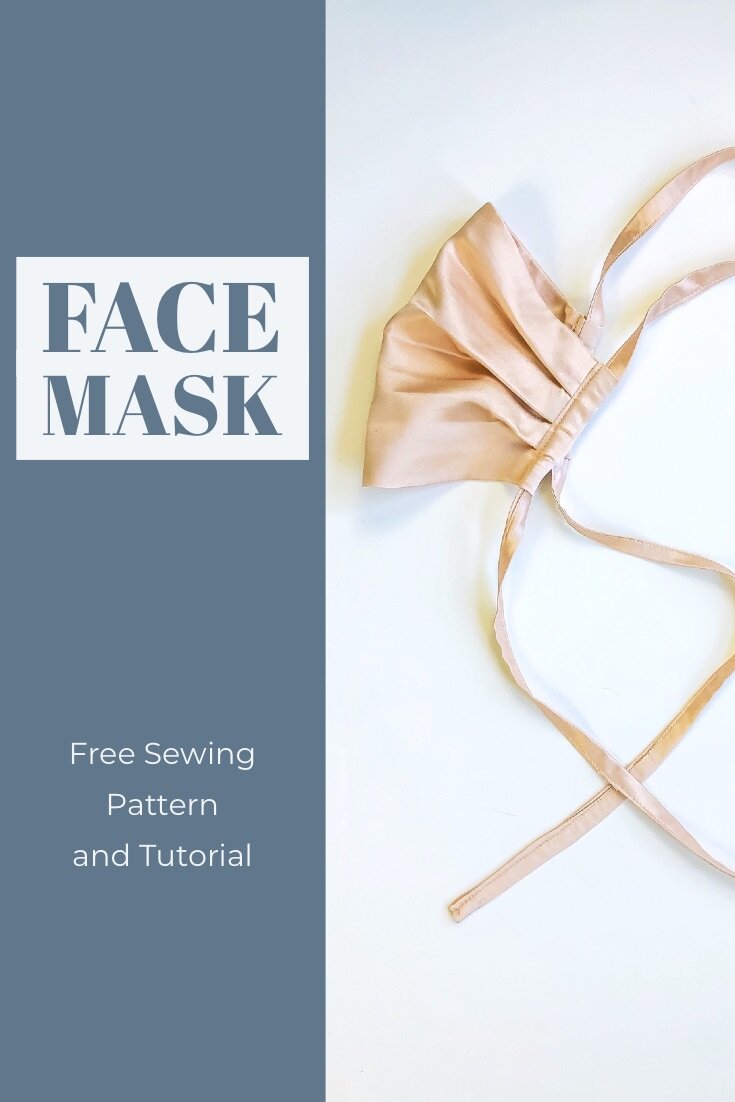
Pleated Face Mask Sewing Pattern and Tutorial Update
Since cloth face masks look like there are going to be the feature accessory for yet another season, I’ve updated my very popular, Pleated Face Mask Tutorial to add a PDF of the Pleated Face Mask Sewing pattern in three sizes: Adult, Older Child/Tween, and young child.
When I first wrote the tutorial last year, I had no experience in wearing a face mask. Like you,I have learned a lot in the past year and a half. Not just how to make a great looking, safe and durable mask, but also that in order to wear them, they have to be comfortable and they need to completely cover your nose and mouth.
Since cloth face masks look like there are going to be the feature accessory for yet another season, I’ve updated my very popular, Pleated Face Mask Tutorial to add a PDF of the Pleated Face Mask Sewing pattern in three sizes: Adult, Older Child/Tween, and young child.
When I first wrote the tutorial last year, I had no experience in wearing a face mask. Like you, I have learned a lot in the past year and a half. Not just how to make a great looking, safe and durable mask, but also that in order to wear them, they have to be comfortable and they need to completely cover your nose and mouth.
The fitting part can be tricky though. Just as we all have fit preferences in our clothes, masks are no exception. Some people like them snug, others want them to be a bit looser. Some like elastic, others ties- or both. The shape and style of a mask is important too as some prefer the pleated mask and others the shaped mask.
All sizes of the Pleated Face Mask are constructed in the same manner and feature a side casing that can be secured with elastic or a drawstring cord. (The addition of a drawstring cord acts as a neck strap so that the wearer can easily take it on and off when walking around.)
The small size fits a child around 5-11 years old. The older child/tween size is a bit larger and fits a child 12- a small adult. The adult size is the largest and should fit most grownups.
You can download the pattern here.
Mask, Vax, wash your hands and be safe out there y’all!
XO, Hilarie


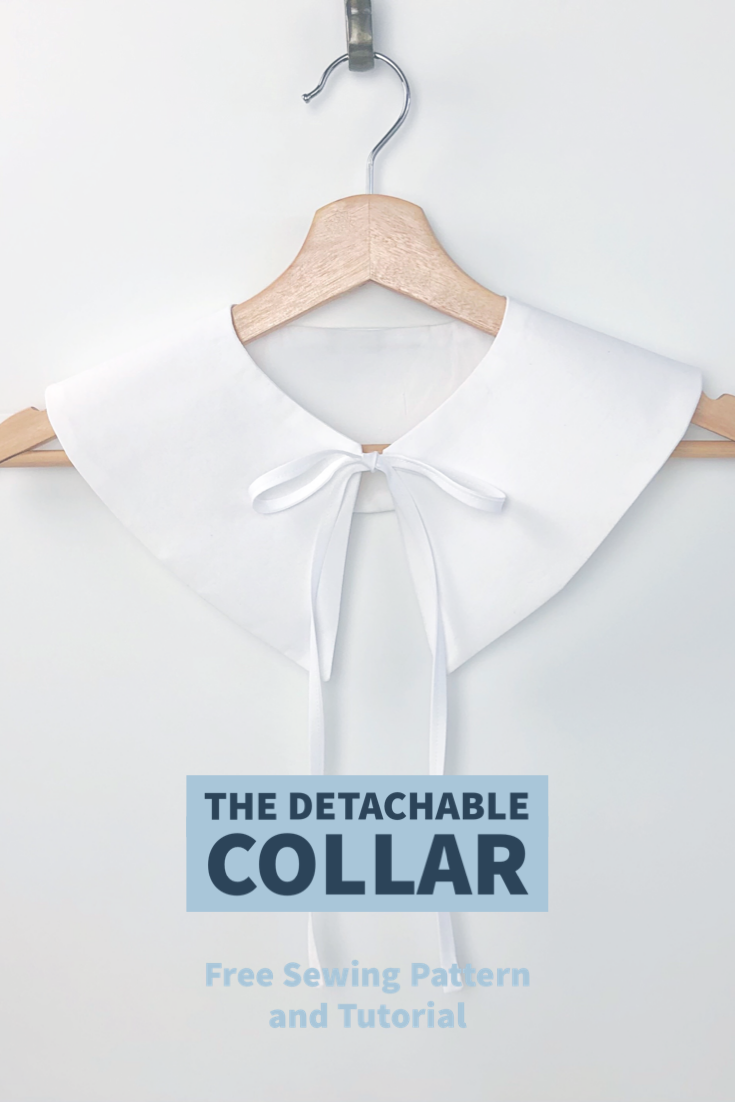
How to Sew A Detachable Statement Collar- Part Two
Learn to sew a detachable statement collar with perfect collar points.
Welcome to part two of the series, How to Sew a Detachable Collar. Detachable Statement Collars are such quick and satisfying sewing projects. There is so much mix and match potential in the variations that you might find yourself amassing quite a collection. Throughout this series, we will begin with a basic collar pattern and learn how to change the design to create a look that is uniquely you.
In my introductory post, I showed you how to make a Peter Pan-style rounded collar with additional tips for sewing curves. For this installment, we are going to learn a bit about the structure of woven fabric and how it relates to creating sharp points to sew a Pilgrim-Esque maxi collar.
If you missed the first post, catch up here: How to Sew a Detachable Statement Collar, Part One

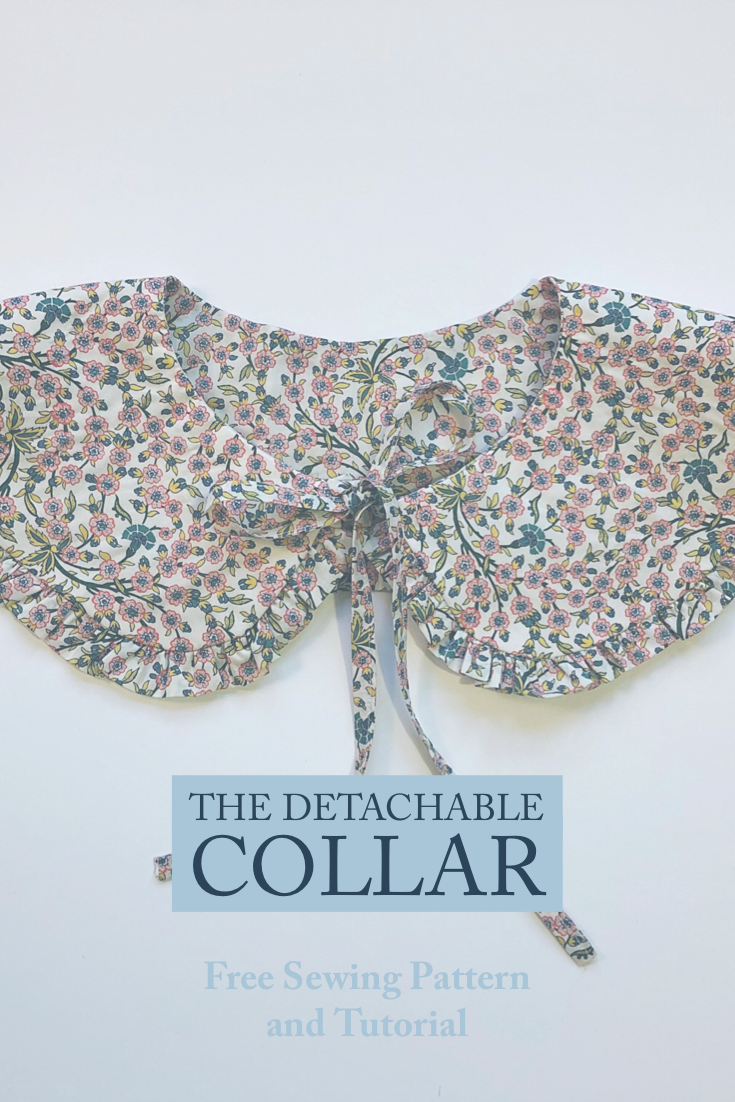
These are two of the many variations that you can create with this pattern. The chambray collar looks great with a mock-neck top worn with a stack of chains and pearls. The plaid taffeta collar has a bit of a softened point and I added a self fabric gathered ruffle to amp up the fun. The possibilities to add your own touch are only limited by your imagination. Have some fun with it!

The pattern is available for download here and also at weallsew where you will find the step by step tutorial. I can’t wait to see what you make!
New to using PDF sewing patterns? Check out this link for tips on assembly.
Head over to weallsew to download and get the tutorial.
Happy Sewing!
XOXO, Hilarie


The Detachable Statement Collar Free Sewing Pattern and Tutorial
Statement collars are everywhere right now- and with good reason. They can be easily tied on over tees, coats, sweaters and even dresses for an instant outfit upgrade. The collars are really easy to make and to give as gifts too!
Detachable Statement Collar Free PDF Sewing Pattern and Tutorial
Statement collars are everywhere right now- and with good reason. They can be easily tied on over tees, coats, sweaters and even dresses for an instant outfit upgrade. The collars are really easy to make and to give as gifts too!
From pristine white collars with lace trim to knitted capelets and quilted denim, there are collars for every occasion and outfit. Beaded collars, fur collars, collars with plumes, collars with lace, collars with piping, and tiers of ruffles. For someone who loves fashion and sewing, these collars offer a sewist a chance to pull out all of the stops and finally try an embellishing technique that perhaps has seemed too daunting for a larger project.
Detachable statement collars are really easy to make- the hard part is choosing a style as there are so many new and fun options. Mini, maxi, round and pointed. Lace, ruffles, trimmed and beaded- the variations are endless. I thought you might enjoy learning all about collars in general and how to make and customize them. To that end, I have designed a group of patterns that I will share with you over the coming lessons. To that end, you can think of this as a sort of mini-course in collars.
The pattern is available for download here and also at weallsew where you will find the step by step tutorial. I can’t wait to see what you make!
New to using PDF sewing patterns? Check out this link for tips on assembly.
Head over to weallsew to download and get the tutorial.
Happy Sewing!
XOXO, Hilarie

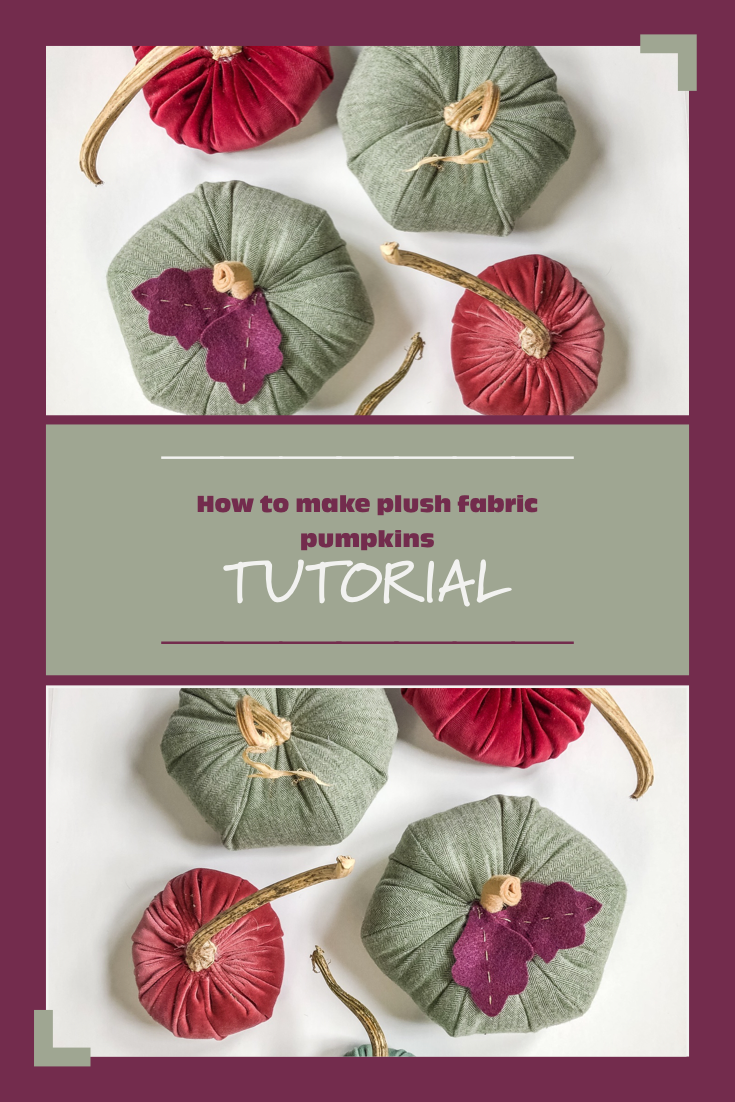
How to Make Plush Fabric Pumpkins Free PDF Pattern and Tutorial
Happy Thanksgiving! Since most of us will be home this year to celebrate, and needing some festive decor, I’ve got a fun DIY for you. This tutorial is a bit of an update from one that I wrote a few years back. The construction and pattern are the same, but I’ll walk you through a few other options for stems. Plus, like the velvet pumpkins that I love to make and gift each year- we can tuft these to give them a more organic pumpkin-y shape.
How to Make a Plush Fabric Pumpkin

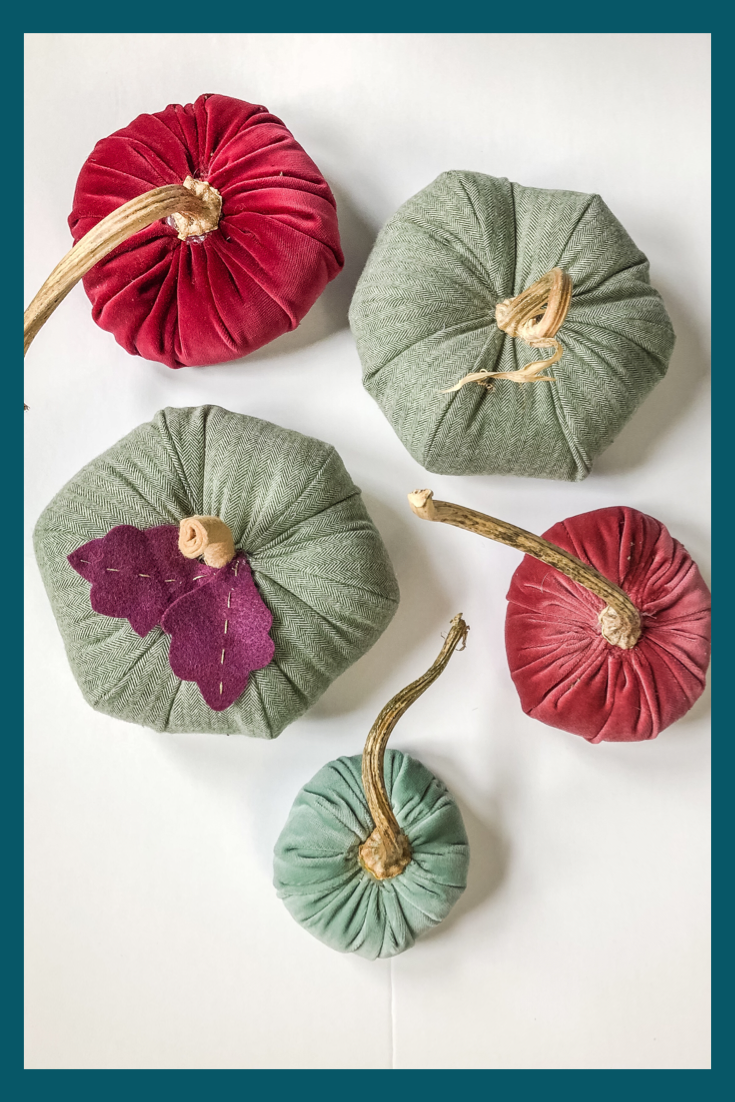
Happy Thanksgiving! Since most of us will be home this year to celebrate, and needing some festive decor, I’ve got a fun DIY for you. This tutorial is a bit of an update from one that I wrote a few years back. The construction and pattern are the same, but I’ll walk you through a few other options for stems. Plus, like the velvet pumpkins that I love to make and gift each year- we can tuft these to give them a more organic pumpkin-y shape.
How to Make a Plush Fabric Pumpkins Free PDF Pattern and Tutorial
Materials to Make a Plush Fabric Pumpkin
1/4" of mid-weight fabric (I have used velvet, flannel, silk and cotton.)
Scissors
Thimble (Trust me on this one!)
A pumpkin stem that has been dried OR a small piece of tan felt and a pipe cleaner.
Poly-fill stuffing
Optional: Felt for leaves to add a bit of embellishment
Hot Glue Gun and Glue Sticks
I’m Stuffed Plush Pumpkin PDF Pattern
Notes:
Once you print the pattern, measure the scaling square to be sure that it measures 1".
Follow the original tutorial until you get to the step where you insert the stem (stick).

Picture order Left to right, top to bottom.
Cut a 45” length of thread.
Thread needle, doubling over and tie ends into a double knot..
To begin stitching, try to Insert the needle into a seam allowance just inside the pumpkin. Make a small stitch or two to secure.
Using a running stitch about 1/4”-1/2” long, stitch around the opening of the pumpkin.
Pull threads to cinch and tie.
Restitch through each gather of fabric around opening.. Tie and knot to secure.
Do not cut the thread!

Tufting time!
Take the needle and pushit through the center of the pumpkin directing it to come out at center of the bottom. If you don’t already have a thimble on- get one STAT.
Put needle through the center bottom, and turn to sew back up through the center top opening. To help anchor the thread, I take a small stitch just over the lip of the opening each time I pull the needle up. Then when I turn the needle and stitch straight back down, this little step helps to neaten the draw of the fabric.. Pulling the thread taut. Repeat a few times until the pumpkin is the size and shape that you desire.
Knot to secure. Trim thread and tuck inside pumpkin.
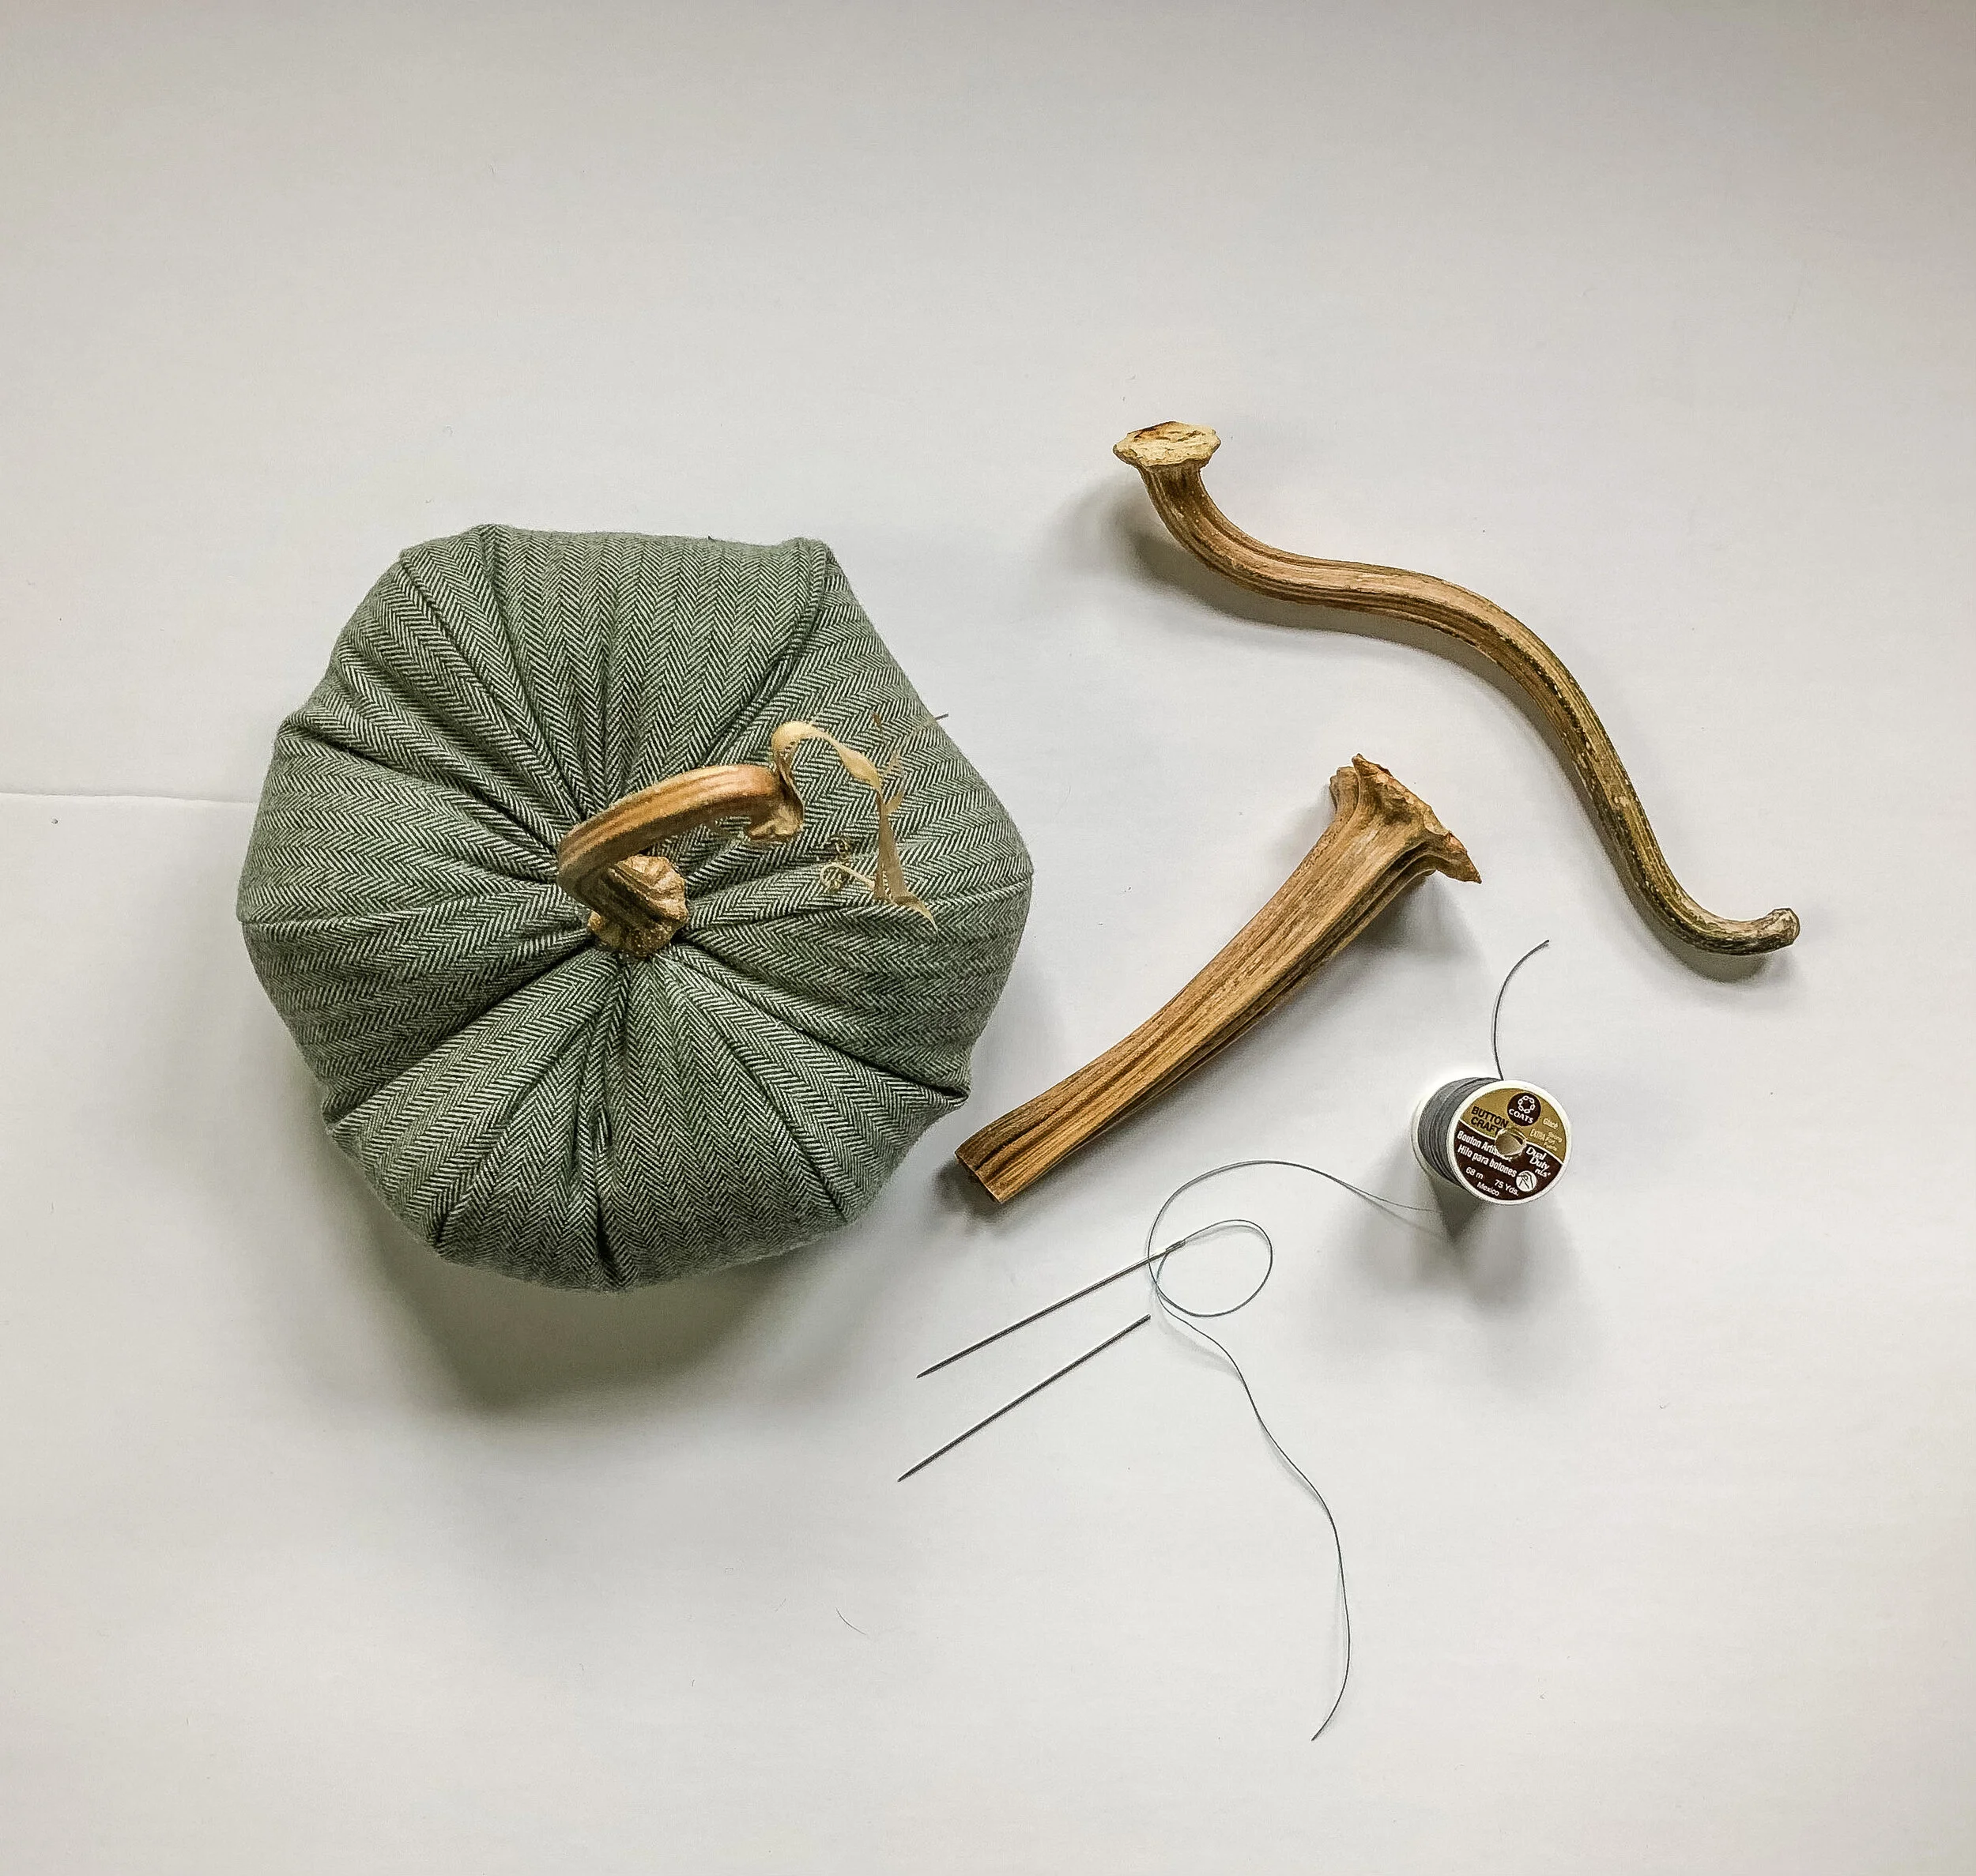
Stems
How to dry a natural pumpkin stem
Each Autumn, I prowl pumpkin stands for beautiful stems that beckon to be preserved, After the pumpkin has sat on my porch for weeks, I carefully cut around the stem, remove it and get as much pumpkin flesh off as possible. Then I let them air dry for several days. Once they seem light and dry, I put them on a cookie sheet and bake in the oven at a really low temperature (about 225 degrees) for about an hour. This dries out the stem and kills the bugs.
*I encourage you to do a web search to discover other methods of drying.

Take a dry (and baked!) pumpkin stem. Check the bottom to make sure it is somewhat smooth and even. If not, lightly sand with sand paper.

Add bit of glue to the center of opening. Set stem and hold until dry.
How to make a stem from felt and a pipecleaner
Materials
Small piece of felt
Pipe cleaner
Glue
Old Scissors
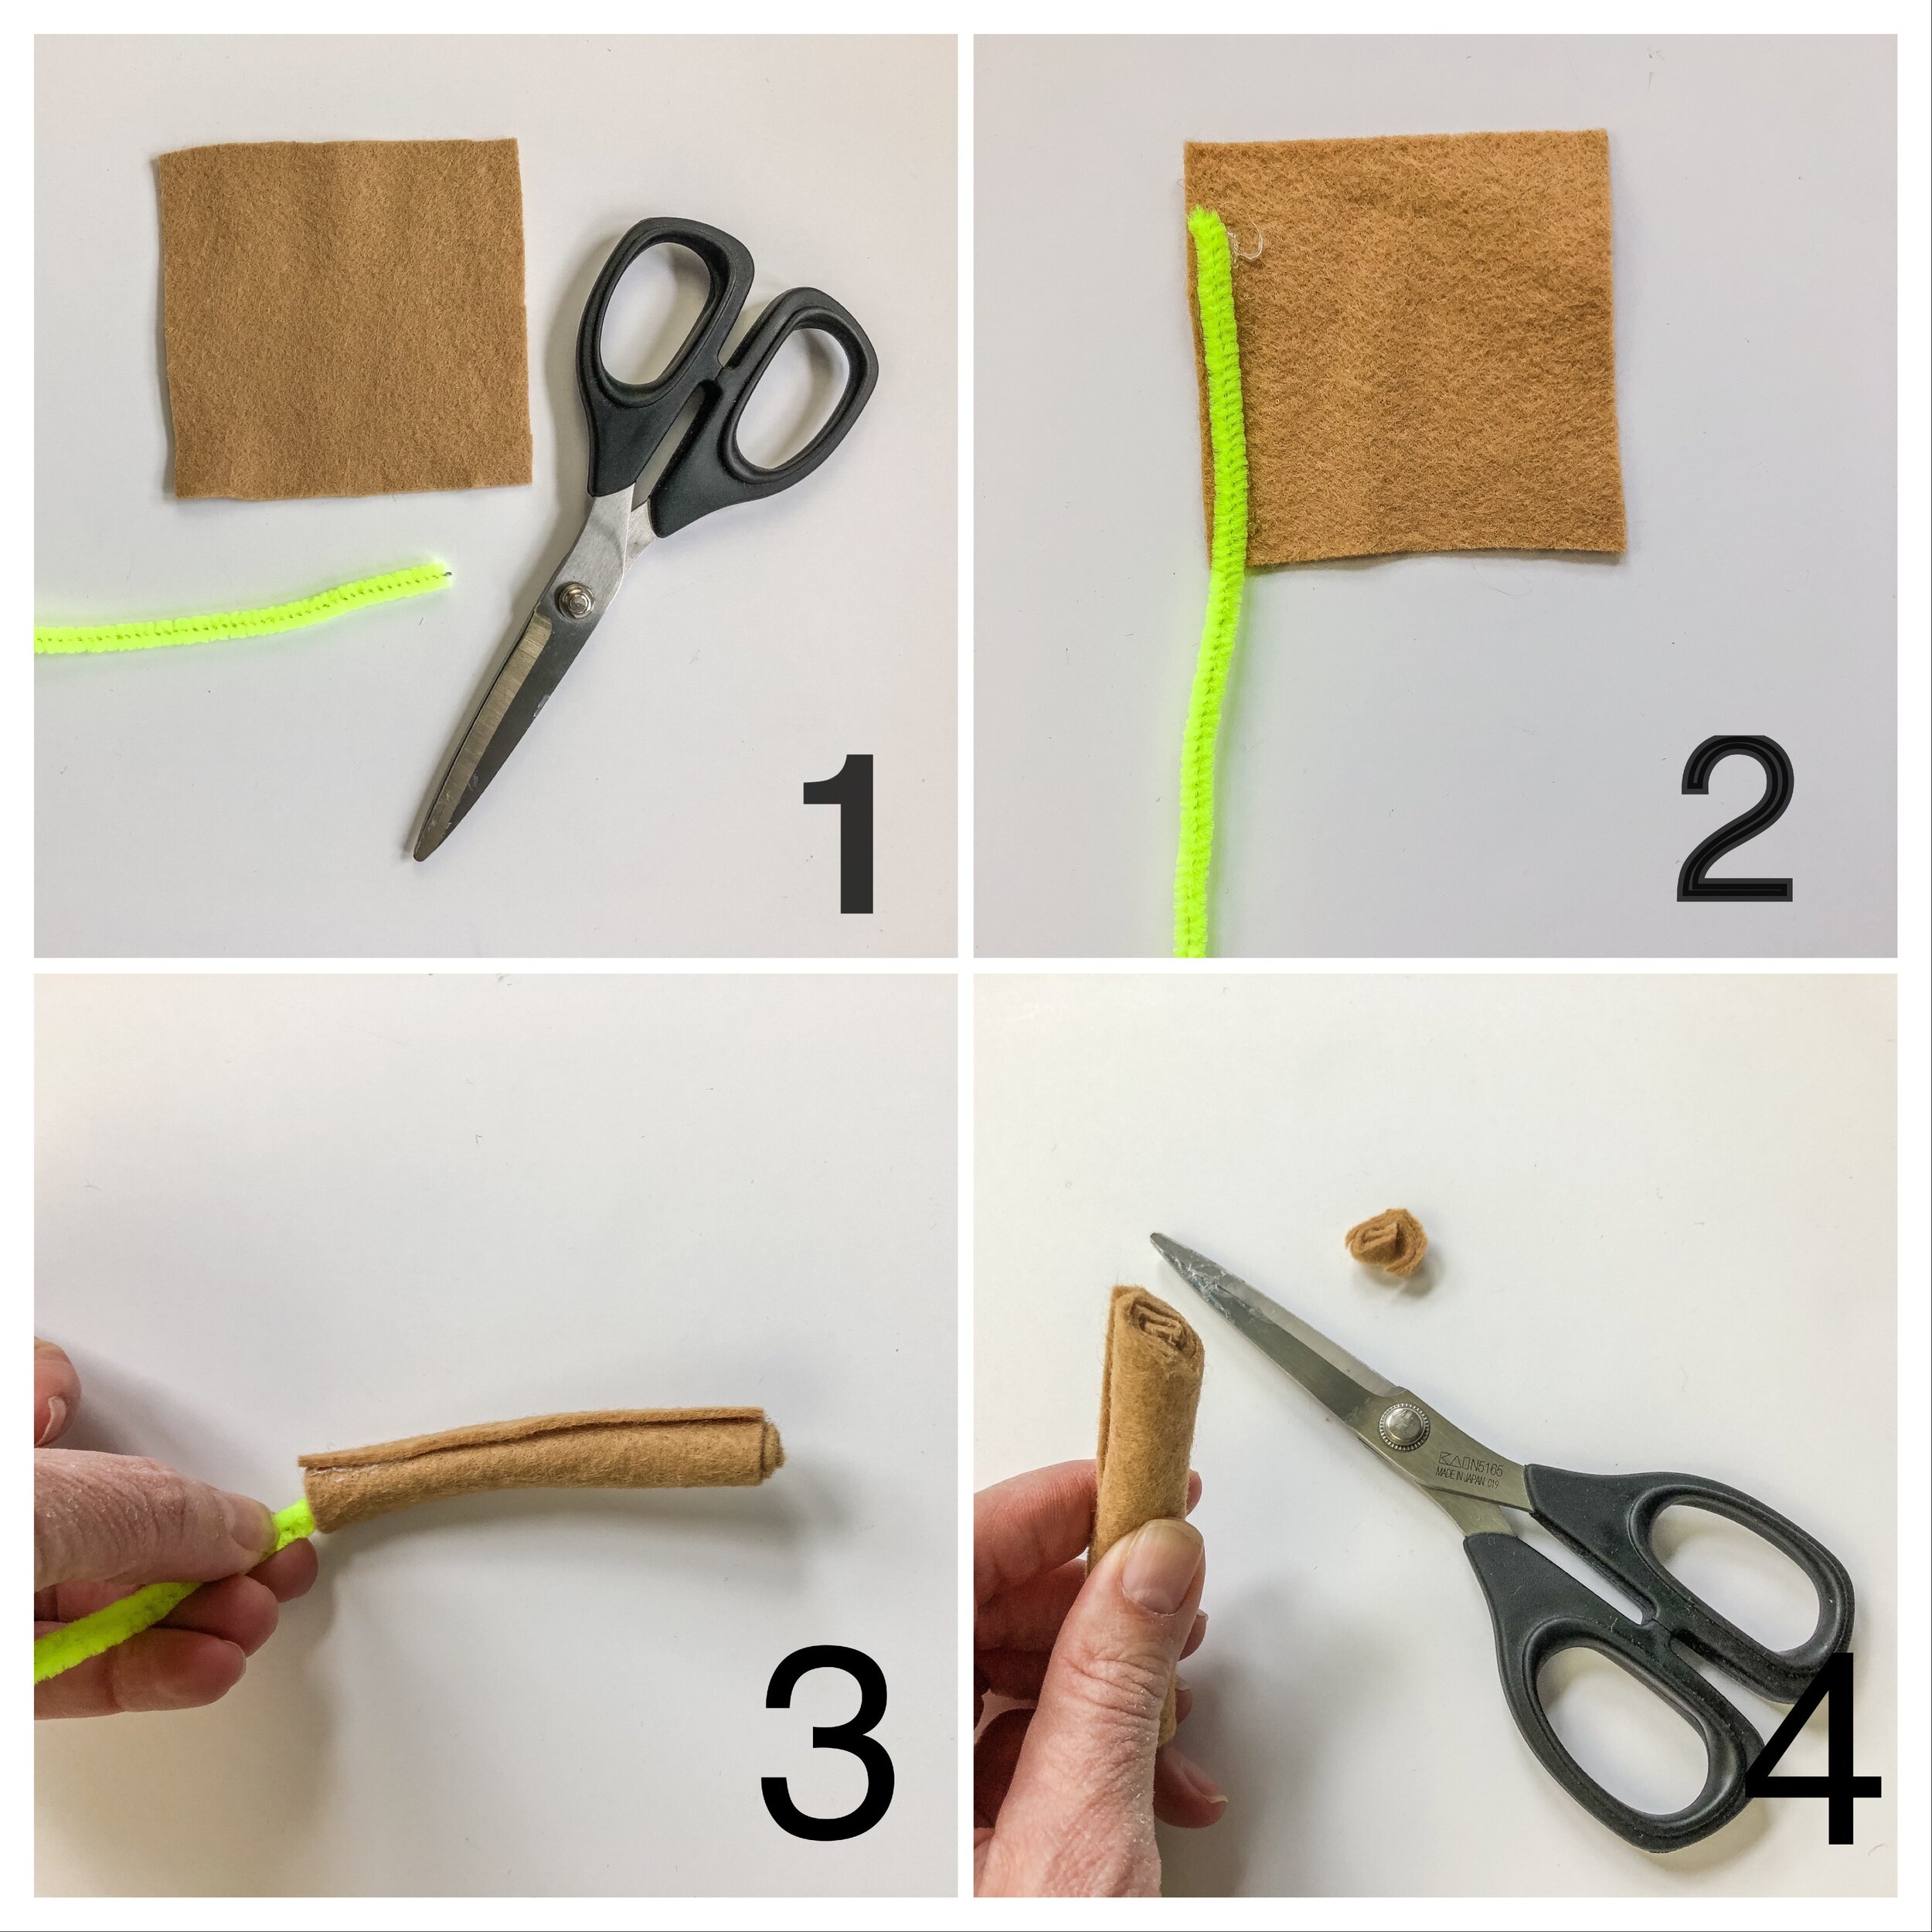
1. Cut felt into a 4” X 4” square
2. Align and glue pipe cleaner along one side of the felt square.
3. Hold onto the pipecleaner while tightly rolling the felt.
Apply glue to secure.
4. Cut the stem at a 45-degree angle.

To help anchor the stem into the pumpkin, bend the part of pipe cleaner that sticks out in half before inserting.

Insert into pumpkin. Add a bit of glue to secure.
Bend the felt stem to a pleasing shape..
Please be gentle with yourself and those that you love. Find some space and time to rest and don’t forget to call your mom.
Happy Thanksgiving!
XO, Hilarie


Last year’s harvest.

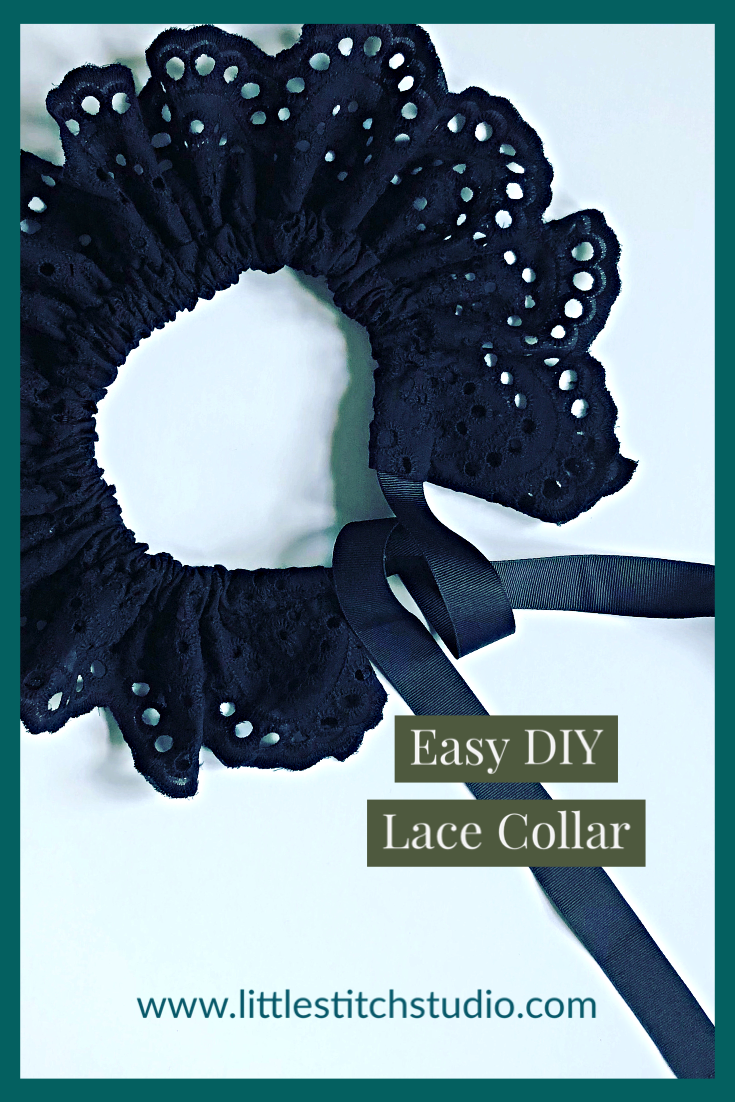
Easy DIY Lace Collar Necklace
Have you gotten used to dressing too comfortable while working from home? Like many of you, I have been looking forward to the change of season wardrobe and some fun experimentation with color and layering. This DIY lace collar necklace is an easy update that can instantly elevate an everyday cardigan or sweater top. The idea is reminiscent of lace detachable collars of the 80’s but so much less stuffy. Gone are the Laura Ashley floral prints and fussy ruffles. These collars are designed to make a statement and bring a bit of contrast to up your look. Ready to sew?
I voted today!
This is the eighth presidential election that I have had the privilege to exercise my right to vote- but it feels like it might be one of the most significant. After getting my kids fed, dressed and started on their virtual school day, I went to get myself ready.
To mark the occasion, I wanted to dress up a bit- to show respect for the women who have come before me and to all of the young girls coming up. Our voice counts- we matter. Looking down at my T-shirt, I saw the illustration of Ruth Bader Ginsburg in her dissent collar. Her “notorious” dissent collar. I need a lace collar! This occasion calls for a lace collar.
I ran upstairs to survey my lace options and decided to use some black cotton eyelet. Since I only had a small window of time to both vote and sew- this had to be quick.
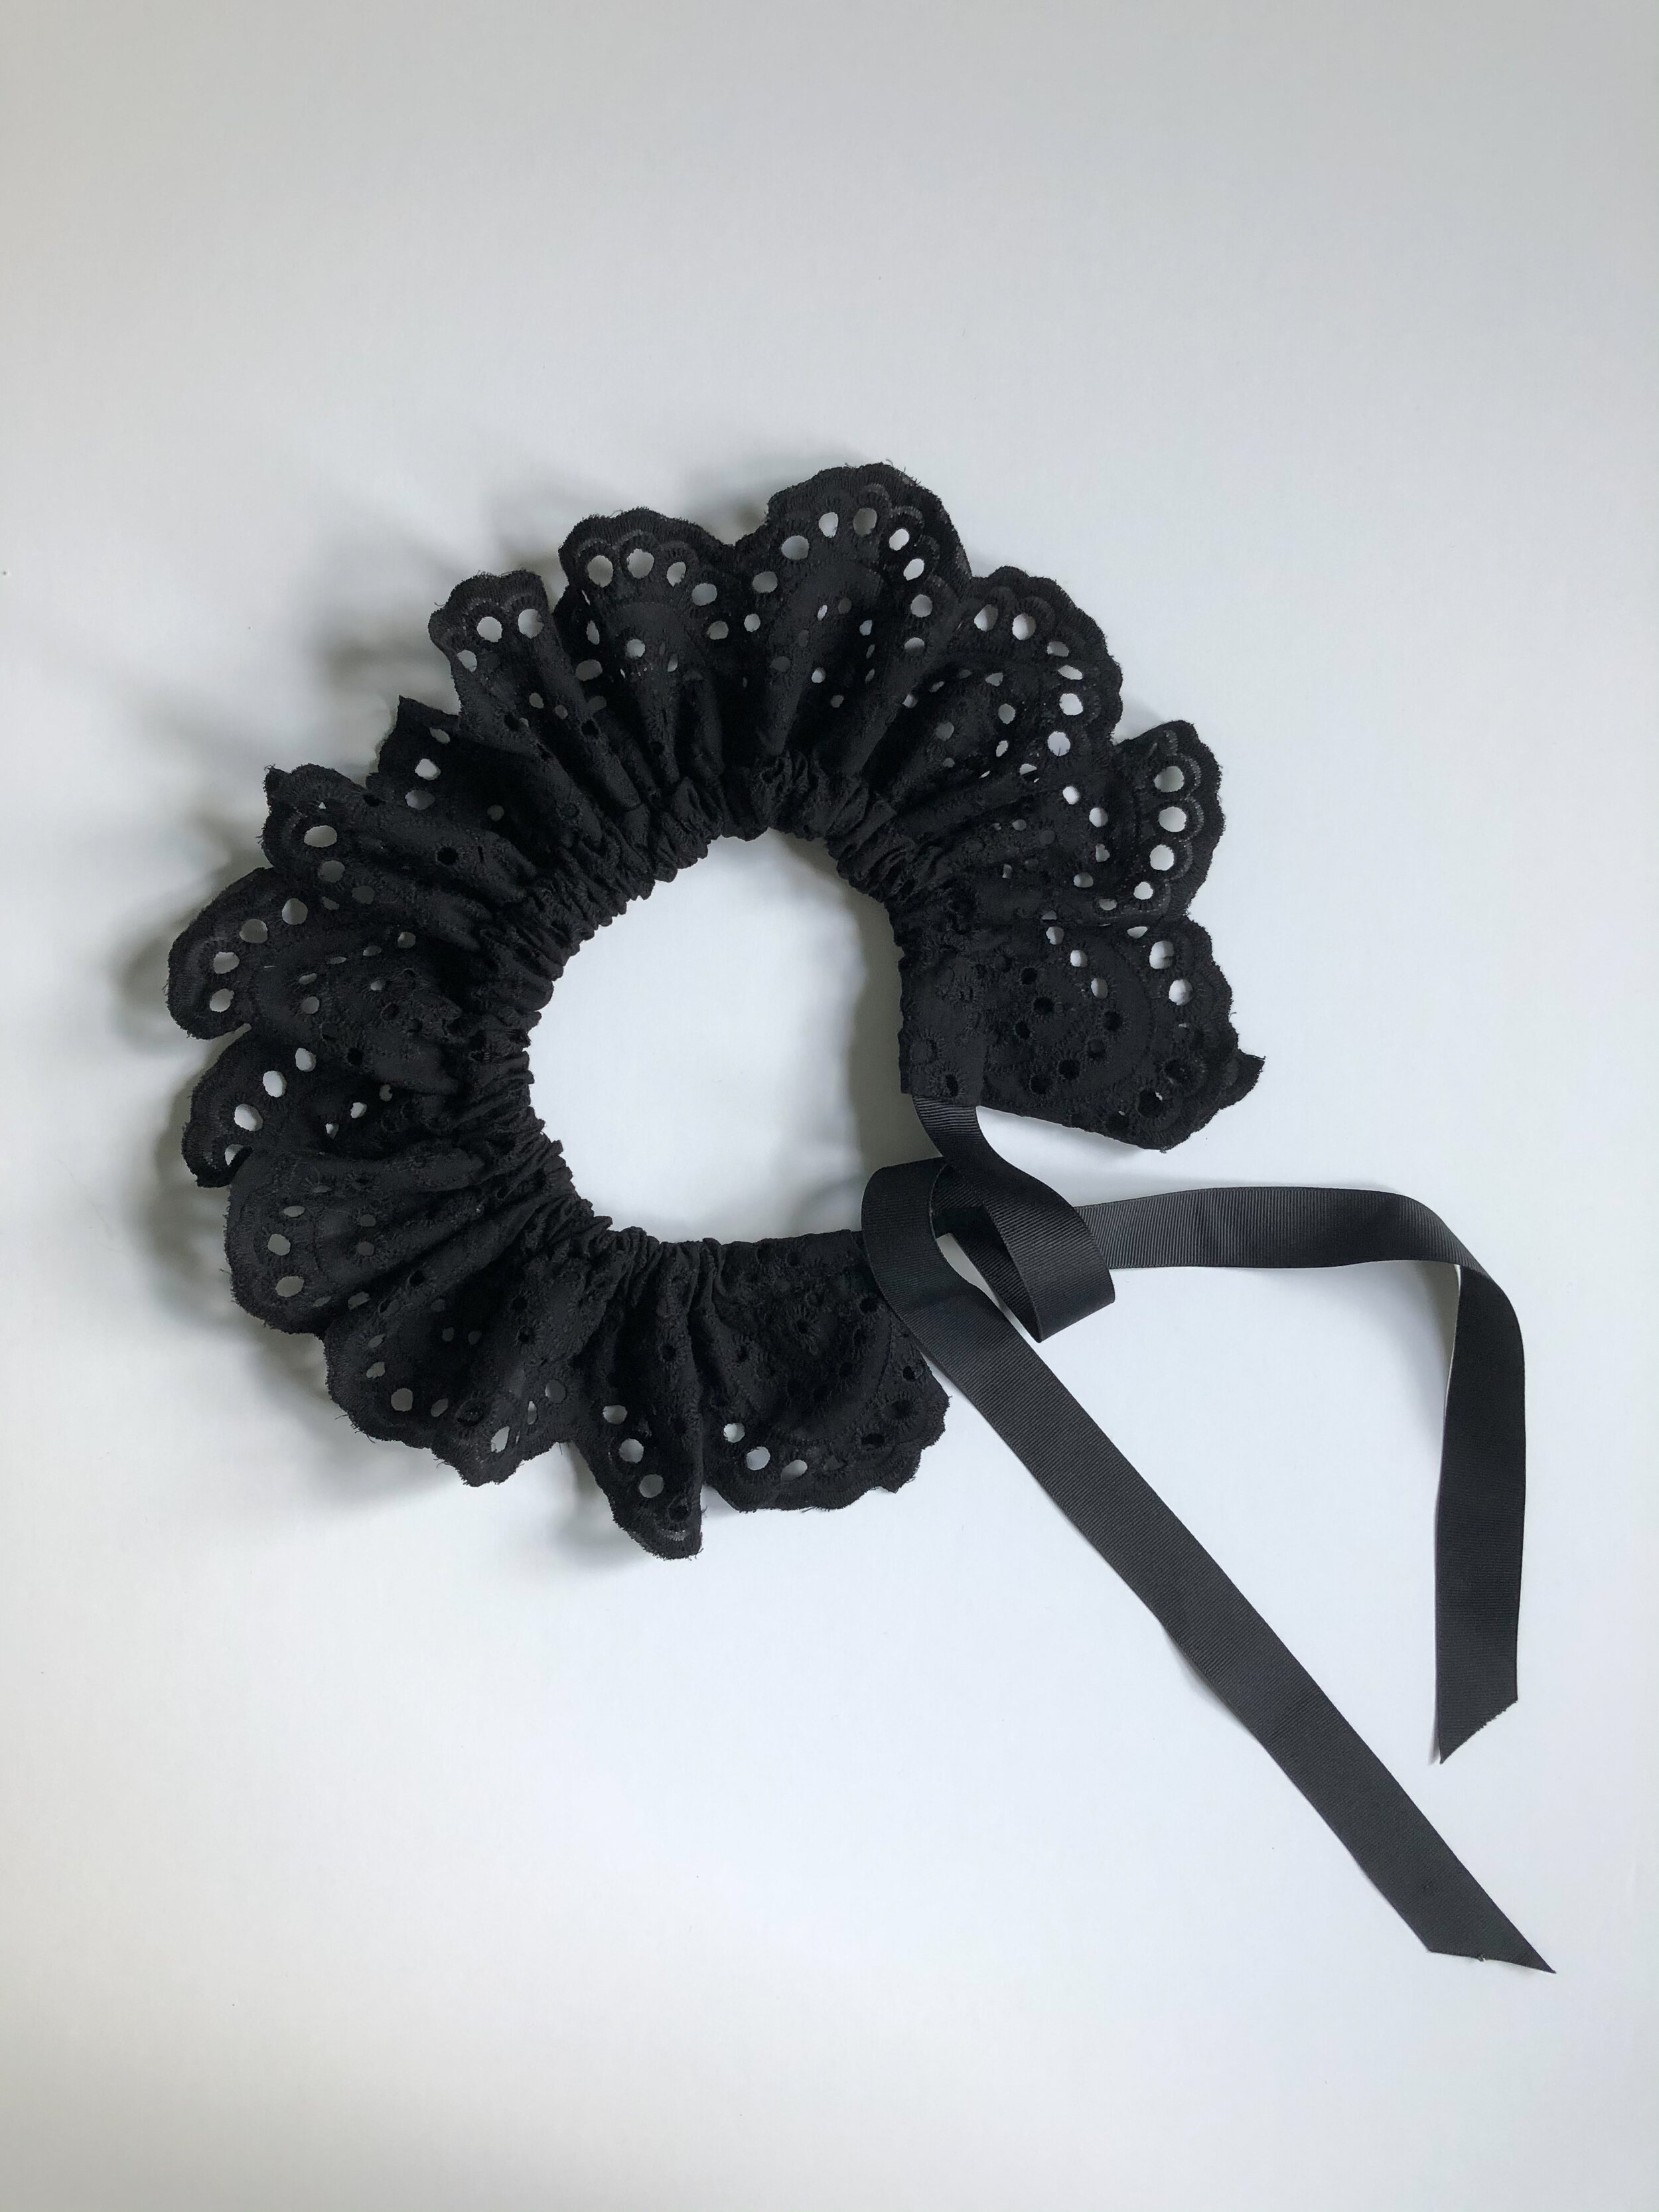
Part collar, part necklace. It turned out perfect!
Scroll down to create your own lace collar necklace.

Sewing with Eyelet Fabric and Lace
Have you sewn with cotton eyelet before?
Eyelet is a fabric with an embroidered, open-work pattern. Though generally made of woven cotton, modern interpretations can be found in wool, leather, jersey, silk and even neoprene.
Like other types of lace, whether delicate or sturdy, special handling is required to ensure the beauty of the finished garment.
Successfully sewing with lace depends in large part on the placement of the motifs of the fabric in relationship to the garment design. This is more easily accomplished than you might think! It just takes a little more time and thought.
Thread:
The ideal weight of the thread is fully dependent on the content of the fiber and type of weave rather than the “lace” design. If you are sewing with cotton or linen eyelet, use cotton or polyester thread, size 50.
Needle:
For lightweight cotton, linen or wool eyelet: Universal-H Point, jeans (HJ) 70/10
More about needle sizes and application.
Seam Finish:
There are as many types of seam finishes as there are functions, fabrics and preferences. Like other laces, eyelet has little holes incorporated throughout the design. Construction methods are determined by the sheerness or opacity of the lace. This should be kept in mind as you consider seam finishes and lining options, as they will be somewhat visible on the right side of the finished garment. Seam finishes such as a bound seam (using a strip of silk organza), French seam, whipped French seam and serged edges look best- and don’t add bulk.
Pressing:
You should press eyelet fabrics face down on a soft pad- a terry cloth towel is good, to avoid flattening the embroidery. Generally, the thread used to embroider most eyelet fabrics is synthetic, and could flatten, burn or pick up some unwanted shine when ironed. Use a pressing cloth and test a small swatch to see how it reacts.
Hem:
When finishing a garment made of lace, there are several important construction details that you will need to keep in mind. The ideal type of hem will allow the fabric to drape and hang in a flattering manner. To achieve this, you will need to consider the overall weight of the fabric as well as the garment design to select an appropriate hem technique. Some garments and fabrics will require a much deeper hem than others.
Generally, the hem is formed by folding under and pressing the raw edge twice before stitching the inside the fold. Depending on the design of your eyelet, the fabric’s selvage might have a beautiful lace border which you can cut to use as the hem of your garment.
Opaque, backed, or underlined laces may have hem edges finished in any of the traditional ways; rolled hems, turned-up bound hems and facings. I do suggest looking at high end garments for ideas at finishing techniques as well as practicing a few for yourself and see what you think works best.
Fabric Preparation:
Lace can be used for an entire garment, or for only a bodice or skirt or even just as trim. Let the weight, density, width and cost of the fabric assist you in determining the look you create.
Lace motifs should be advantageously placed whenever possible, to serve as decorative edges or trim your garment. If your lace is one which has a scalloped edge, pattern pieces can be positioned so that this forms a decorative finish alone a straight neck edge or hemline.
Lace should be laid out flat, in a single layer on a table or other flat surface. Cutting should be taken with care.

Scalloped lace borders.
The Lace Collar Necklace
Free Pattern and Tutorial
The Lace Collar Necklace
Free Pattern and Tutorial
Finished Size: 42” x 4”
One size fits all
Supplies:
1 yard of Black Cotton Eyelet Lace (similar to this)
1 1/3 Yards of 7/8” Grosgrain Ribbon

Prepare:
Layout the entire piece of fabric, in a single layer on a table or other flat surface. Scallops along the edge of a hem need planning. Check the scalloped border to determine the ideal place to begin and end cutting your collar.
For this project, there is a turned casing at the neckline.. The bottom of the collar was cut to feature the beautiful selvedge border.
If you look closely at mine, I began and ended my cut in the center of a lace motif. This way, when I go to turn the opening for the casing, the lace will fold back in and mirror the shape of the motif next to it. This will help to make a pretty opening.
Cut:
Measure and cut lace 44” X 5.5”.

Press:
To prepare the center front casing, layout the cut lace and fold one short end of the lace in the center of a scallop inward matching the scallop shape along the edge. Press. Repeat for the opposite side.

Sew:
Finish the raw edge of the lace. (I used a serger for mine.)

Fold cut edge of fabric 2” toward the inside of the collar.
Pin through both layers of lace across the collar.
Since my ribbon was 7/8” of an inch wide, I made my seam opening, 1 1/8” wide to allow for the ribbon to draw through plus a bit of ease for gathering.
Stitch. Clip threads.
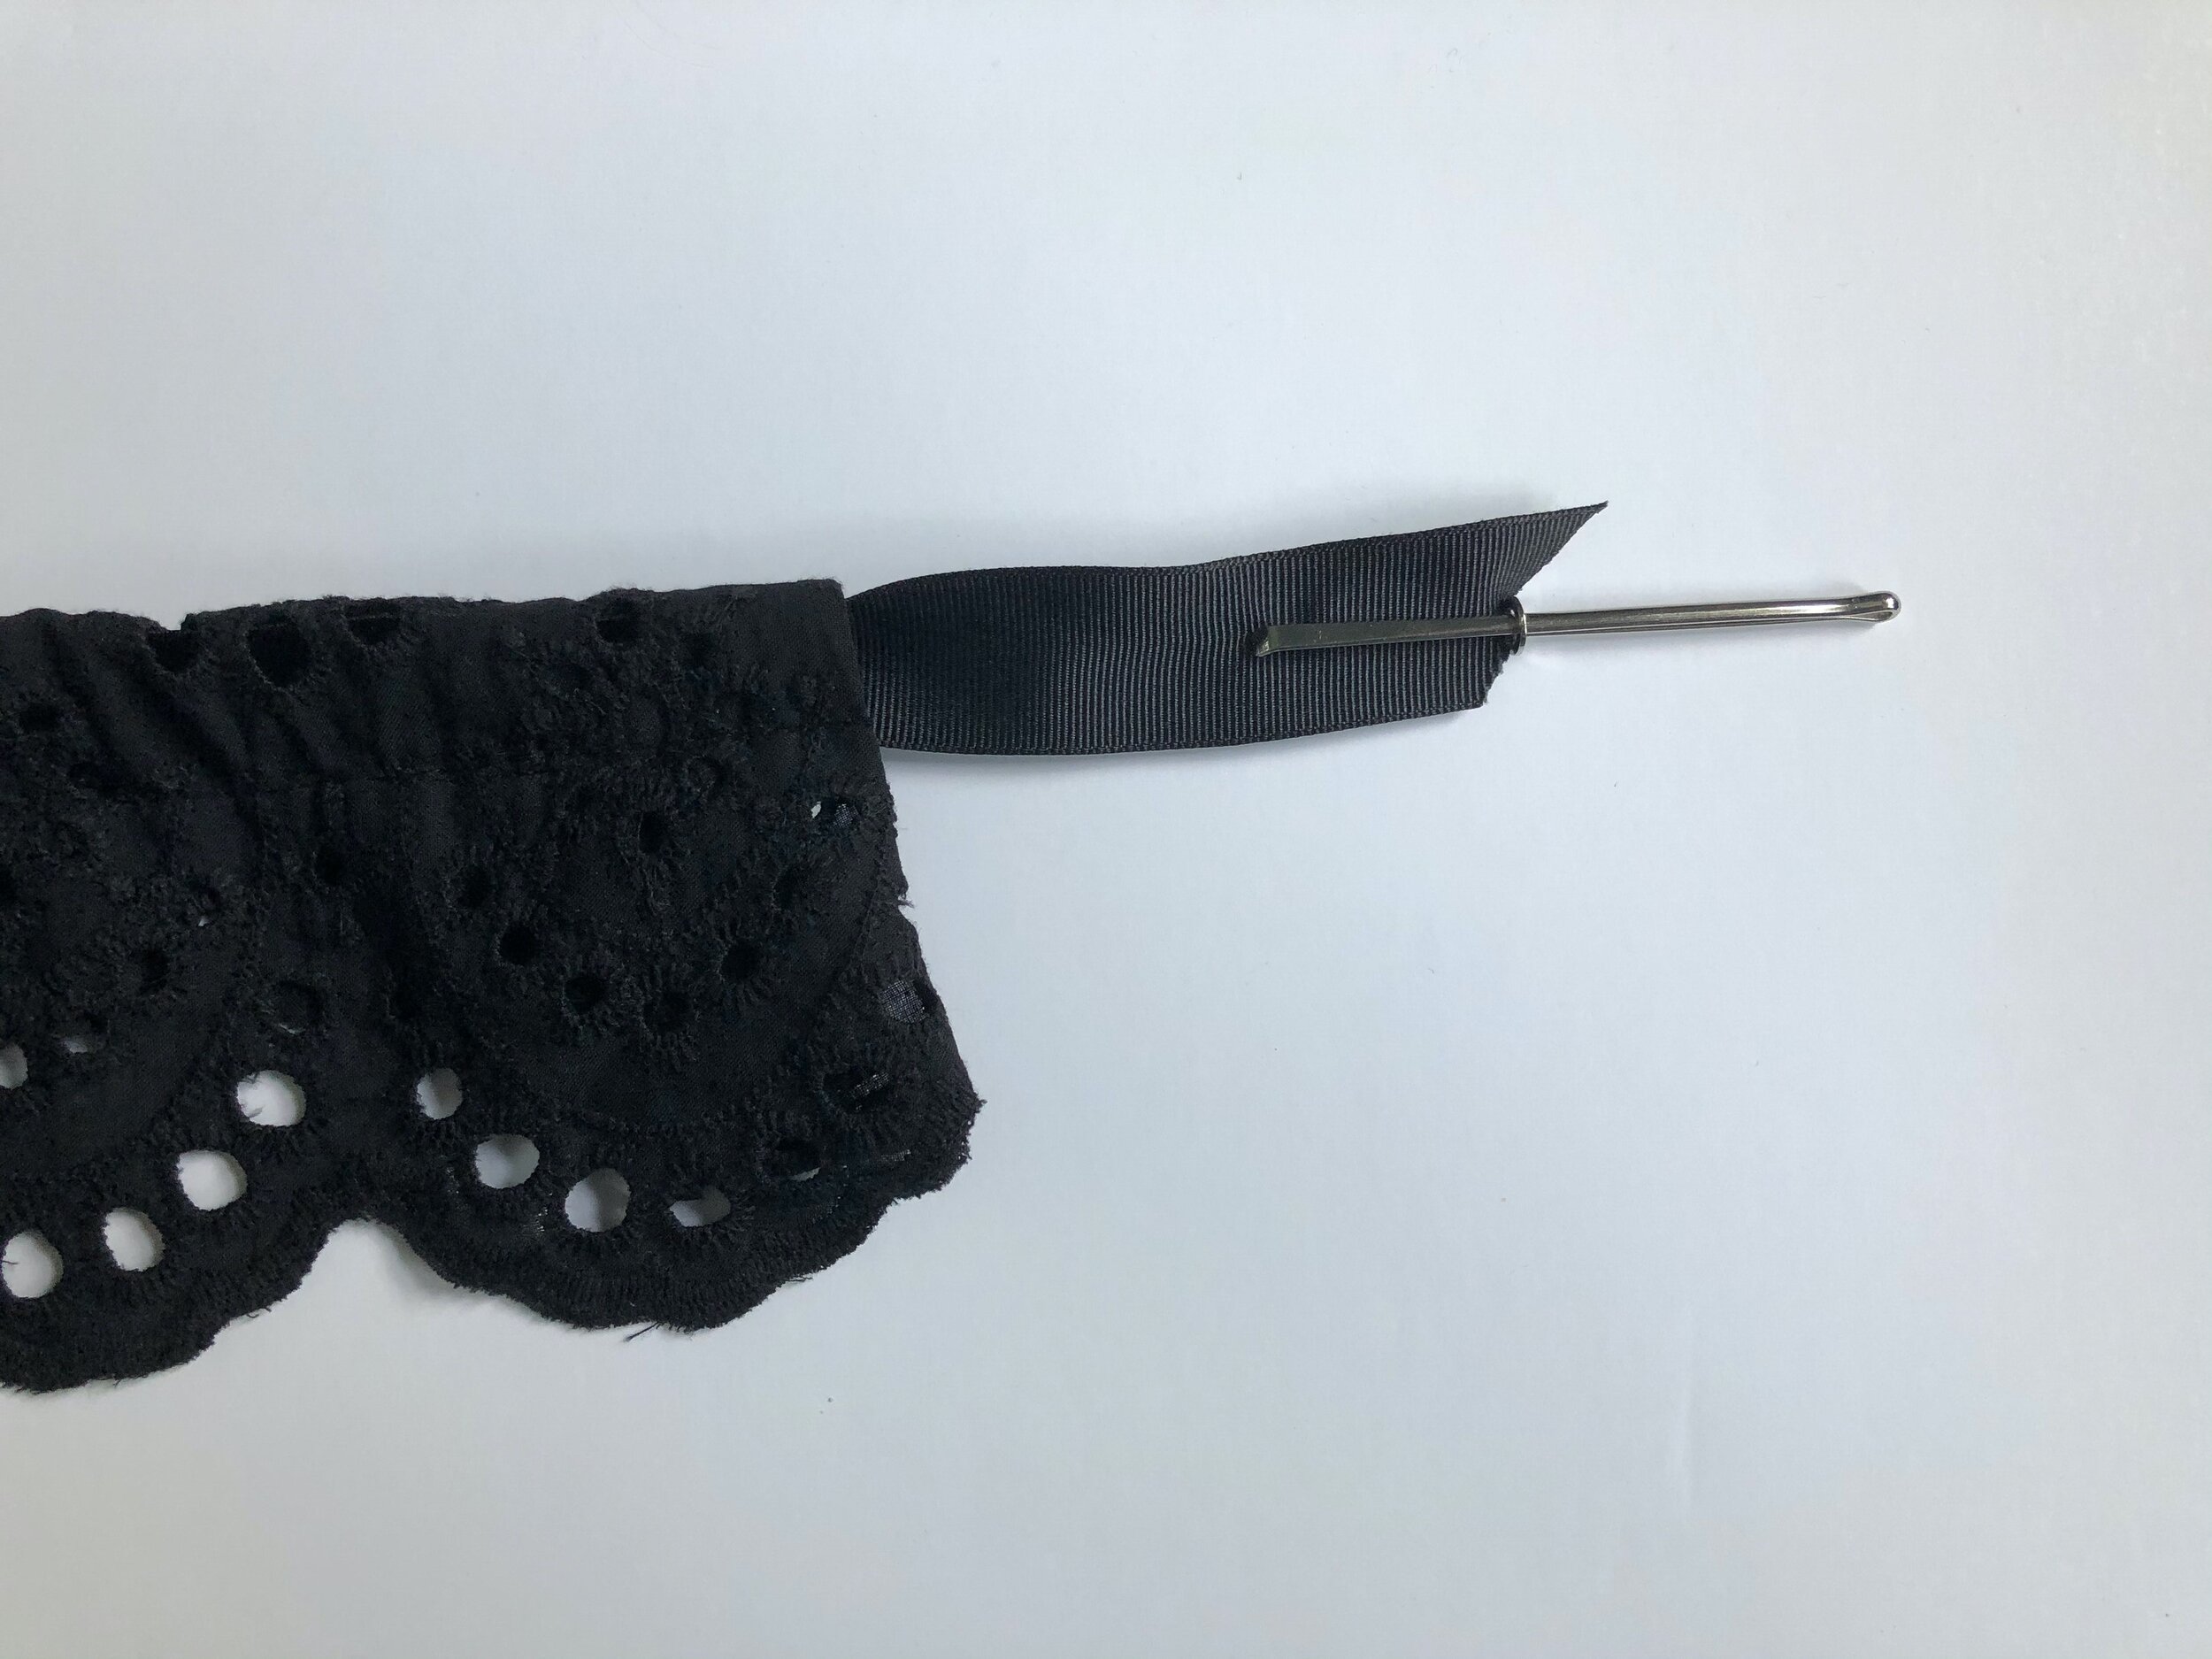
Take the ribbon and thread it through a safety pin or bodkin and draw through the casing. Once the ribbon is pulled through, cinch the collar to encourage it to ruffle a bit.
The ribbon should be just a few inches longer than the entire length of the collar before cinching.
Try it on and adjust the gathers and ruffle so that they form an attractive collar.
Clip each loose ribbon end at an angle to prevent fraying.

The collar can be tied at the center front for a rounded, ruffled collar.

Try playing with the length and width of the collar. This would be really flattering on a v-neck sweater or cardigan. It reminds me of the dainty Eileen West and Laura Ashley collars from the 80’s- but so much bolder and way more stylish!

The collar would be equally as lovely tied in the back. I could see wearing this out one evening with a halter cut sweater top, jeans and heels- and a great bag of course, too.

XO, Hilarie
Remember to Vote! For more information on voting in the US Election, go to vote.org

DIY Easy Mini Felt Bunny Ornaments
Easter is on Sunday! Since quarantine began, I am never really quite sure what day it is anymore. Somehow in all of this uncertainty, I hadn’t gotten around to putting out any type of seasonal decoration. With a daughter called Bunny, we generally take Easter decorating pretty seriously around here. So, in an effort to jump start on all things Bunny, here is a quick hand-sewing project for you to make and enjoy.
DIY Easy Mini Felt Bunny Ornaments

Easter is on Sunday! Since quarantine began, I am never really quite sure what day it is anymore. Somehow in all of this uncertainty, I hadn’t gotten around to putting out any type of seasonal decoration. With a daughter called Bunny, we generally take Easter decorating pretty seriously around here. So, in an effort to jump start on all things Bunny, here is a quick hand-sewing project for you to make and enjoy.
DIY Easy Mini Felt Bunny Ornaments Free Pattern and Tutorial

MATERIALS

These mini felt bunnies sew together pretty quickly and it is likely that you already have the supplies on hand.
To make an assortment 2 1/2-inch bunny place ornaments:
9 X 12-inch sheets of felt in assorted colors; each sheet will make one bunny plus a little felt left over.
Embroidery Floss or Pearle Cotton (if you don’t have either, thread is fine.)
A Felt Mini Bunny Ornament template available for free download here, printed and cut out.
Craft glue
Embroidery needle
Scissors
PATTERN
FINISHED SIZE
About 2.5” inches high, plus ears
CUTTING

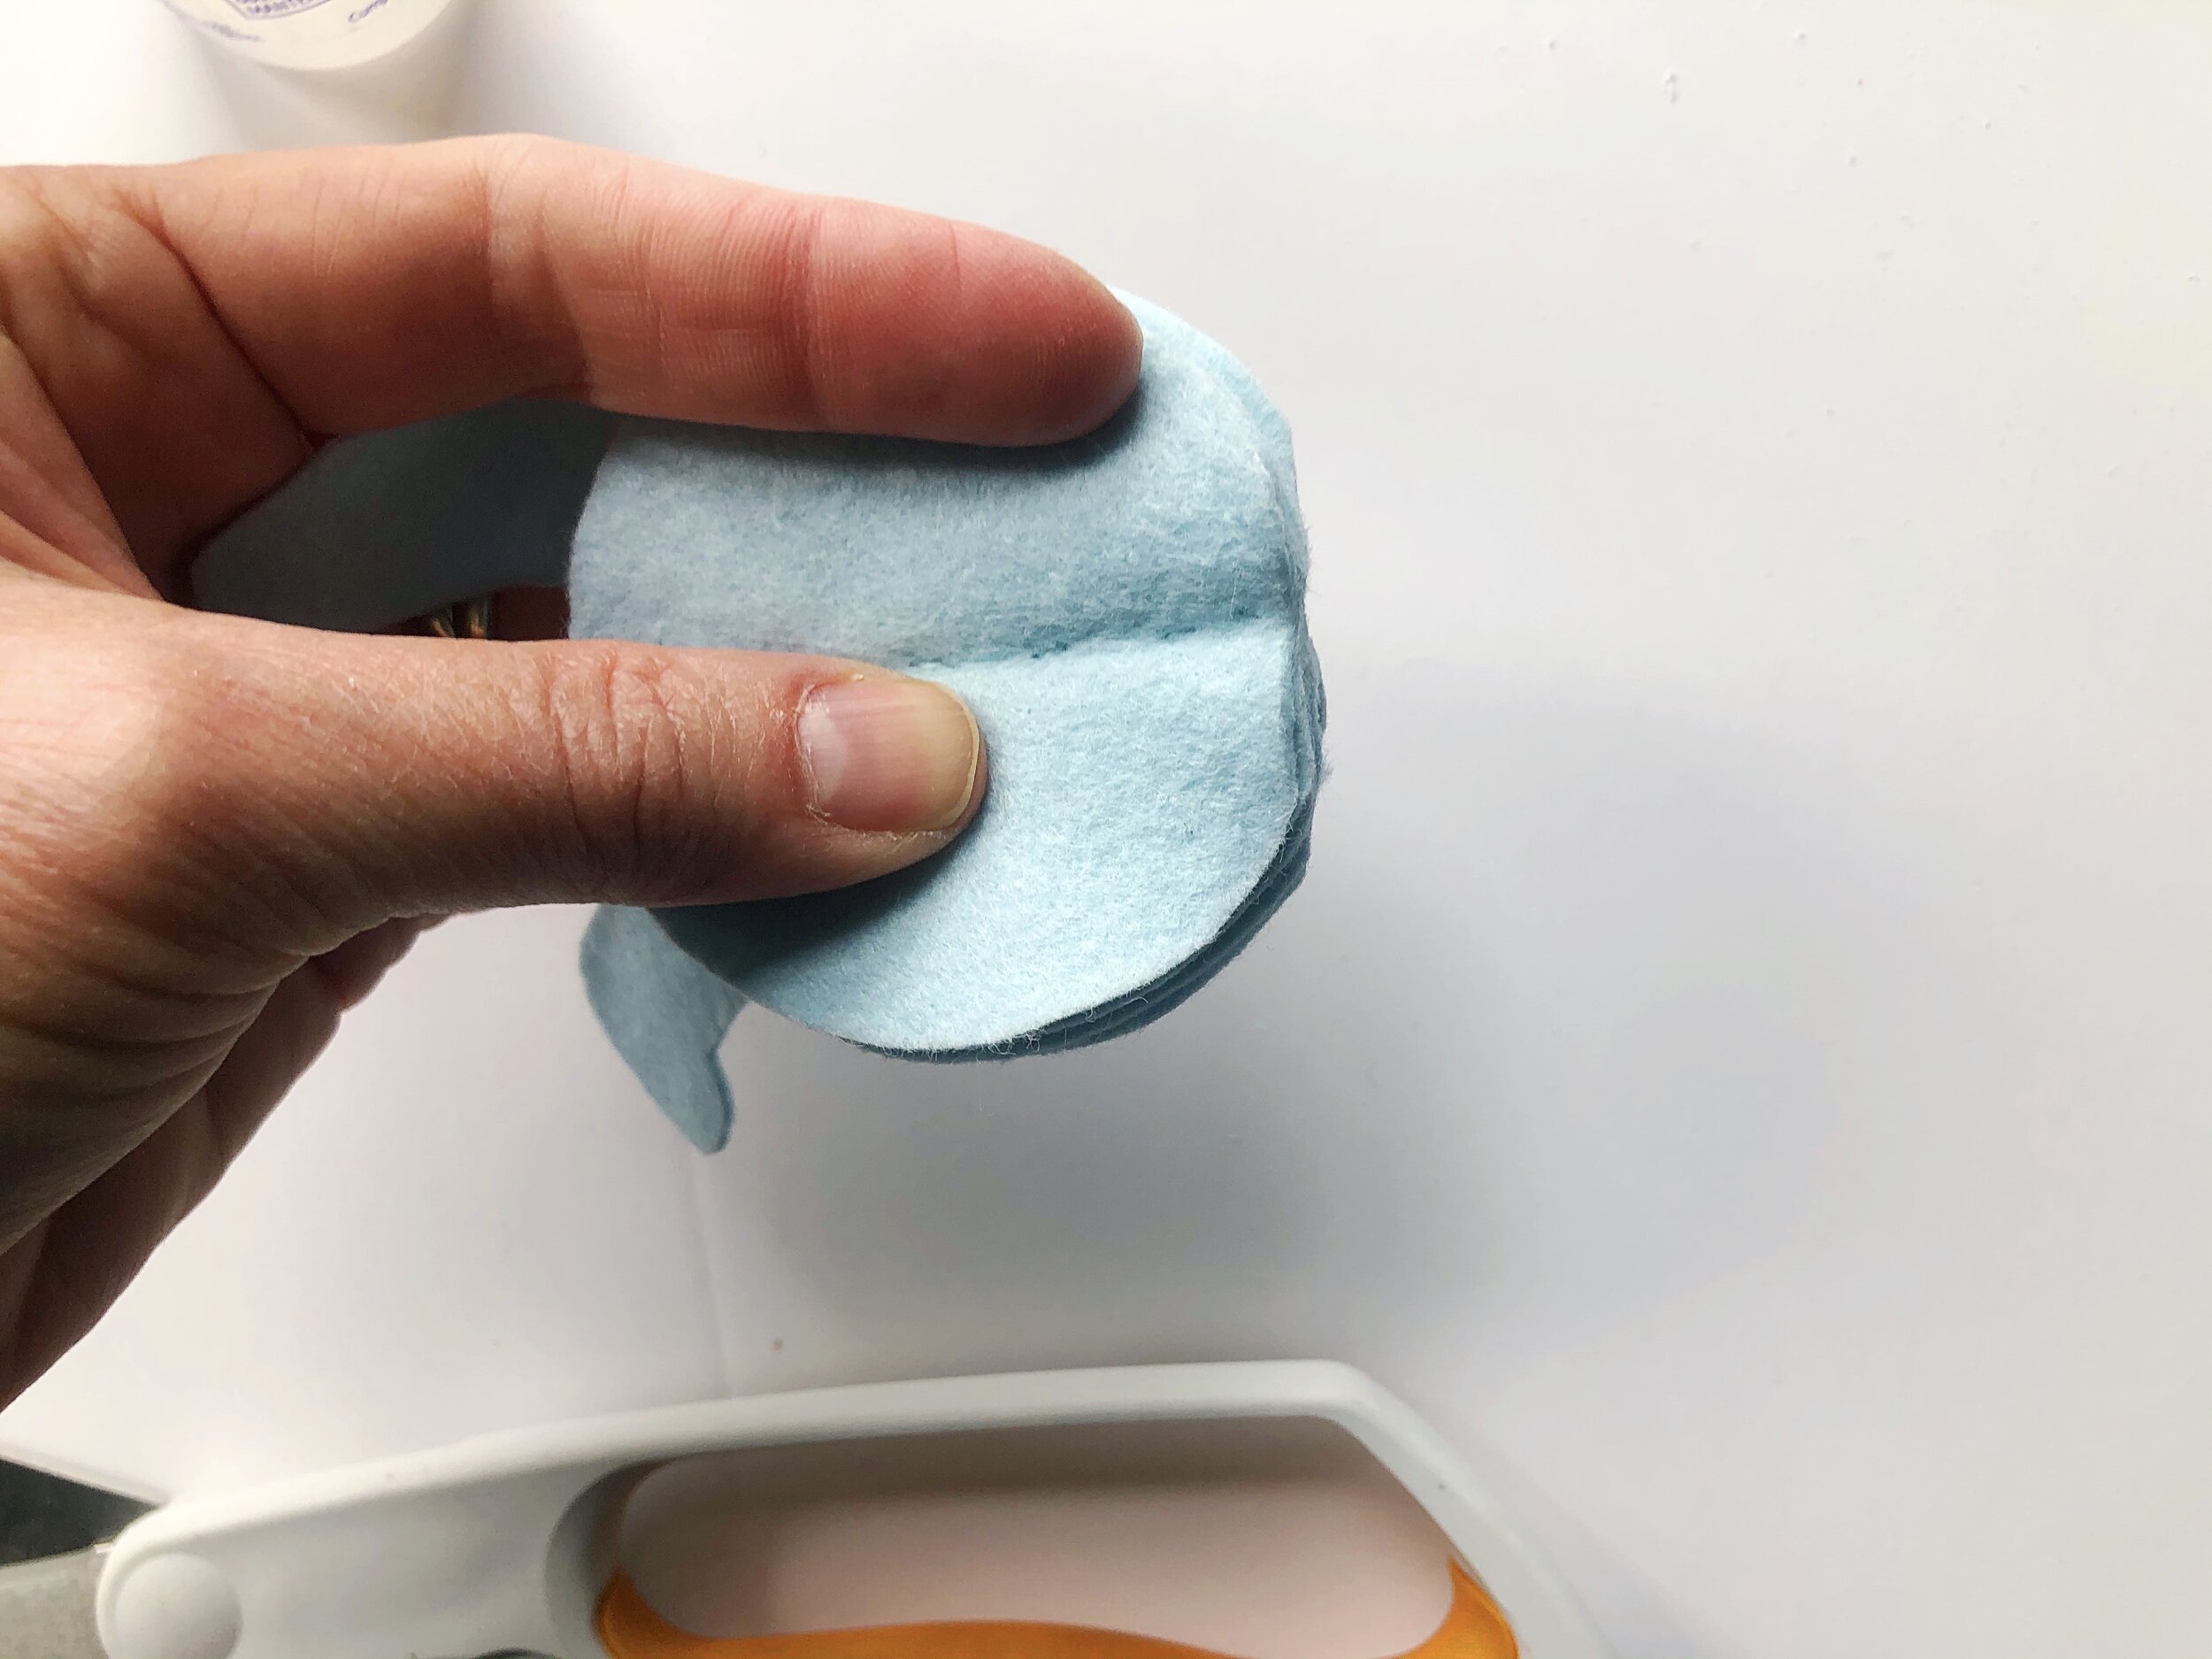
Cut eight circles from the felt and two ears

Press each of the cut circles in half, making a crease along the center. Place the ears aside for now.
SEWING

Cut a piece of thread about 20” long. Thread a needle and knot the end to tie. Insert the needle from the back of one of the circles and make a small stitch to secure.
*This thread should be long enough to complete one bunny. The idea is to keep sewing with the same strand of thread between all layers. If you run out- no worries. Just tie off the end and rethread another strand.

Fold the circle in half. Grab a second circle, keeping it folded in half as well, and align both so that the straight fold of each piece mirrors the fold of the other.
You might find it helpful to think of each piece as a folded tortilla.


Stitch the two pieces together along their crease lines with a small hand stitch.

Try to keep your stitches even and be sure that both circles are aligned. Sew across the entire fold and stop. Keep your working thread- do not cut.

Fold the pieces that have just been sewn in half, like two tortillas.
Grab two more felt circles and layer them with the just sewn pieces in between.

Doesn’t it look like a tortilla sandwich? Make sure that the center fold creases remain aligned with the center seam of the inner layer


With the working thread, sew these two new pieces together along their center fold lines in the same manner as before.
Sew to the end of the folded crease. Remember-don’t cut your thread.

Now we are going to repeat that same step again, by folding all of the circles closed and placing the two more felt circles on the top and bottom. Be sure to align the creases.
Sew these two pieces together through the center as before. At this point the felt is getting a bit bulky to sew through. Just be patient- you are almost finished.


Repeat this process for the final two creased circles, layering them opposite to one another through the center and stitch.

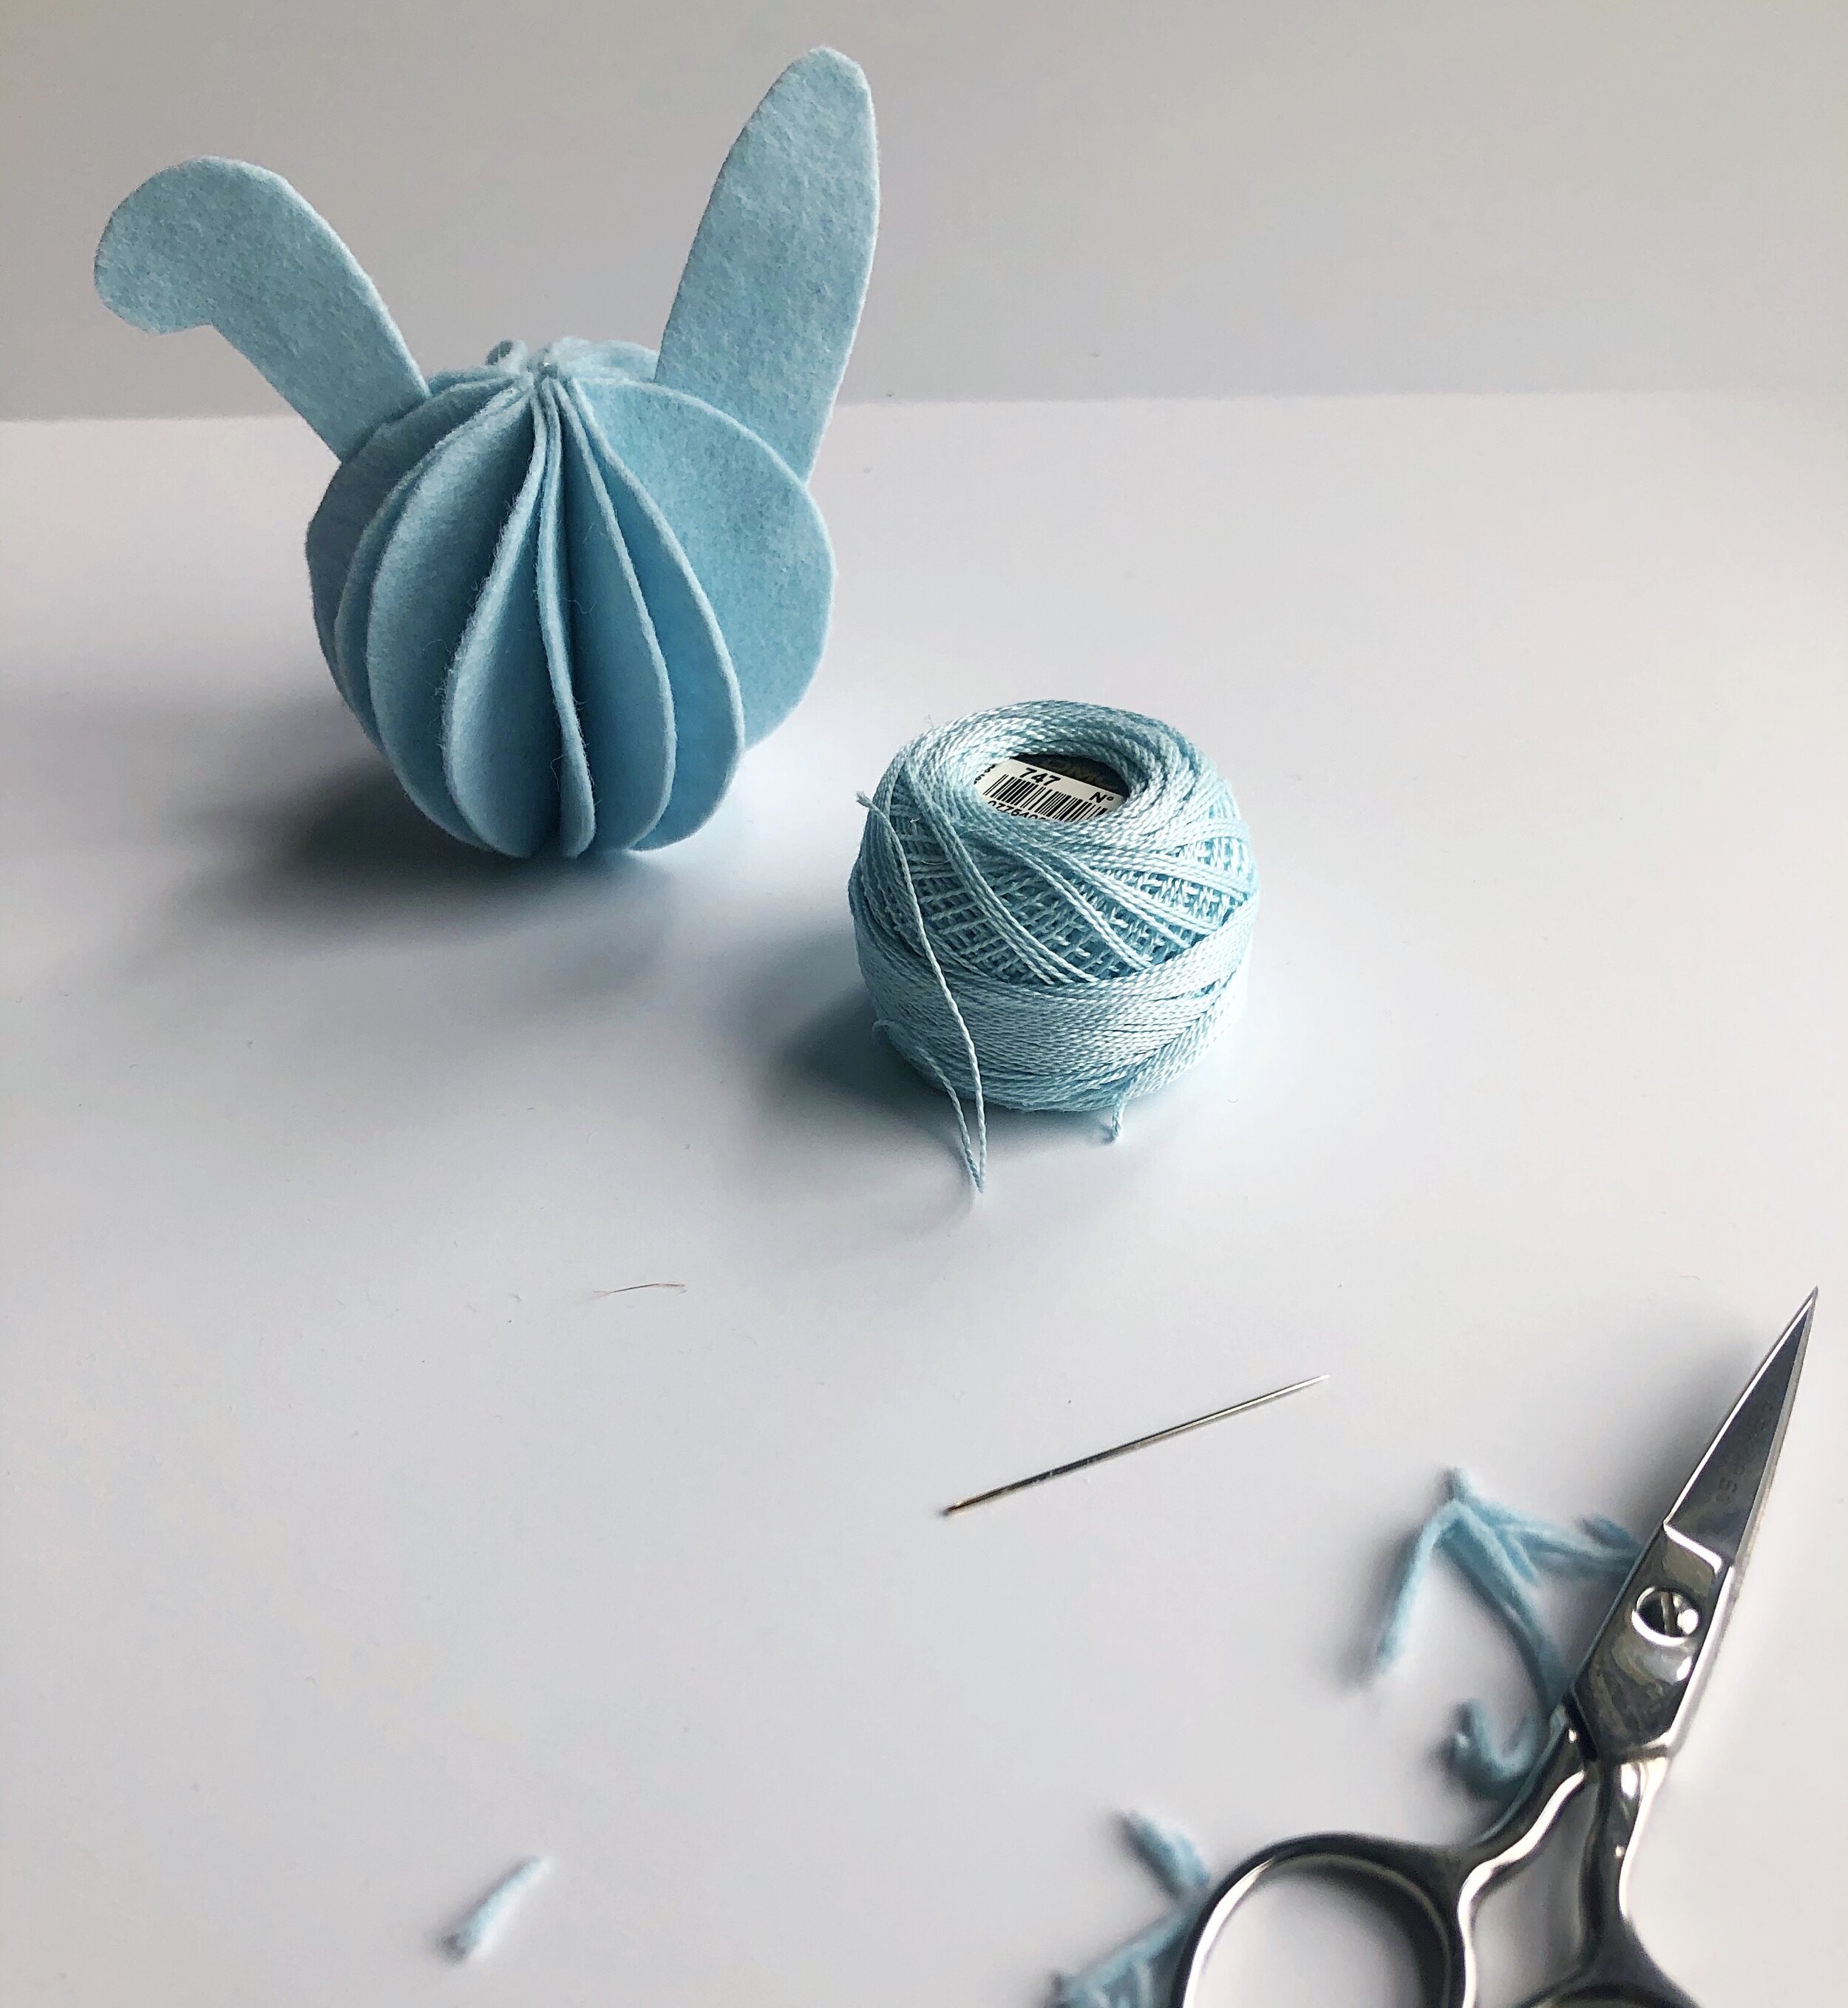
Sewing is complete!
FINISHING

Give each section a little tug to straighten, then divide the circle in half to place the ears.

For the ears, I dabbed a bit of glue on each side and placed the ear. You may need to pinch it for a minute or two to set.
If you plan to have your bunny sit, you may need to flatten the bottom just a bit. To do this, I pinched the circle in half and gave it a bit of a trim. Just watch your stitching. If you happen to cut through- add a bit of glue and pretend it never happened.
All done! Doesn’t it remind you a bit of a weeble?

Wouldn’t these look adorable strung as an Easter bunny garland?


I made one into a chick by cutting two hearts for wings and one tiny heart for a beak.
This Easter may be the perfect opportunity to focus on renewal. Let it serve as a reminder that life goes on and that love is greater than fear. With that sentimant in mind, I wish you all a lovely Easter holiday.
XO, Hilarie

How to Maximize Your Time Sewing Cloth Face Masks With These Tips and Tricks
Learn how to save time and maximize the number of face masks that you can sew. How to sew a double-layer face mask with wire and pocket for filter or shield. Step by step cloth face mask tutorial and free pattern. Face masks are hard to come by and it seems that hospitals will be facing a shortage.
Thank you all so much for your lovely comments and kind word about my cloth face mask sewing pattern and tutorial. Like many of you, I am making masks daily and have discovered a couple of tricks to speed up the process a bit. Here is a video I made to share my tips with you. Enjoy!

THIS WEBSITE IS NOT INTENDED FOR THE PURPOSE OF PROVIDING MEDICAL ADVICE
All information, content, and material of this website is for informational purposes only and is not intended to serve as a substitute of a qualified physician or healthcare provider.
“In settings where facemasks are not available, HCP might use homemade masks (e.g., bandana, scarf) for care of patients with COVID-19 as a last resort. However, homemade masks are not considered PPE, since their capability to protect HCP is unknown. Caution should be exercised when considering this option. Homemade masks should ideally be used in combination with a face shield that covers the entire front (that extends to the chin or below) and sides of the face.”
Article from Courier & Press, Evansville, IND “Citing shortages, Deaconess Health System, including Henderson's Methodist Health, has asked the public to sew face masks for staff fighting coronavirus”.

Face Mask Sewing Pattern and Tutorial
Across the world, we are all discovering just how unprepared we are for the COVID-19 situation. Face masks are hard to come by and it seems that hospitals will be facing a shortage in the near future. After reading this article I decided that I needed to put my skills to use make a mask pattern.
Across the world, we are all discovering just how unprepared we are for the COVID-19 situation. Face masks are hard to come by and it seems that hospitals will be facing a shortage in the near future. After reading this article I decided that I needed to put my skills to use make a mask pattern.
THIS WEBSITE IS NOT INTENDED FOR THE PURPOSE OF PROVIDING MEDICAL ADVICE
All information, content, and material of this website is for informational purposes only and is not intended to serve as a substitute of a qualified physician or healthcare provider.
“In settings where facemasks are not available, HCP might use homemade masks (e.g., bandana, scarf) for care of patients with COVID-19 as a last resort. However, homemade masks are not considered PPE, since their capability to protect HCP is unknown. Caution should be exercised when considering this option. Homemade masks should ideally be used in combination with a face shield that covers the entire front (that extends to the chin or below) and sides of the face.”
Article from Courier & Press, Evansville, IND “Citing shortages, Deaconess Health System, including Henderson's Methodist Health, has asked the public to sew face masks for staff fighting coronavirus”.
EDIT 9/2/2021: PDF Face Mask Sewing Pattern Free Download
Download Free PDF Pattern Here
EDIT 4/9/2020: I have written a Mask Making FAQ to address some of the more frequent questions. I hope you find it helpful.
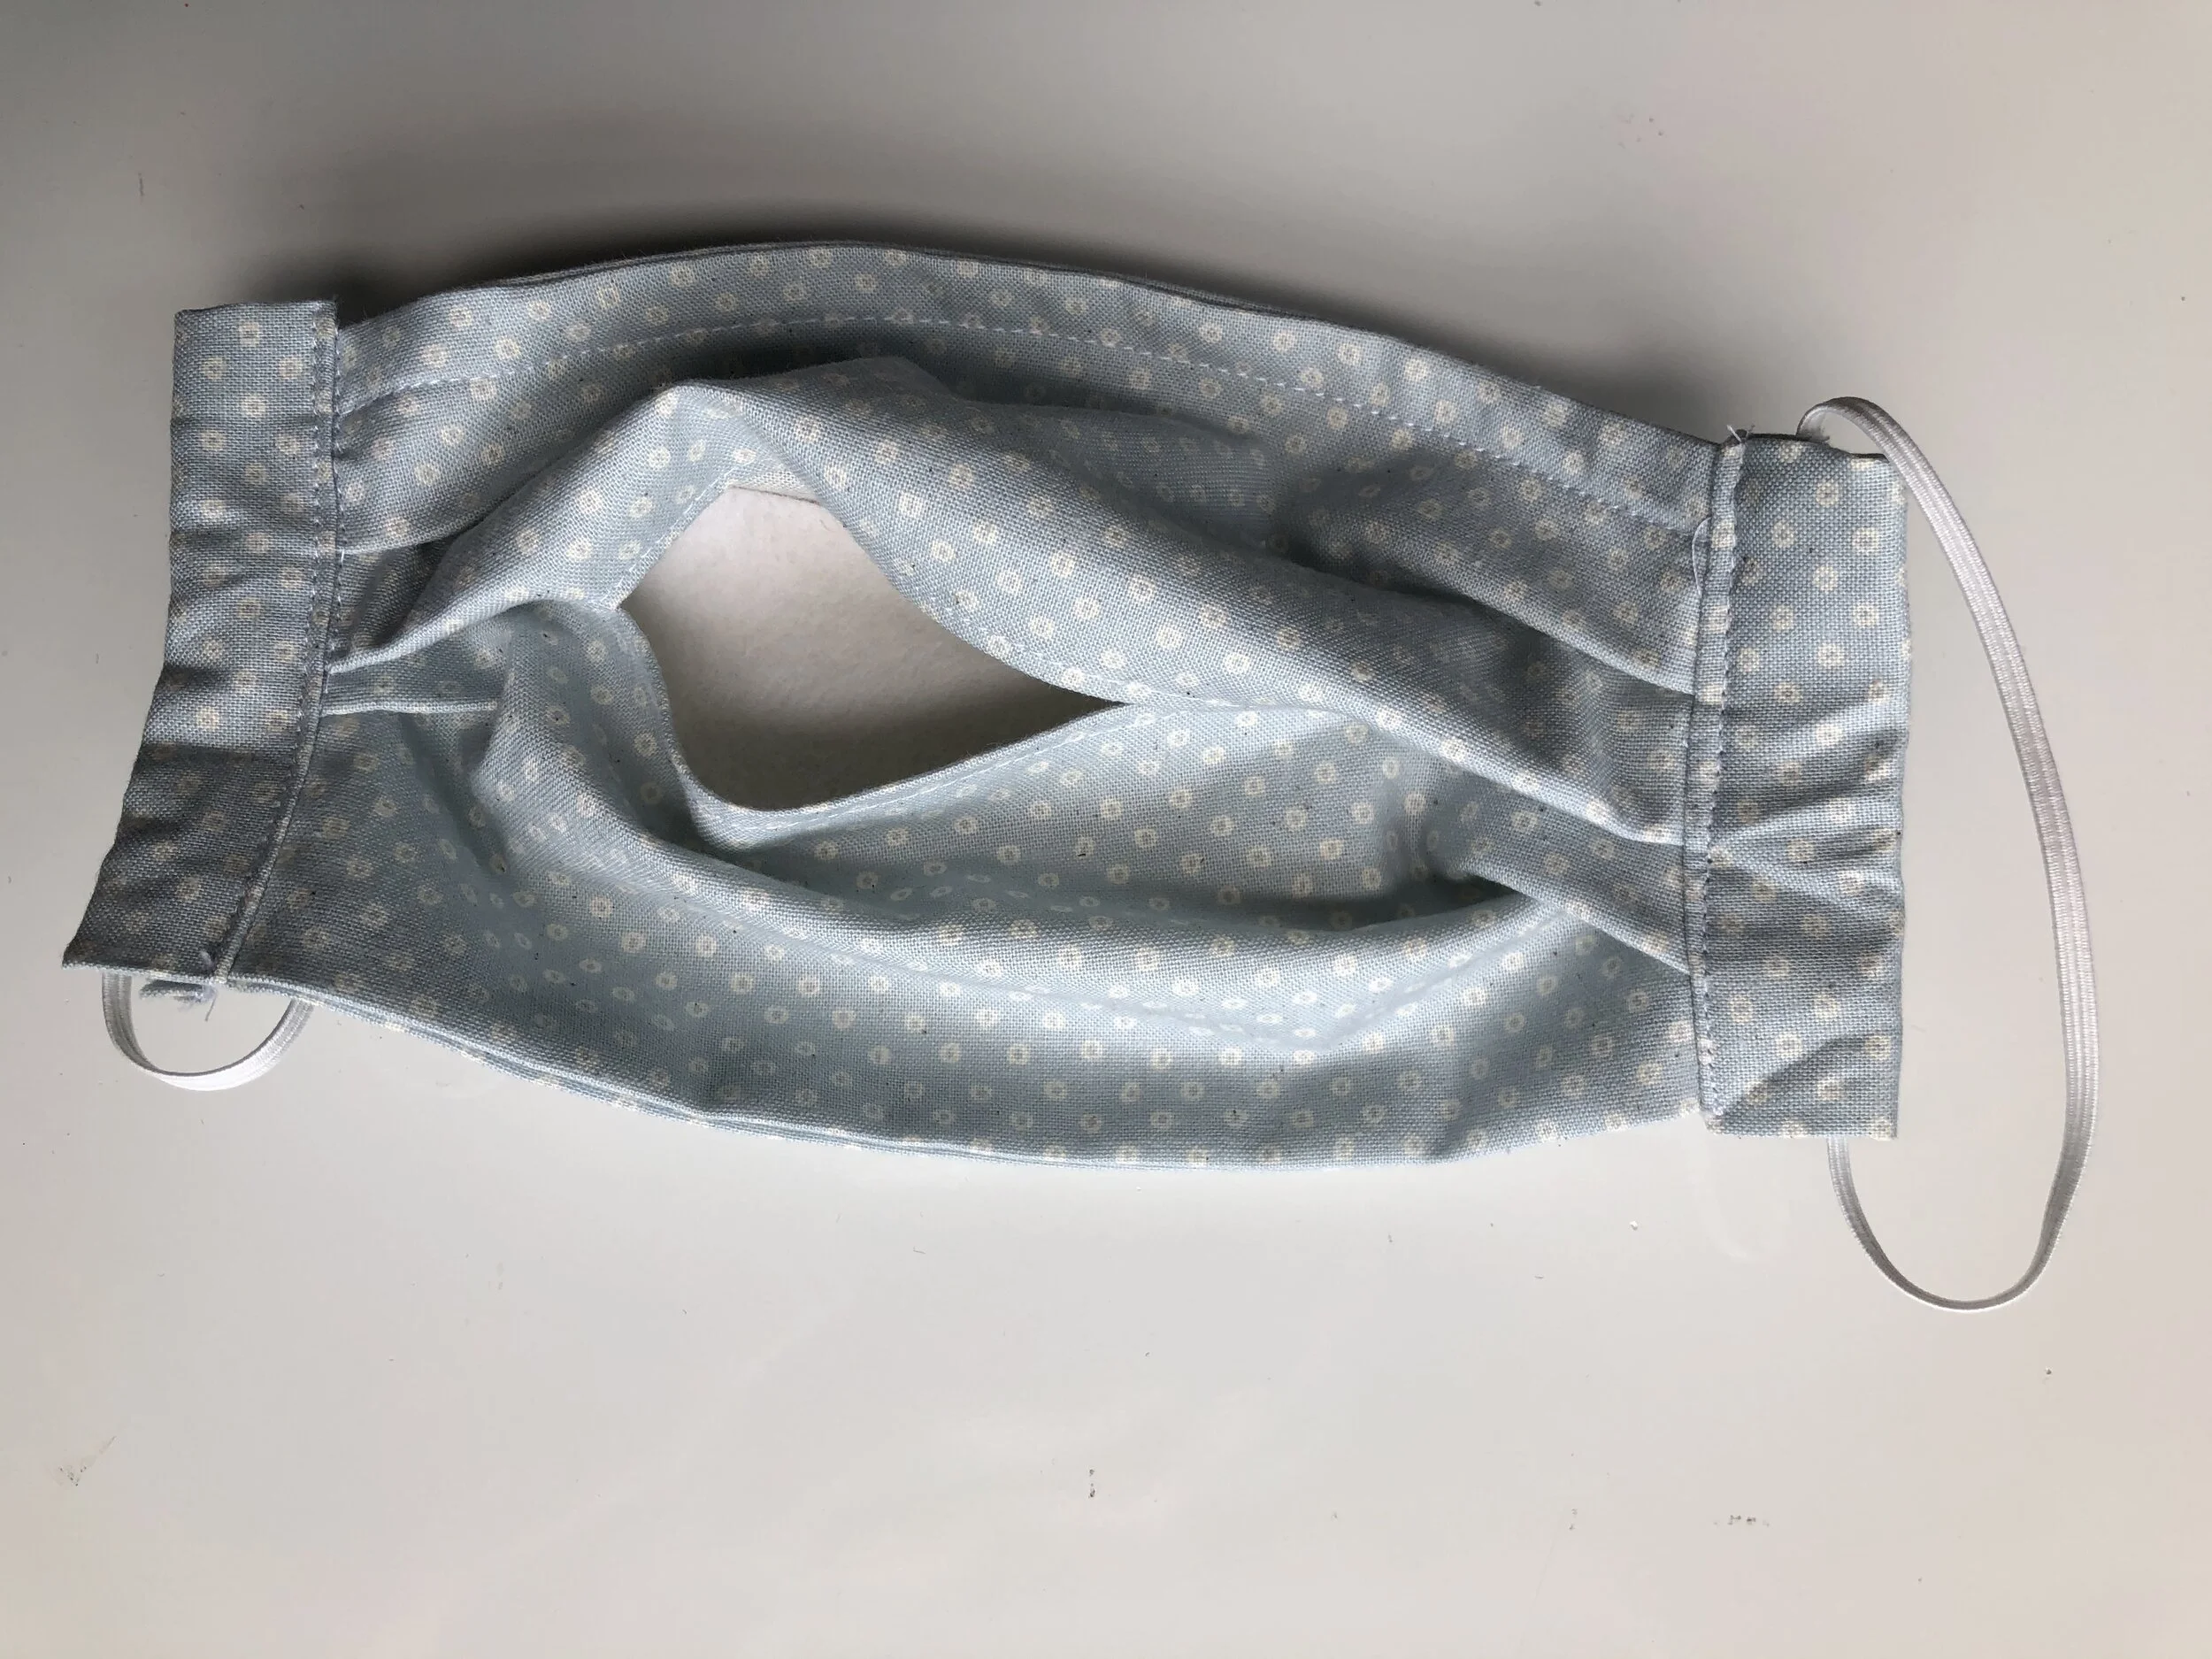
HOW TO SEW A FACE MASK
This mask is made of two layers of cotton and can be fastened with elastic or ribbon and tied around your head. After wearing it around for a bit, it is surprisingly breathable.
Instead of recommending fabric to you, I have linked to a couple of articles above. Please read and decide for yourself which fabric you feel is best to use.
This mask pattern and tutorial has three variations. The first is a standard two layer mask with elastic to fit around your ears.
The second variation is to add ties to the mask so that it loops and ties around the head.
The final variation is to adapt the mask to allow it to hold a shield or filter.
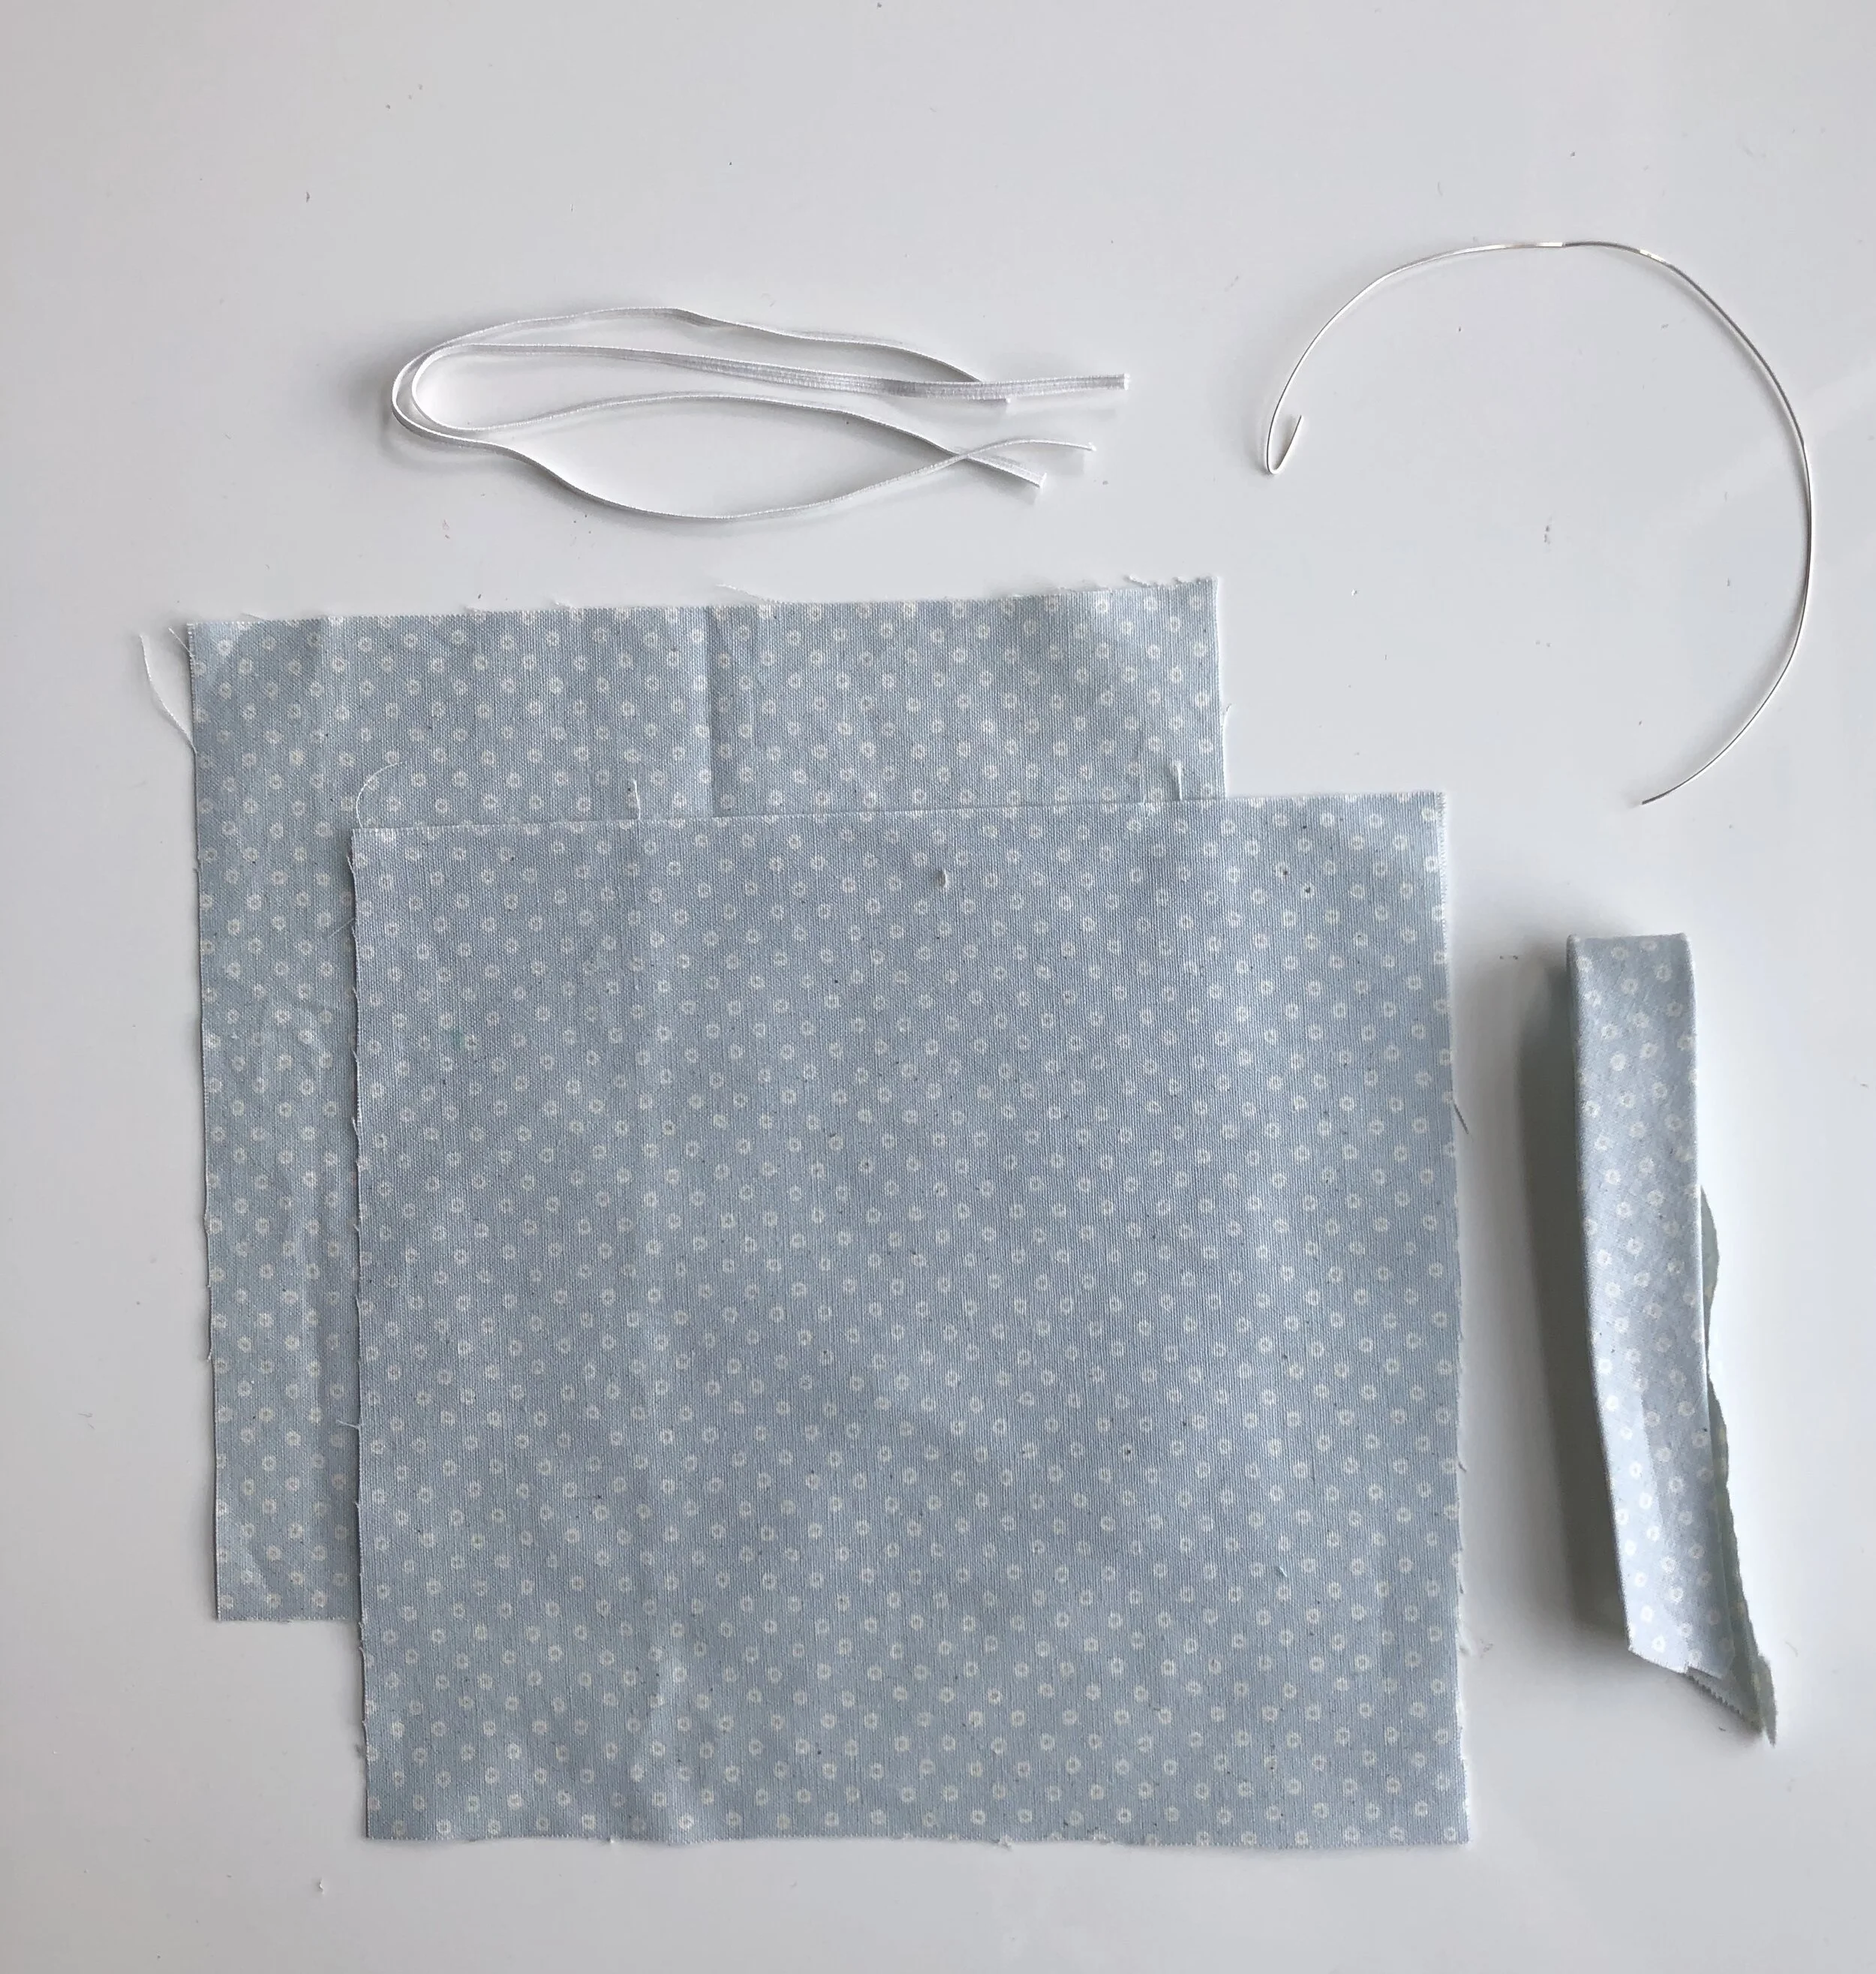
SUPPLIES
Fabric, Refer to CDC Guidelines *Instead of recommending fabric to you, please read this article and decide for yourself which fabric you feel is best to use.
2 - 10” pieces of 1/4” -1/2” flat elastic or 2 yards of 1/2” ribbon
7.5” of metal wire , I used 16 gauge wire, but would image that a straightened out paper clip would likely work in a pinch.
8” of Bias tape OR 2 rectangles of fabric 3 x 4.5”
Filter for pocket option
SIZE
Finished Dimensions: Approximately 3.5” x 7”
PREPARE
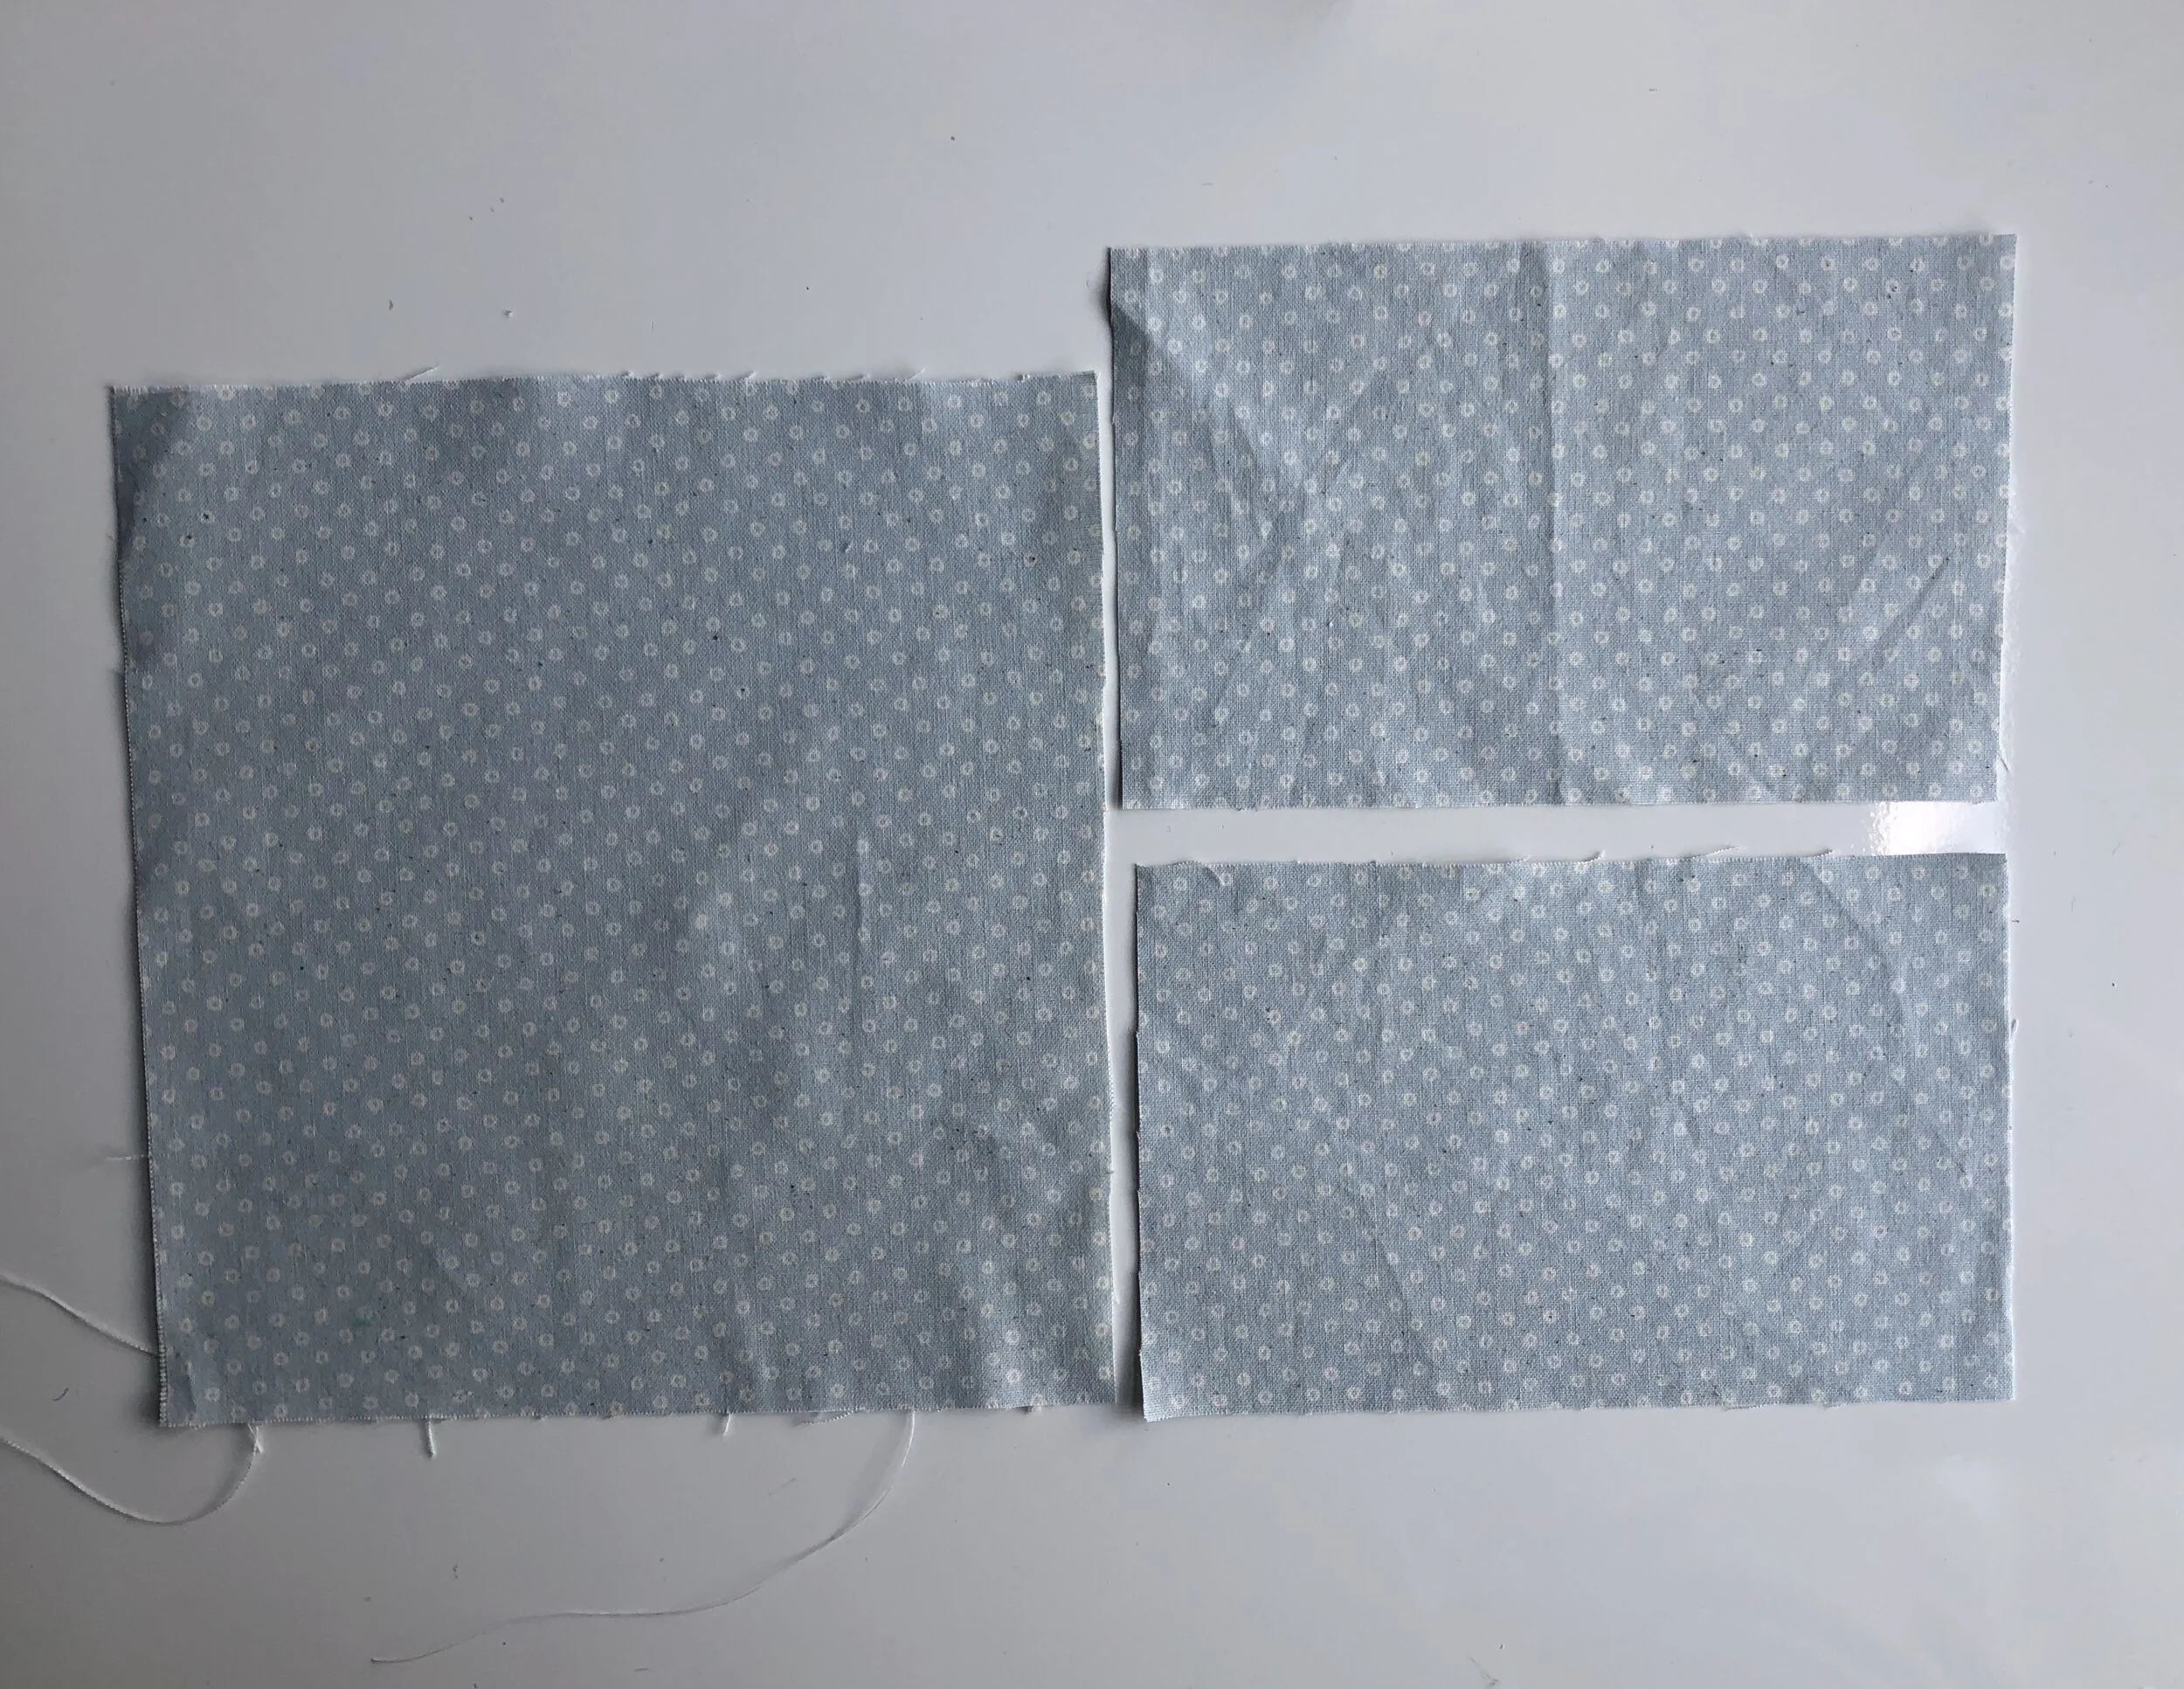
Cut 2 pieces of fabric in a 7.5” square. Pin and sew across the top and the bottom using a 1/2” seam allowance.
How to Sew a double layered face mask with elastic
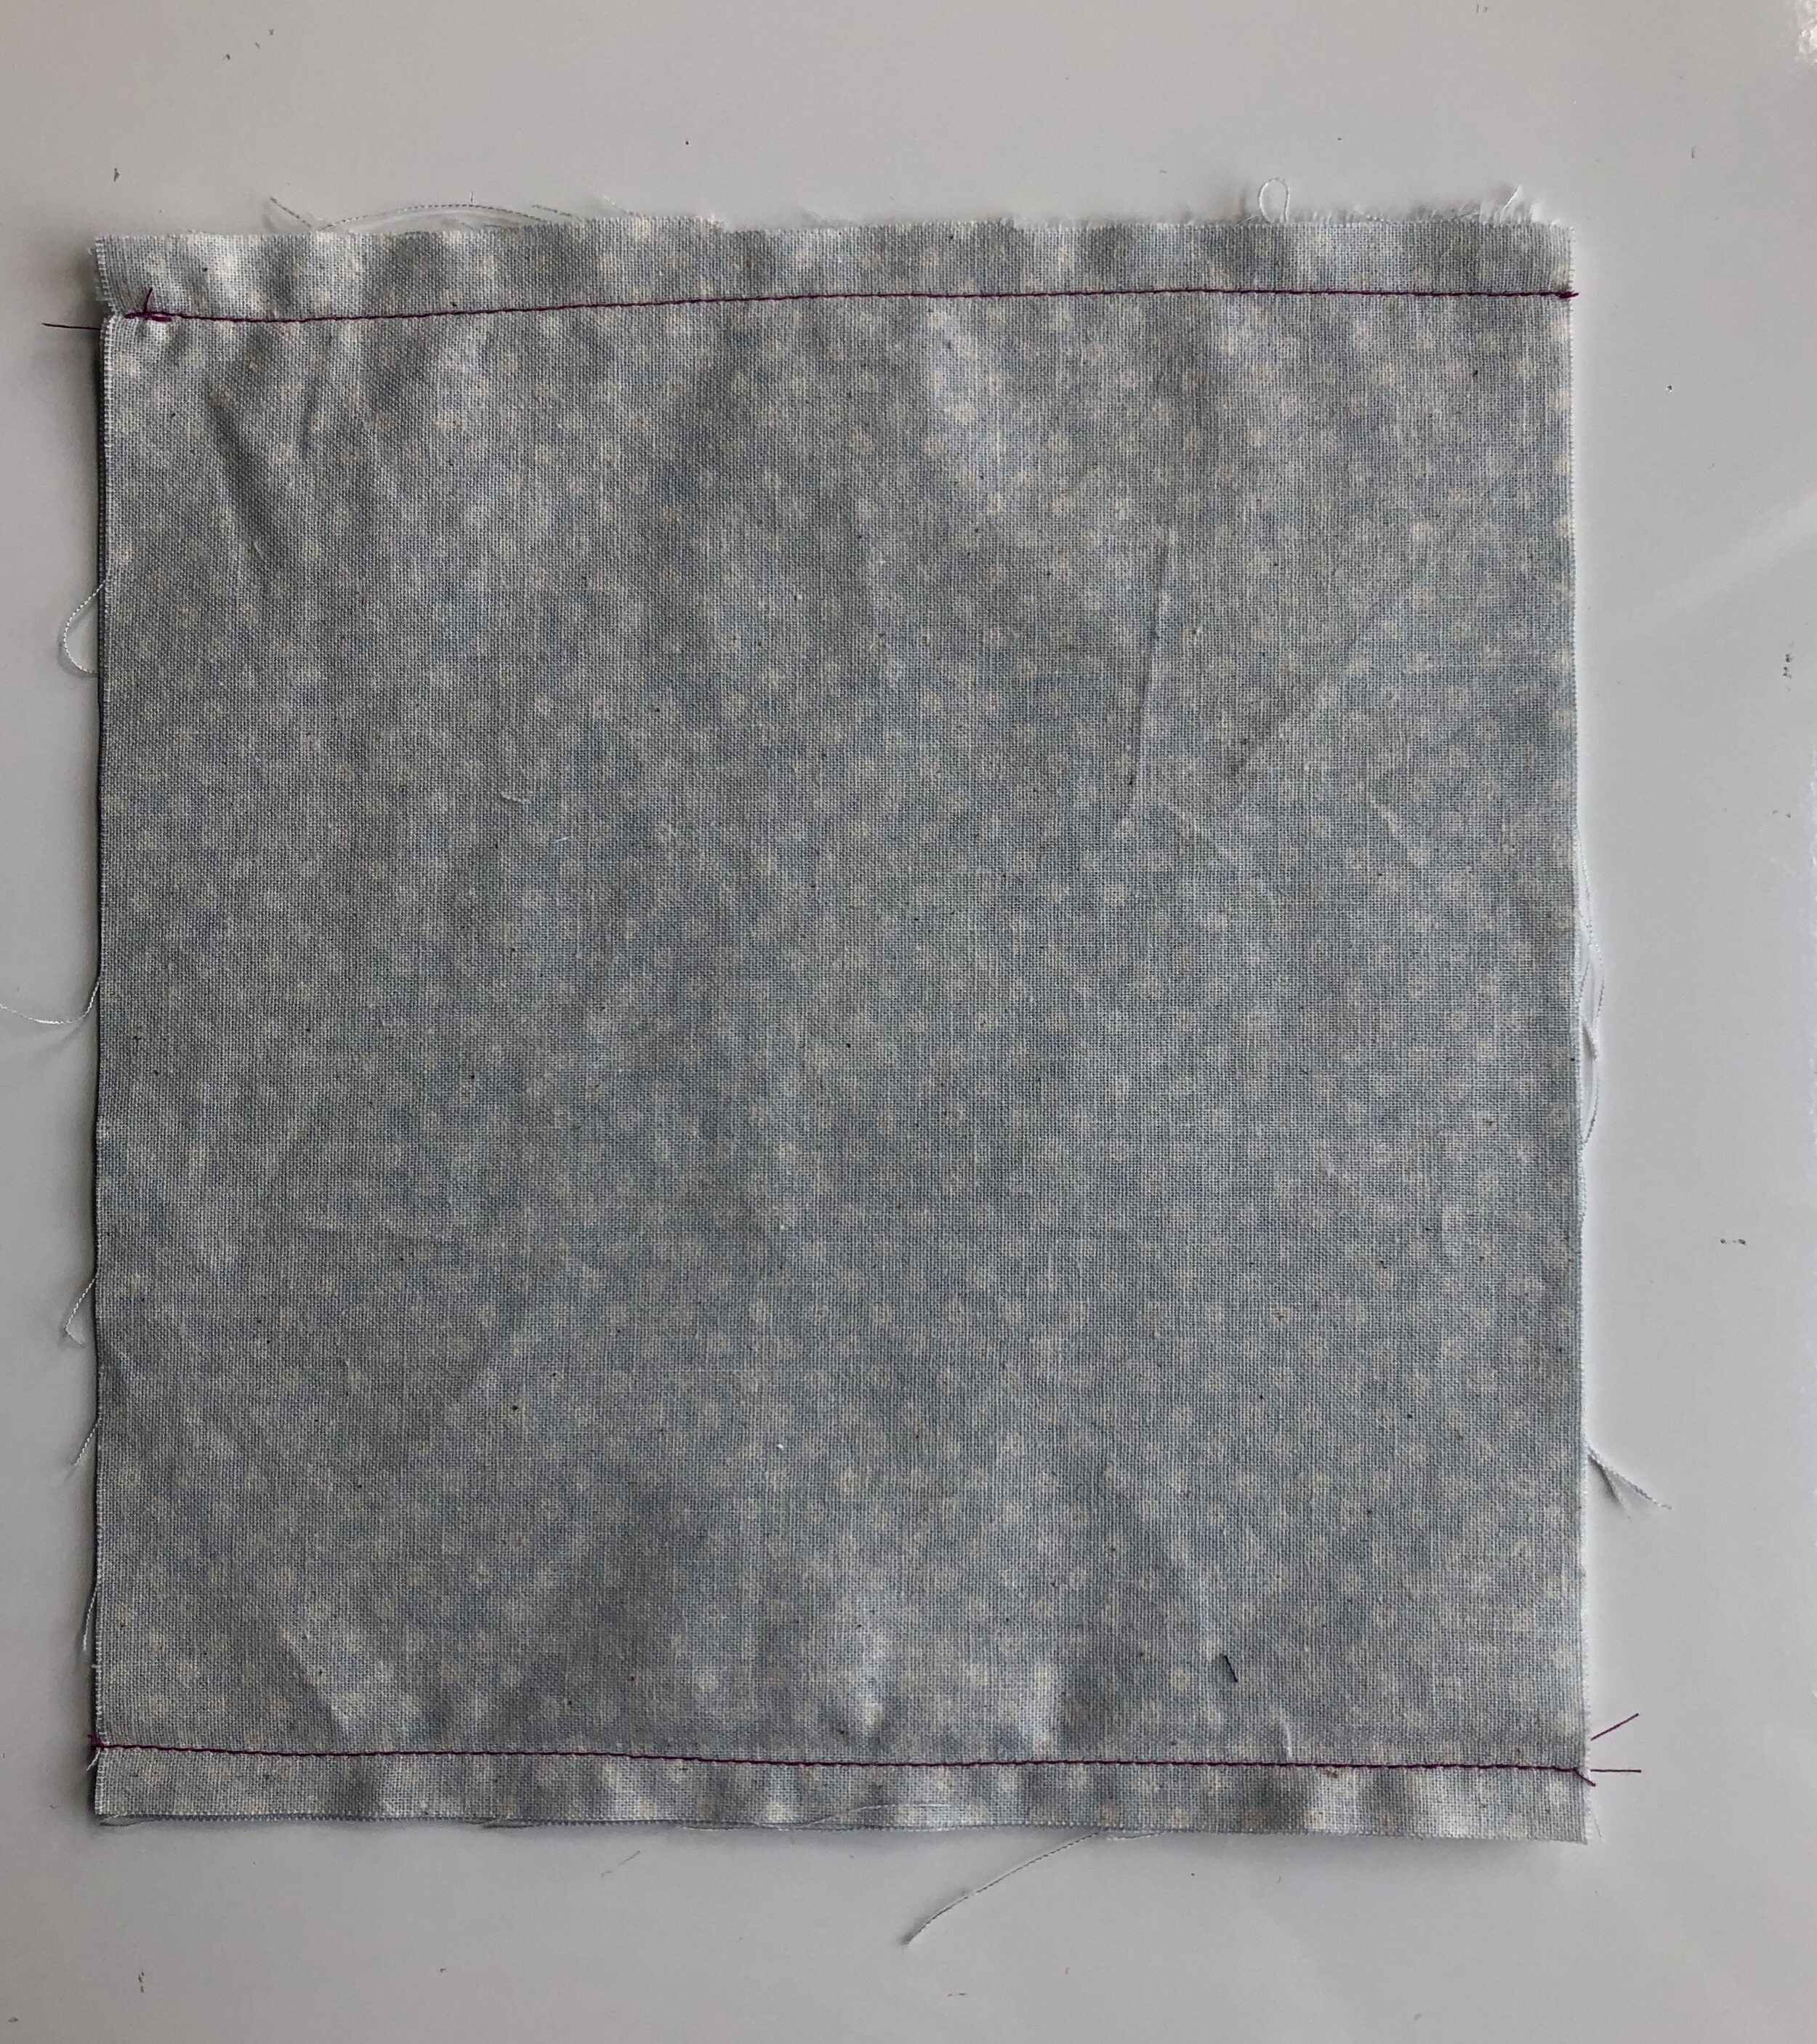
Trim the seam allowance, turn to the right side and press.
CASING
To form a casing, stitch through both layers along the top edge, again with a 1/2” seam allowance.

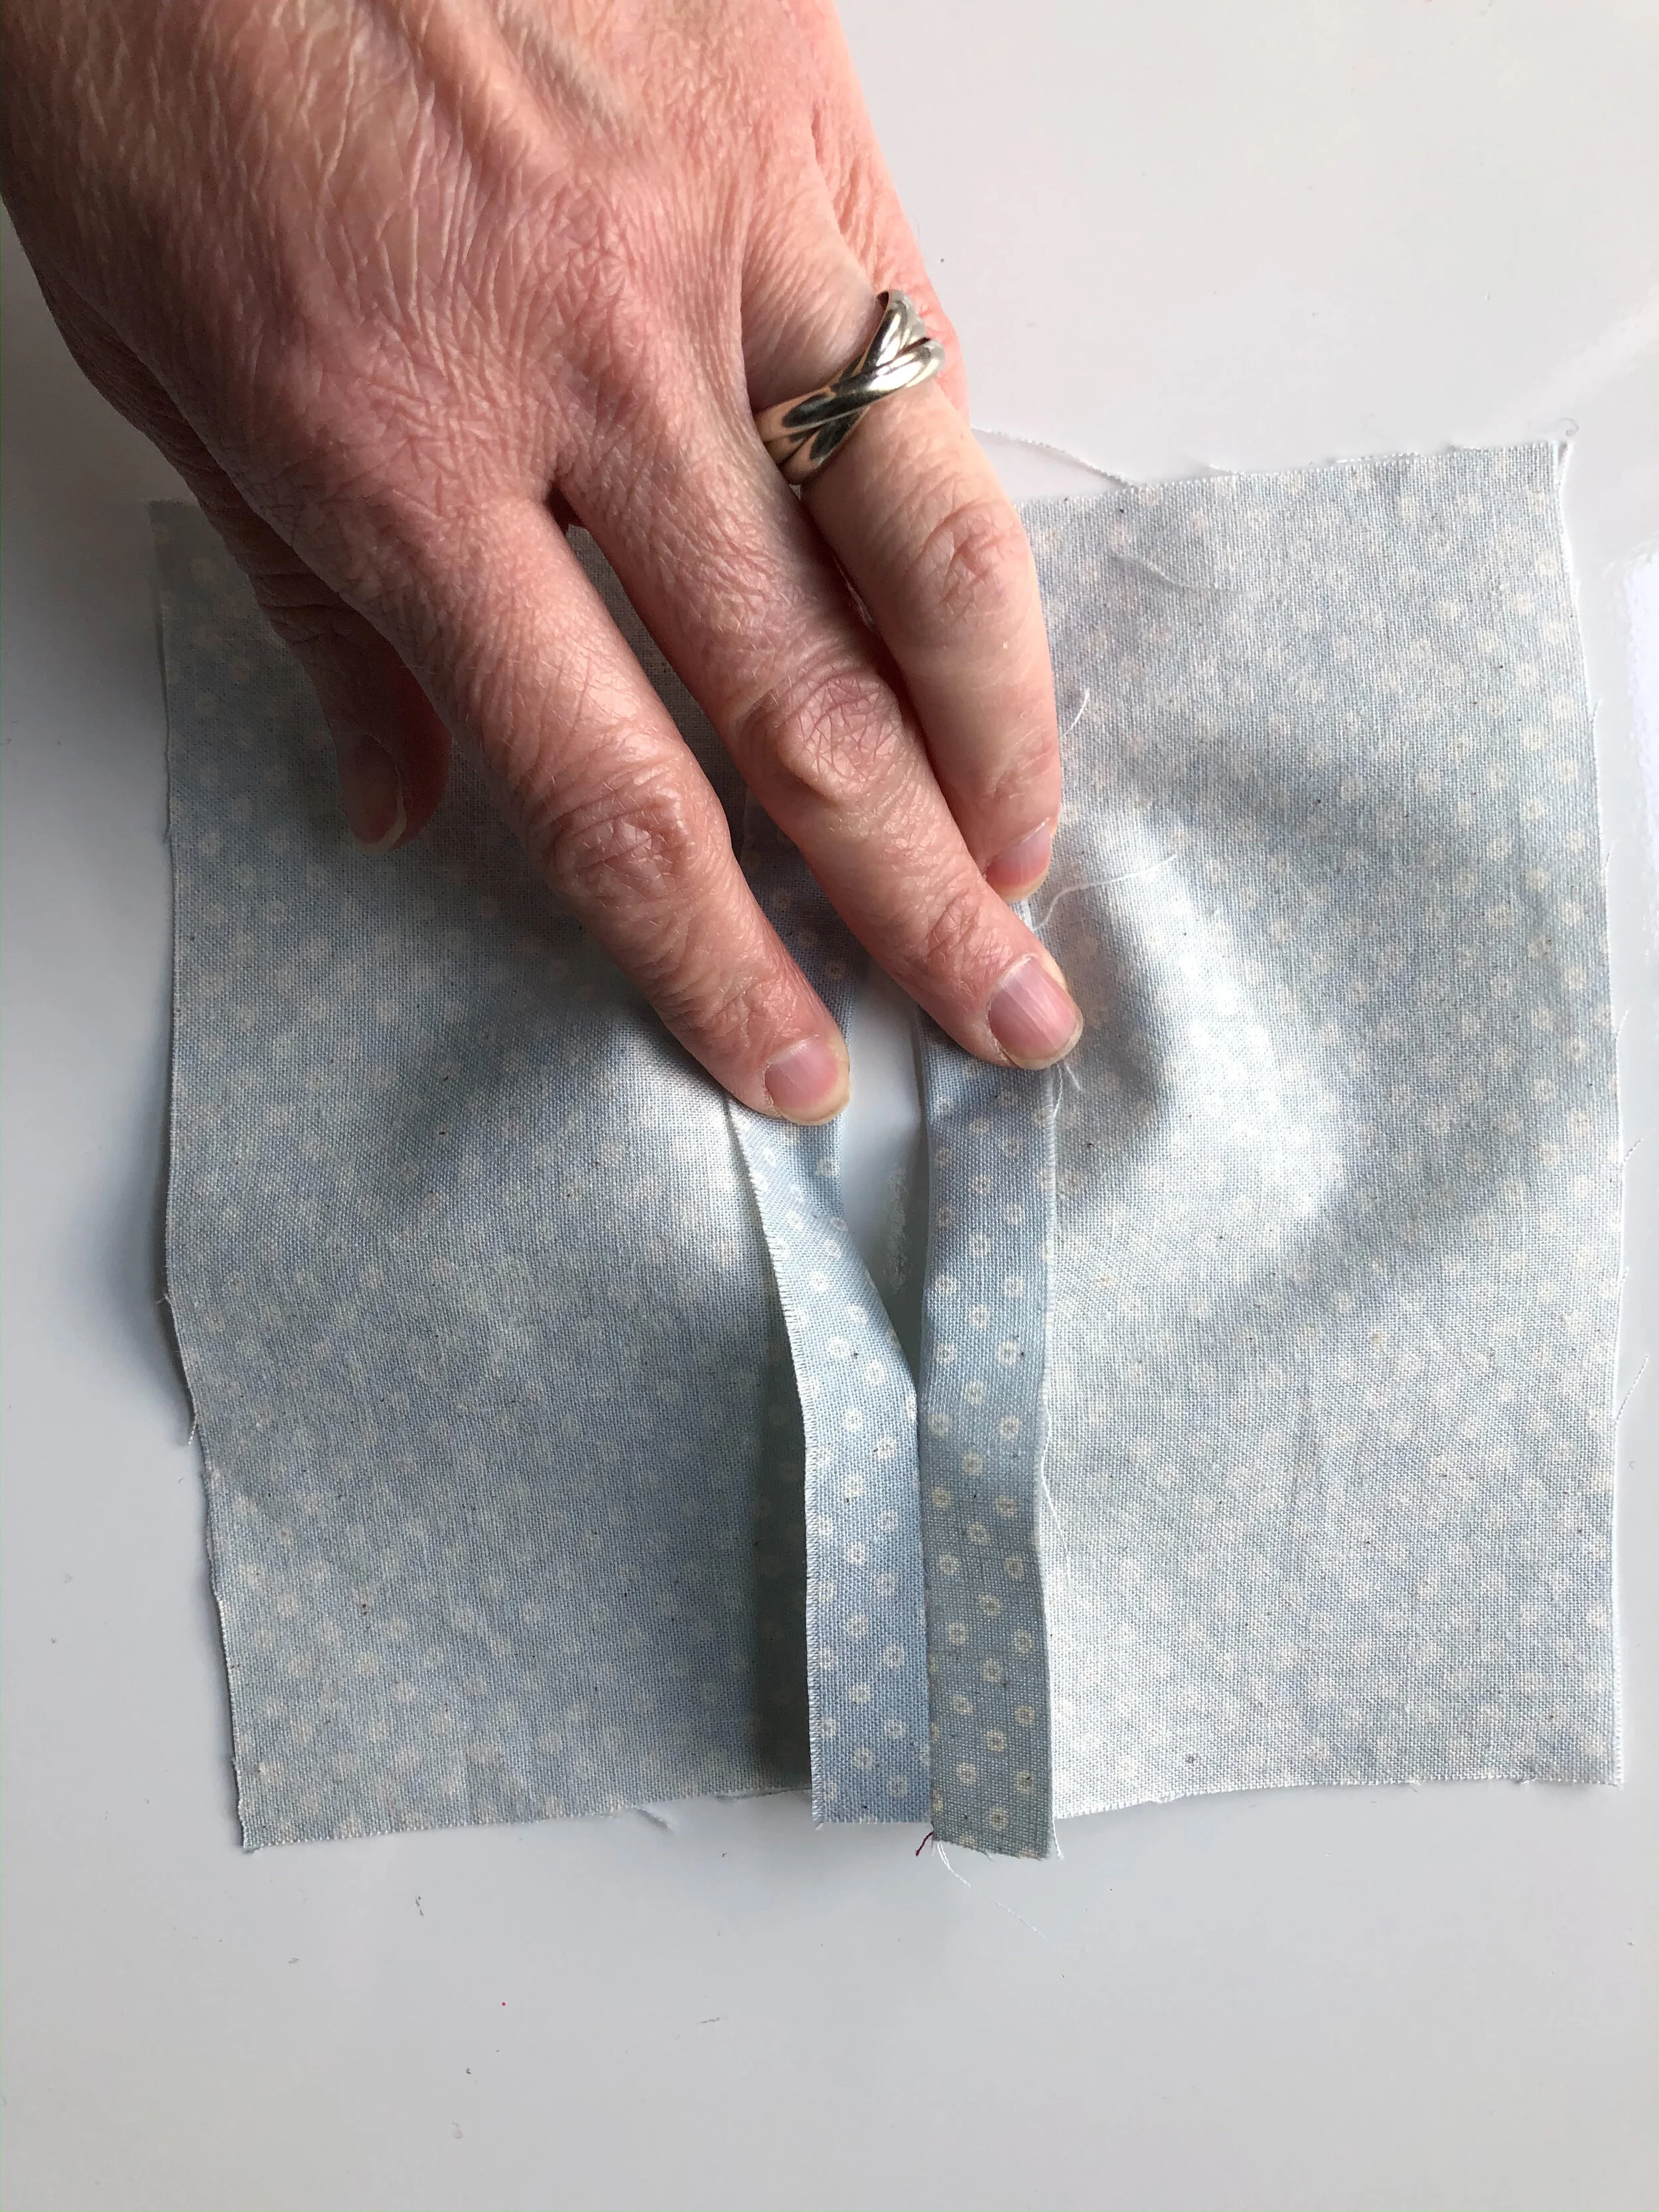
Fold the leading edge of the wire in just a bit so the it doesn’t poke through the fabric. Insert into the casing. Bend the opposite side.


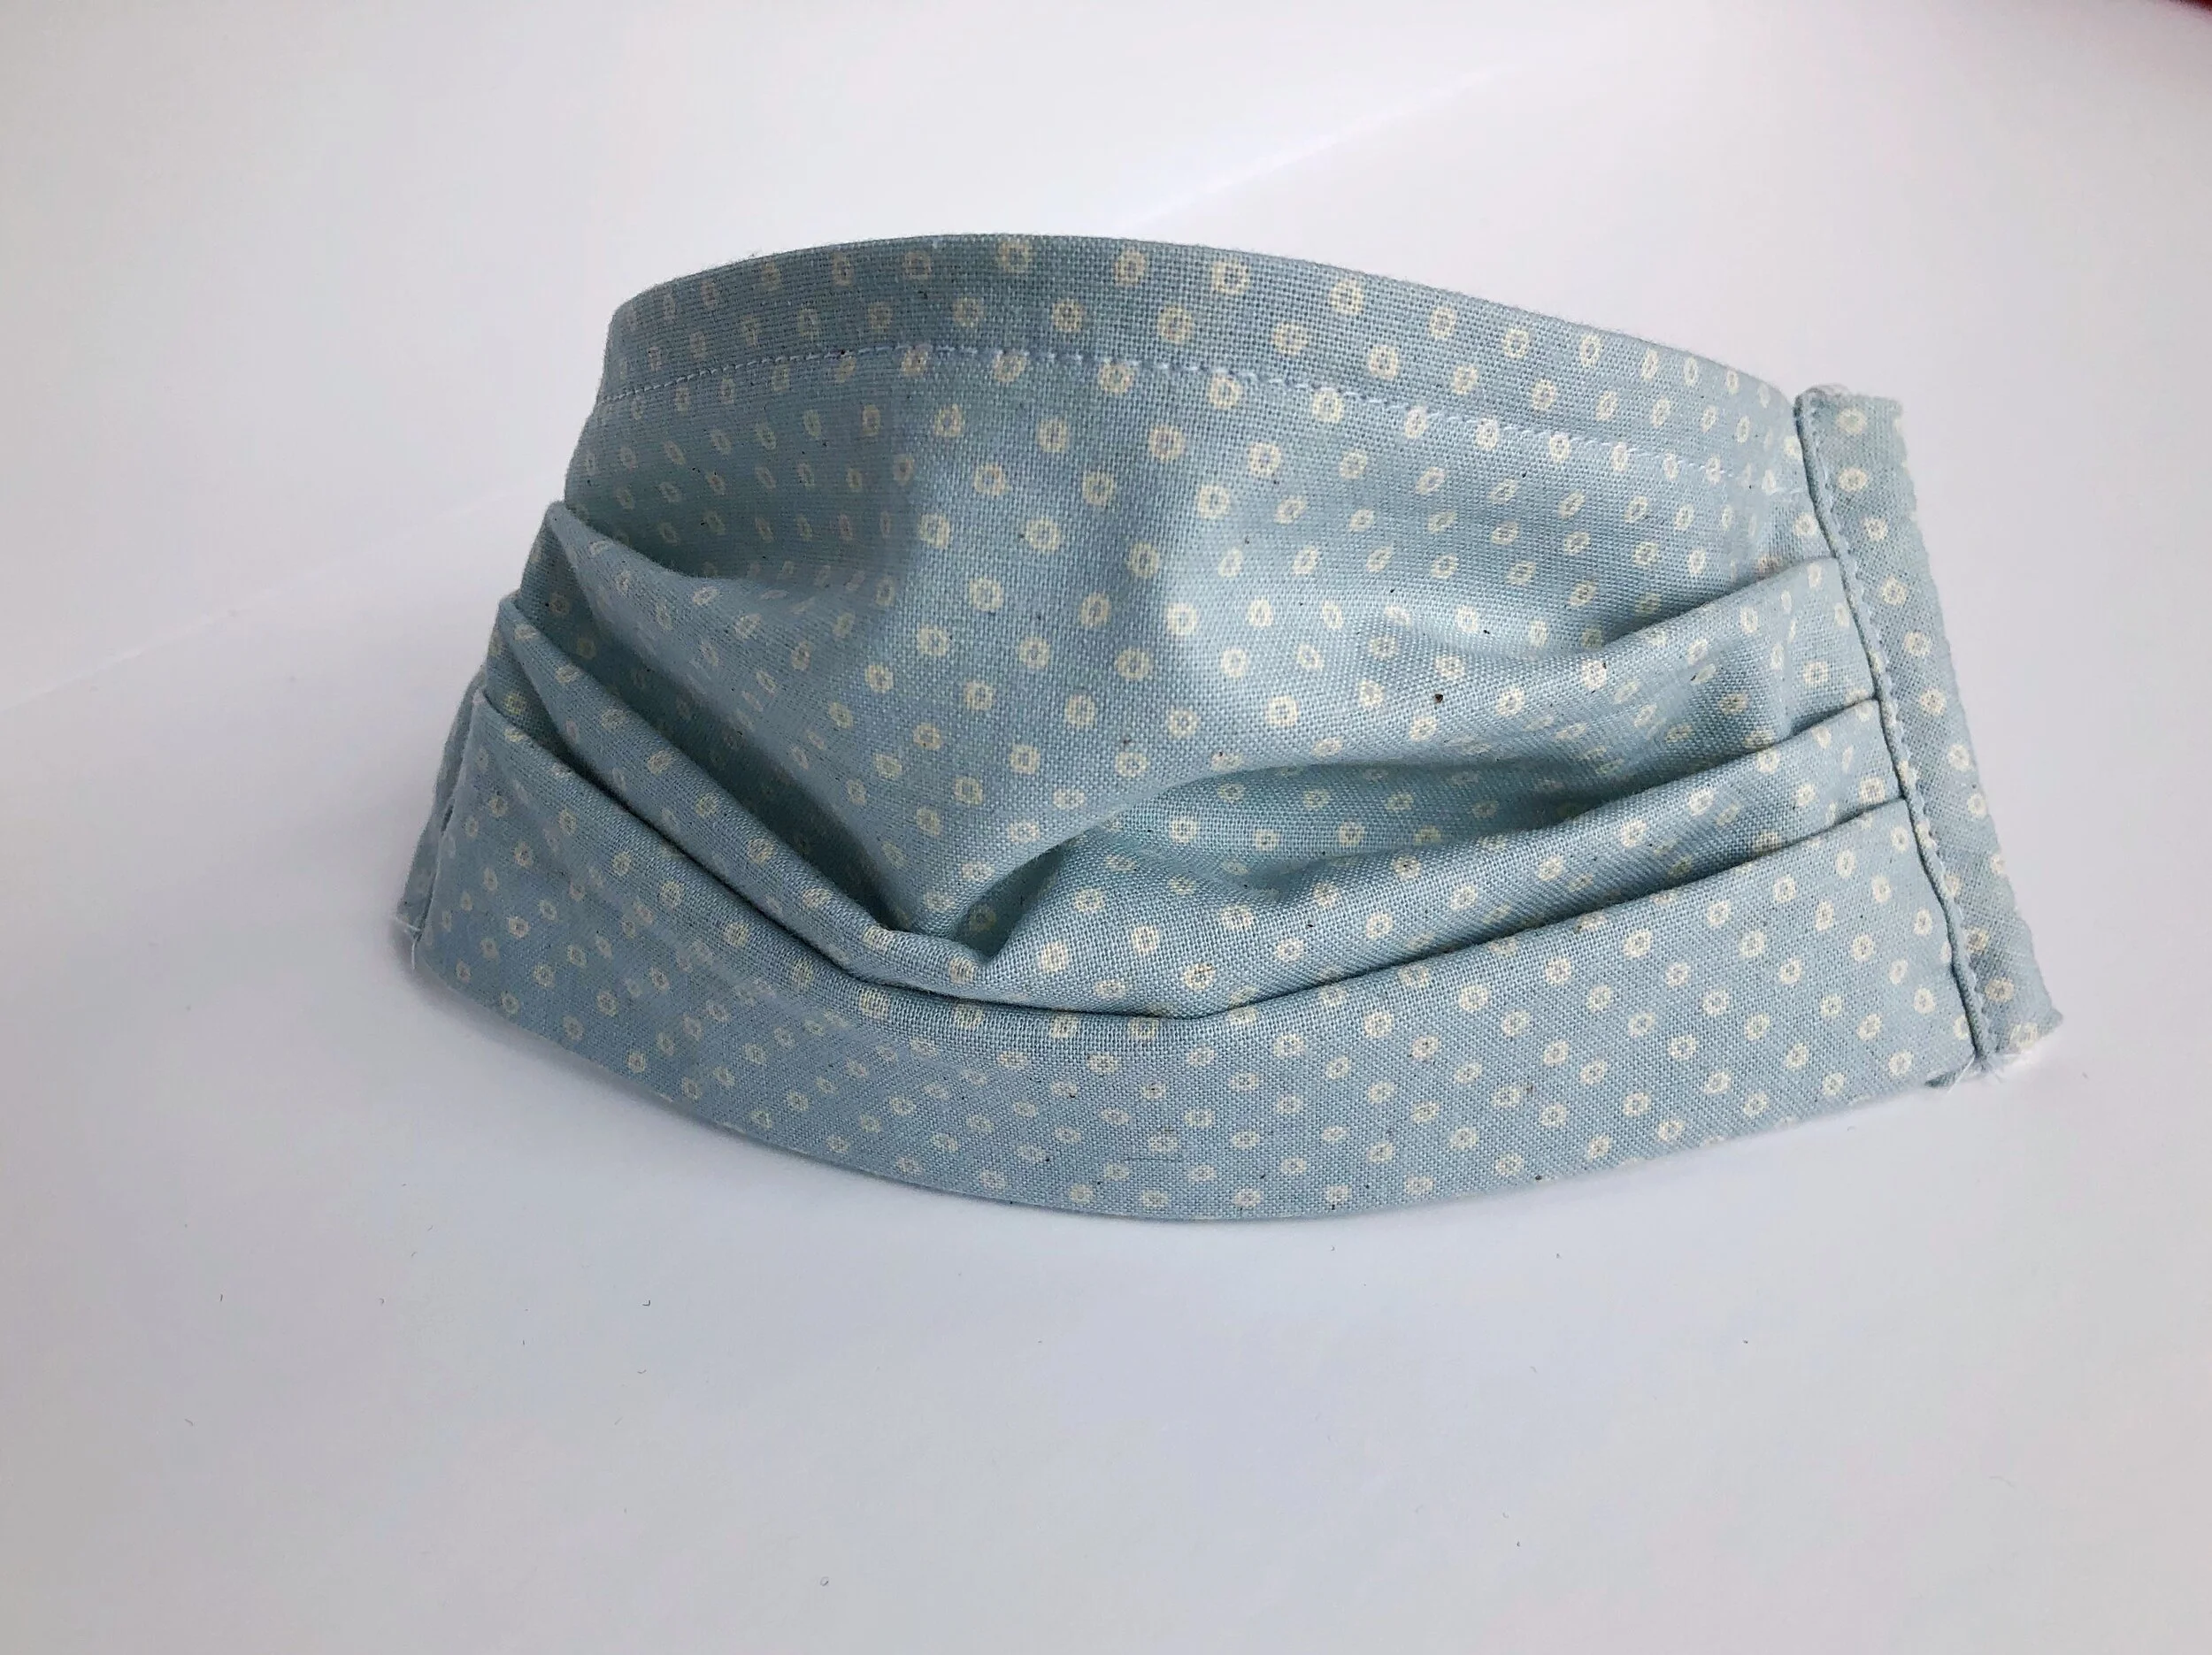
PLEATING THE MASK
To form the pleats, mark your mask at the 1 3/4”, 3 1/2” and 5 1/4” points from the top. This will be your guide to fold the pleats. If you aren’t the exacting type of person, just wing it. The mask needs to be pleated so that it is 3.5” tall.
The image below is not sewn, however, it is cut to the same dimensions as if it were sewn with a 1/2” seam allowance at top and bottom.
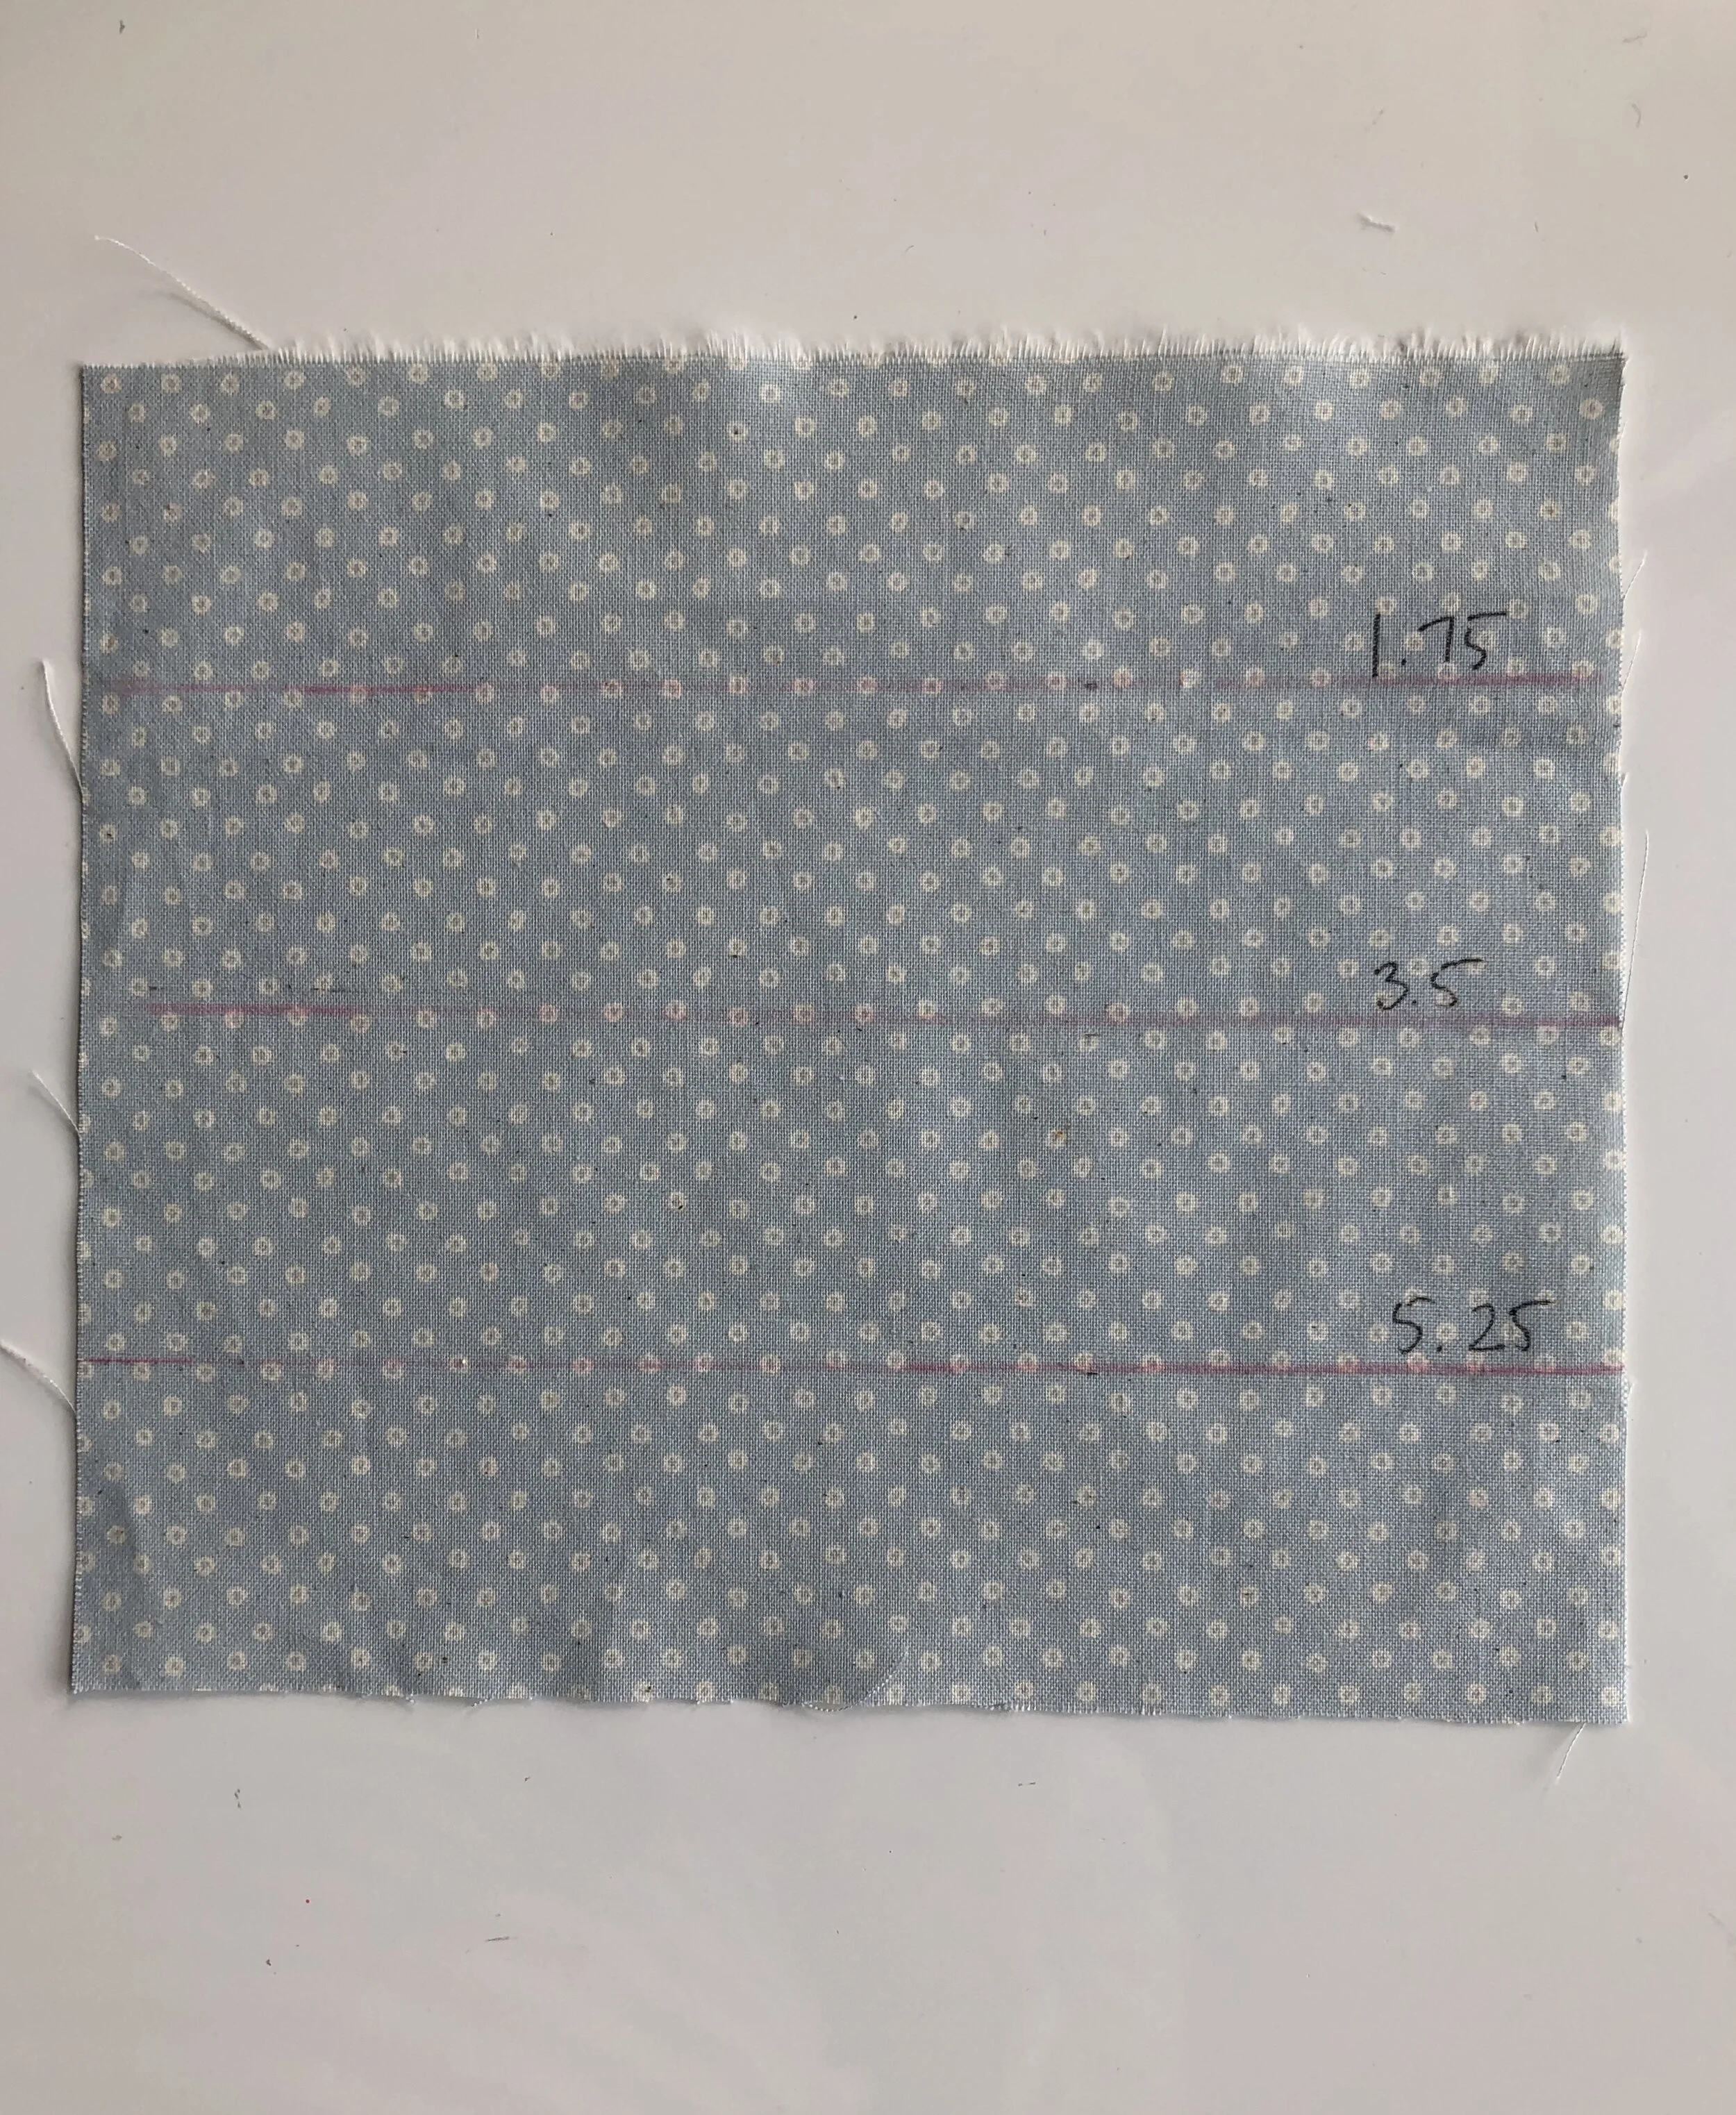
Each pleat is 1/2” deep. Fold pleats up, toward the top of the mask and pin.

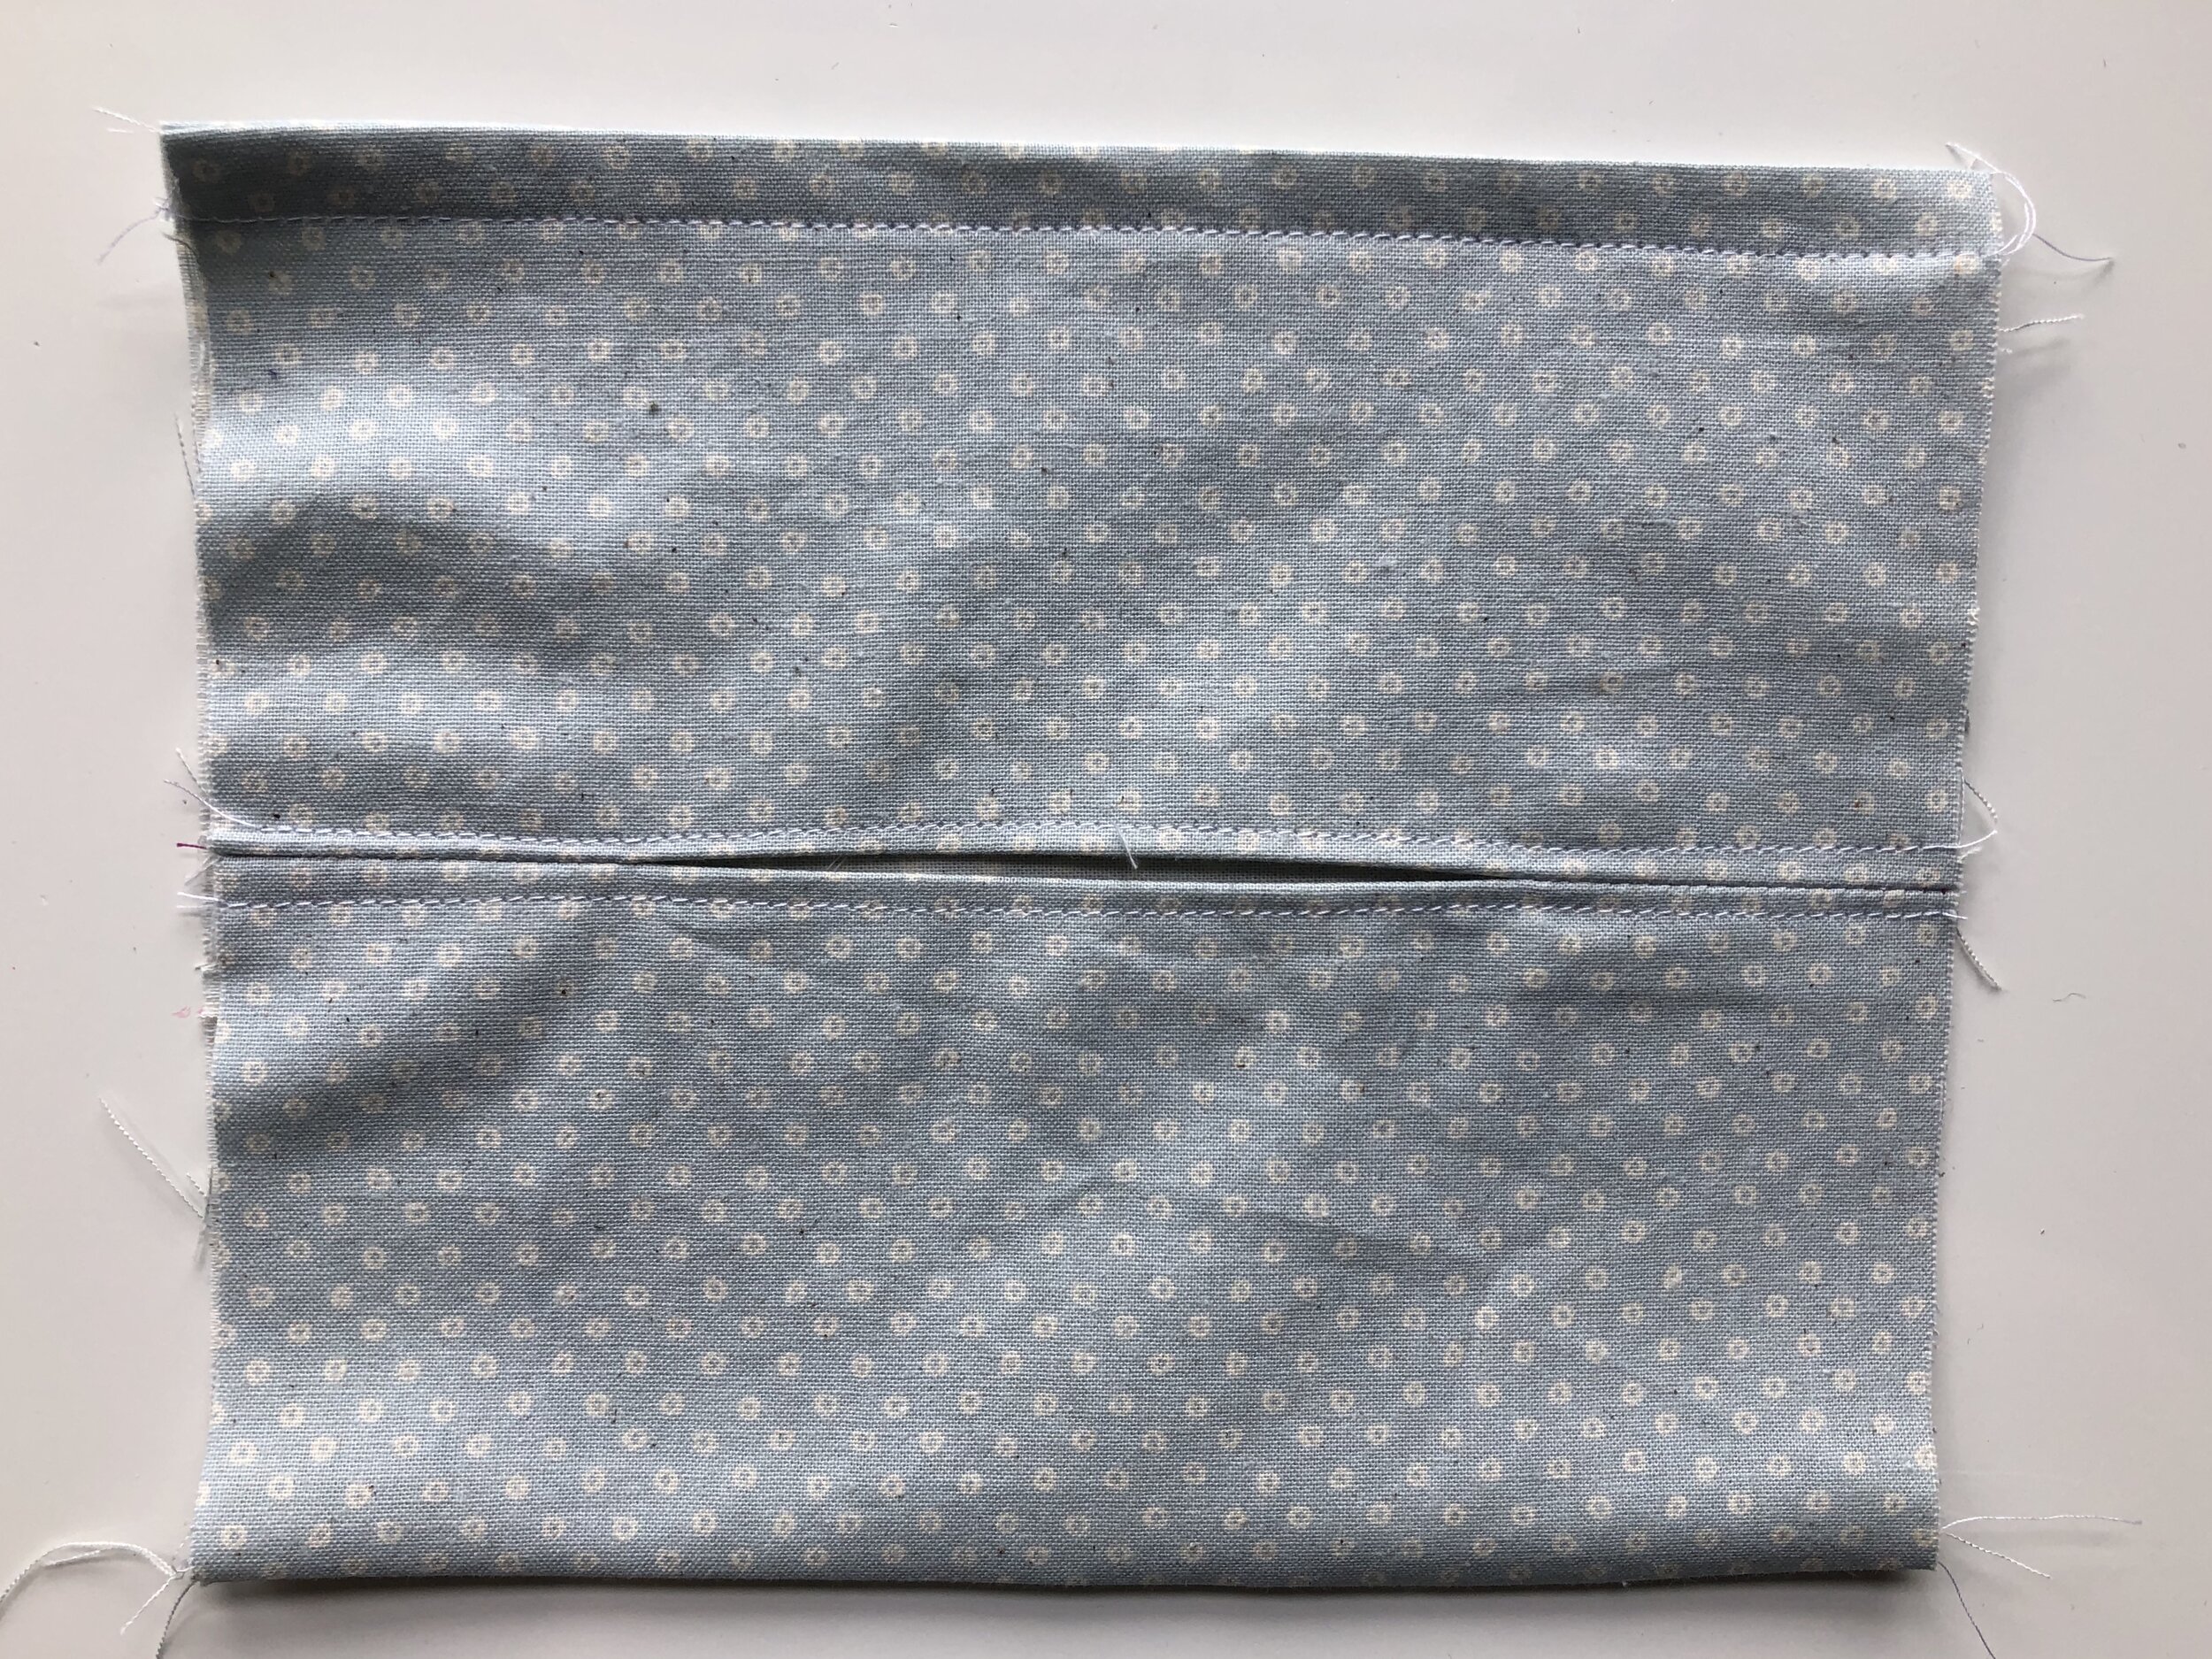
Stitch along pleats using a 1/2” seam allowance. Repeat for opposite side.


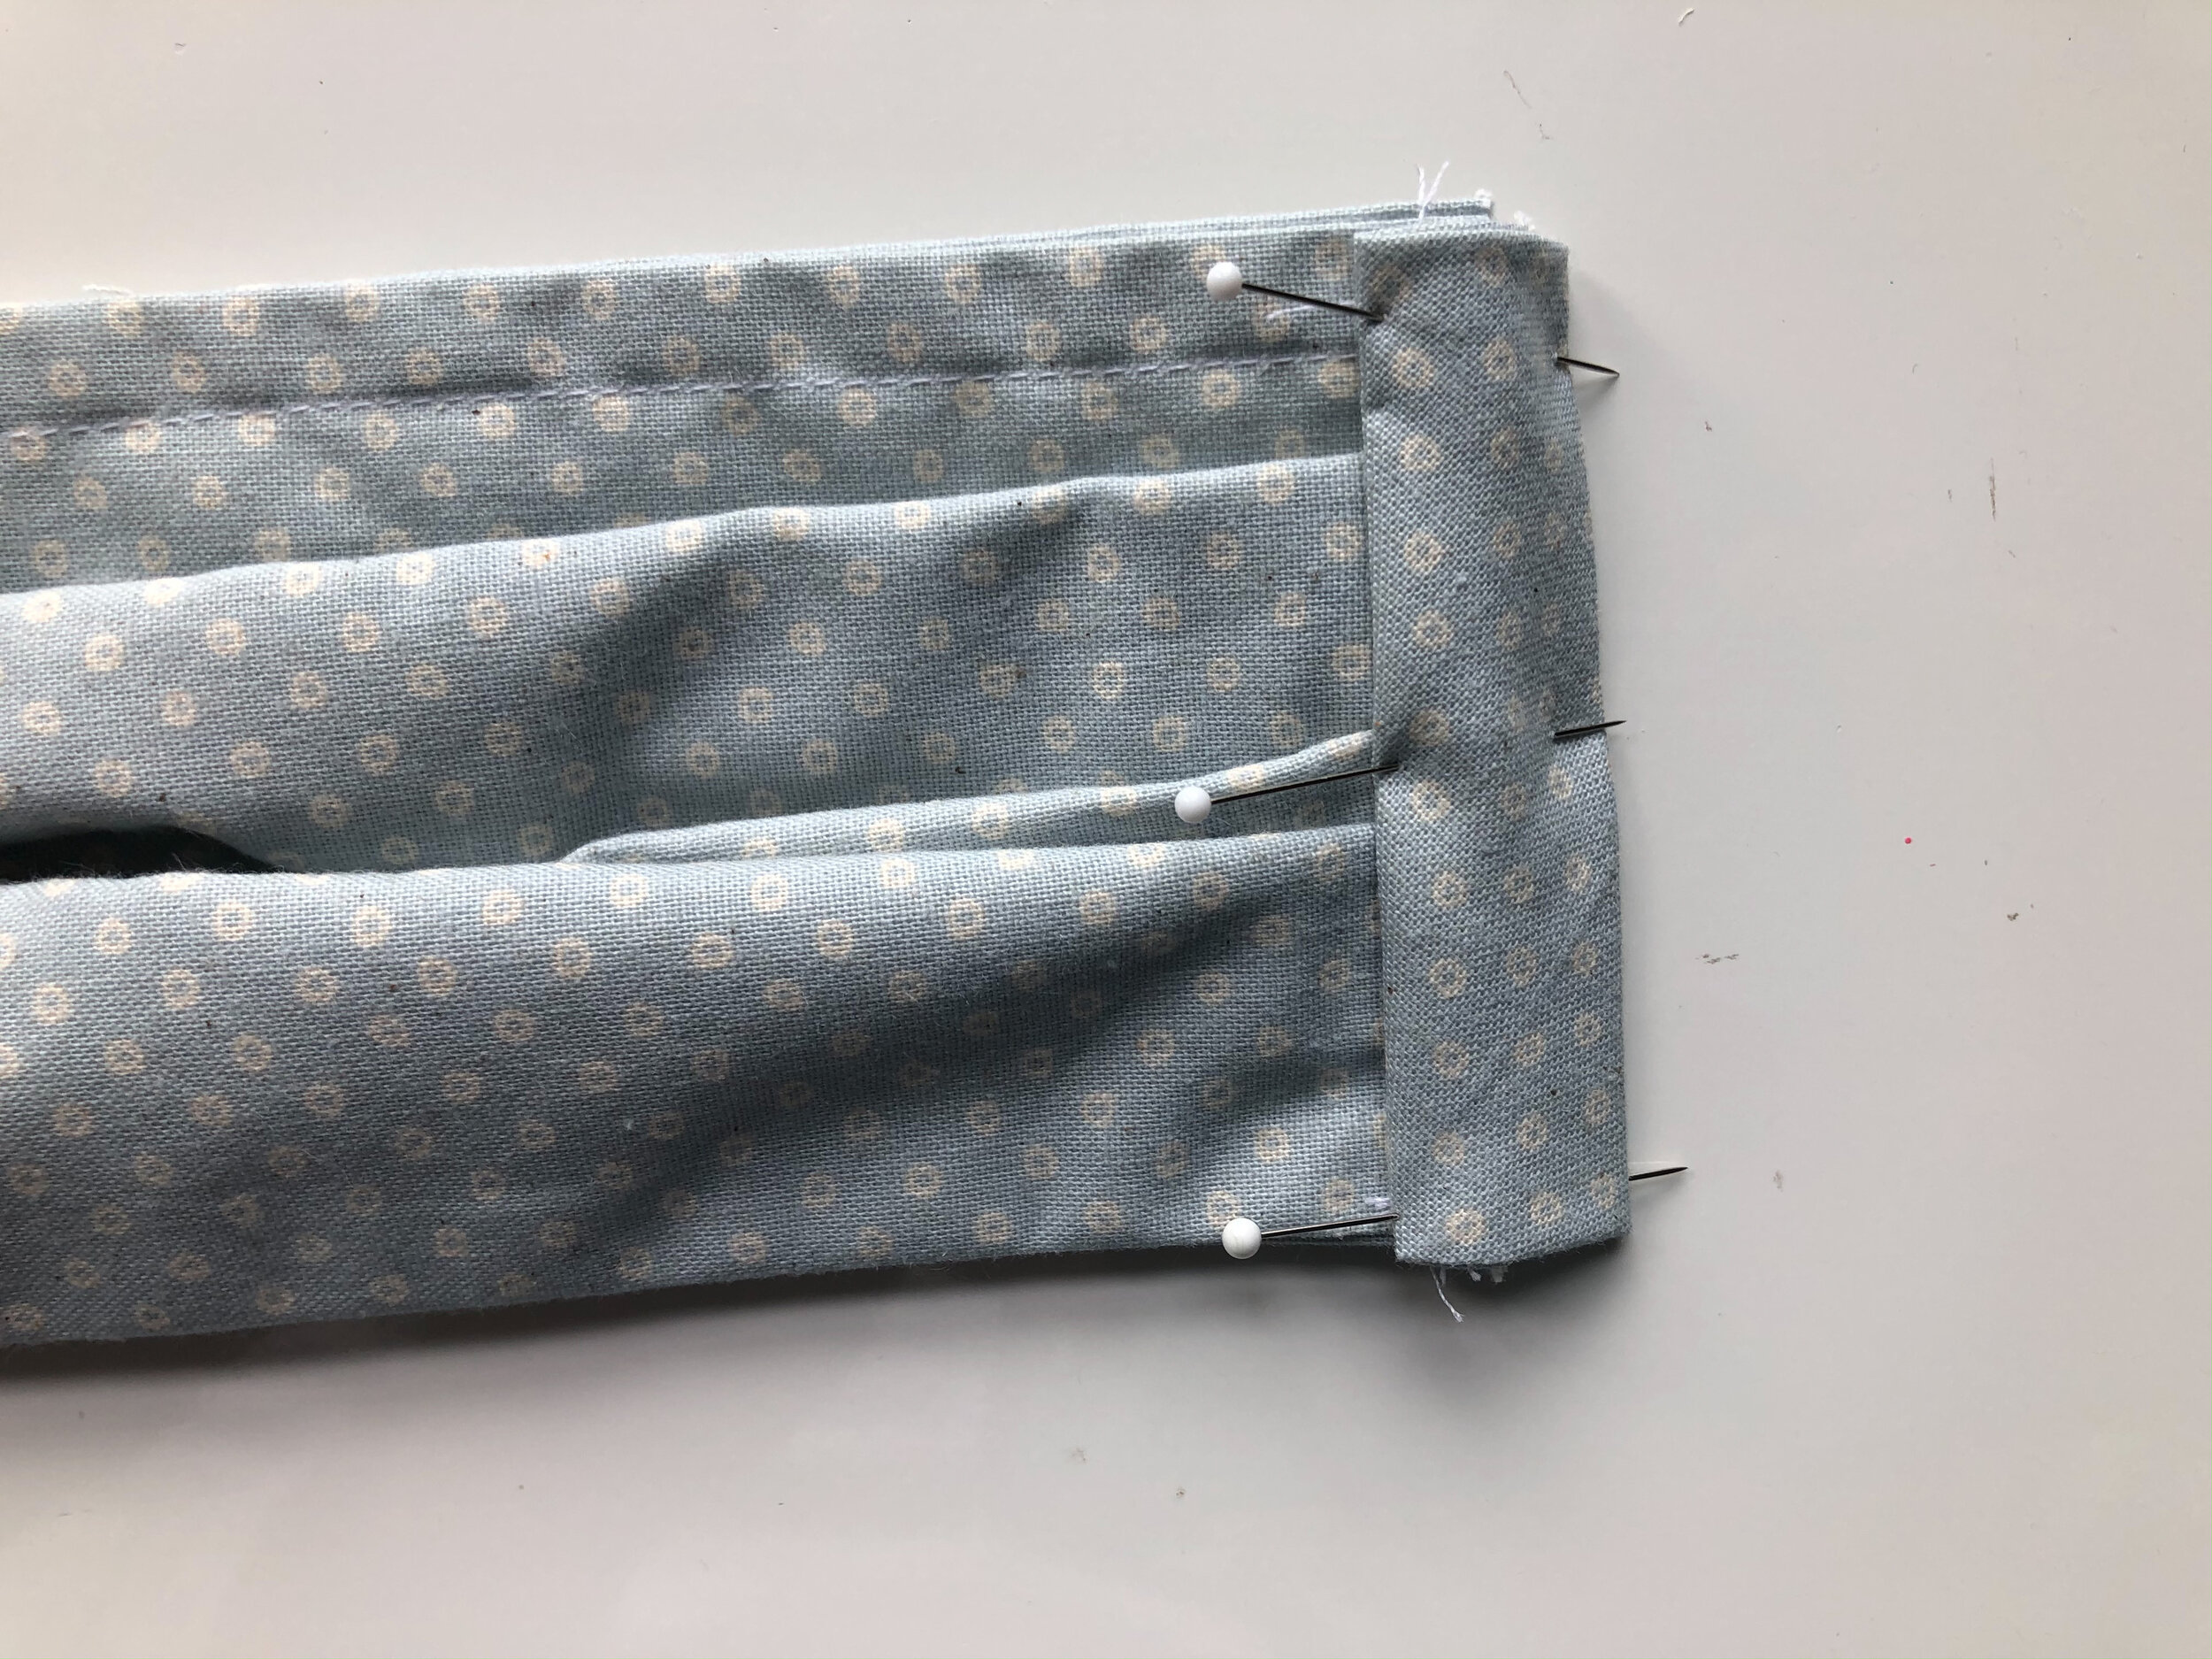
APPLYING BIAS
Align folded edge of bias tape along the line of stitching. Trim tape to 1” longer than the side of your mask. Fold and press edge of top and bottom of bias 1/2” toward the inside. Repeat for opposite side.

Pin and stitch right over the previous row of stitching. (If you do not want to make bias tape, keep reading. I have another option for you.)

Fold bias inward along the fold line. Pin in place. Topstitch the edge of the bias.

FINISHING
Take one piece of elastic and using a safety pin, draw it through the mask side casing. Tie in a slip knot. Repeat for the opposite side.

Trim knot ends and pull through the casing to conceal. Repeat for the opposite side.
Your mask is complete! Try it on and bend the wire for a comfortable fit.
HOW TO SEW A FACE MASK WITH TIES
This pattern has a lot of flexibility as far as supplies and technique go.
The second variation involves just making the side edge casing a little wider to allow for ribbon to be drawn through.

SUPPLIES
Fabric, Refer to CDC Guidelines *Instead of recommending fabric to you, please read this article and decide for yourself which fabric you feel is best to use.
2 yards of 1/2” ribbon
7.5” of metal wire , I used 16 gauge wire, but would image that a straightened out paper clip would likely work in a pinch.
2 rectangles of fabric 3 x 4.5”
Filter for pocket option
SIZE
Finished Dimensions: Approximately 3.5” x 7”
Follow directions up until the bias tape application. Instead of bias tape, cut 2 rectangles of fabric 3” x 4.5”. Press the long sides in 1/2”. Press shorter sides in 1/2”.

Align the folded edge of the fabric along the line of stitching in the same manner as the bias tape application. Folding and press the edges of the top and bottom 1/2” toward the inside to conceal raw edges. Repeat for opposite side.
See section Applying Bias for step by step pictures. The fabric squares are applied exactly like the bias tape- just wider and a bit easier to handle for beginners.
Topstitch along the edge of the casing.
This casing is nice and wide and should easily accommodate a 1/2” wide ribbon or twill tape.

Pin the edge of a 36” long piece of ribbon or twill tape to a safety pin and pull through casing. Repeat for opposite side.
Try on and tie for fit. Feel free to use a longer or shorter length of ribbon.


UPDATE- HOW TO MAKE A FACE MASK WITH A POCKET FOR A FILTER OR SHIELD
For those of you who would like to make a mask with a pocket for a filter, here are the steps to create that variation.
Cut one square 7 1/2”
Cut 2 rectangles 7 1/2 x 4 1/4
Take the two smaller rectangles and place them with their RIGHT sides facingtogether. Pin inward 1.5” in from each outside edge.

Stitch with a 1/2” seam allowance, leaving the center open.

Press the seams flat.
Top stitch along the seam line. This will help the fabric to lay flat.
Once you have pieced the fabric to make the pocket opening, if it is larger than 7 1/2”, trim to size.

Place the stitched piece with the split opening and the 7 1/2” square with their RIGHT sides facing together and continue as explained in step one of first tutorial.
The following picture is what it will look like after the casing is stitched.
Once complete, the opening should allow for a filter to be place inside. The split opening should fold nicely between the pleats.
If you look closely, this mask has a filter inside. Once the sides are pulled, the center pleat pulls tight so that the wearer does not feel the filter.
I hope that this tutorial is helpful. Please feel free to email with any questions.
Wash your hands, hug your kids and stay home and sew.
XOXO, Hilarie

HOW TO HAND SEW SEQUINS: A Course in Creating Custom Embellishments with Sequins
Recently I have been seeing a host of embellishments of all manner in fashion magazines and on the runways. Perhaps since clothing shapes and silhouettes are holding steady, embellishment is a way to make clothing new and enticing. Whether it’s just a sprinkling here and there or an all-over design, embellishment is a fun way to both personalize and dress up your wardrobe.
This winter I discovered that one of my favorite sweaters had been enjoyed by some moths. Uggh! However, instead of being upset, I decided that this presented the perfect opportunity to create a design that I had been playing around with in my mind and repair my beloved sweater.
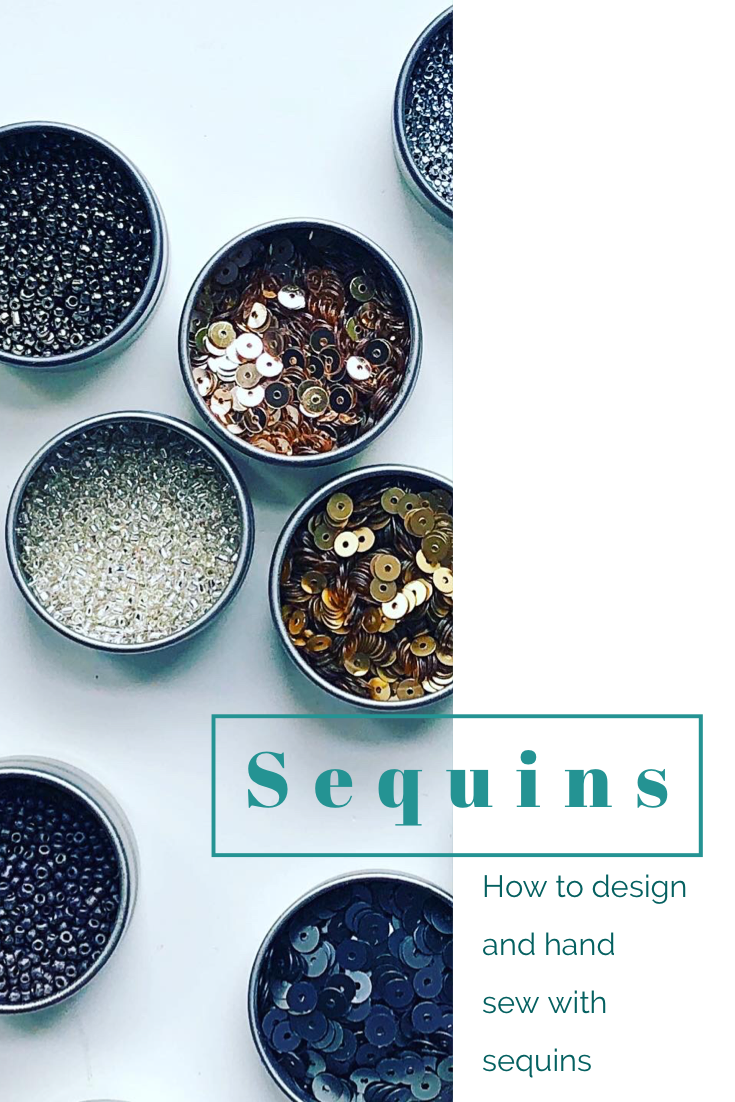

The design that I had in mind was something between a leopard print and a paisley. Initially I wanted it to be more leopard, but the scale of the paisley seemed more fitting. Also, I really wanted the design to only be on the front of the sweater as beads and sequins- especially when sewn to a knit have the tendency to rub. Then there is the issue of of placement. A leopard or paisley print with unfortunate motif placement could look ridiculous very quickly. I did not want to draw any undue attention to my bustline.
In order to clear this hurdle, I made a few shapes to pin on the sweater to determine the best placement and repeat. Once I was pleased with the placement, I began to sew. It took probably 10-12 hours to complete, but I am quite happy with the result and even more pleased knowing that my once loved sweater may now last me another 15 years.
Want to try your hand at embellishing a sweater? The steps below outline how I did it, but they can be adapted to any sequins pattern you create.
You’ll Need:
Sequins, I used one ounce of 5mm
Thread, Ideally, fil a gant, or gloving thread.
Contrast or Basting Thread (all purpose is fine. Good time to use the odd ones:)
Pins and scissors
A sweater
HOW TO SEW SEQUINS BY HAND
Step 1. Create the design. You can follow mine or map out your own. Paper and pencil is a great place to begin. If you are in need of inspiration, look in your own wardrobe. Which motif’s do you seem to be drawn to? Polka dots? animal prints? stripes? Start there.
Step 2. Determine placement and design repeat. Do you want the design just on a specific part of your sweater? Or would you prefer an all-over design?
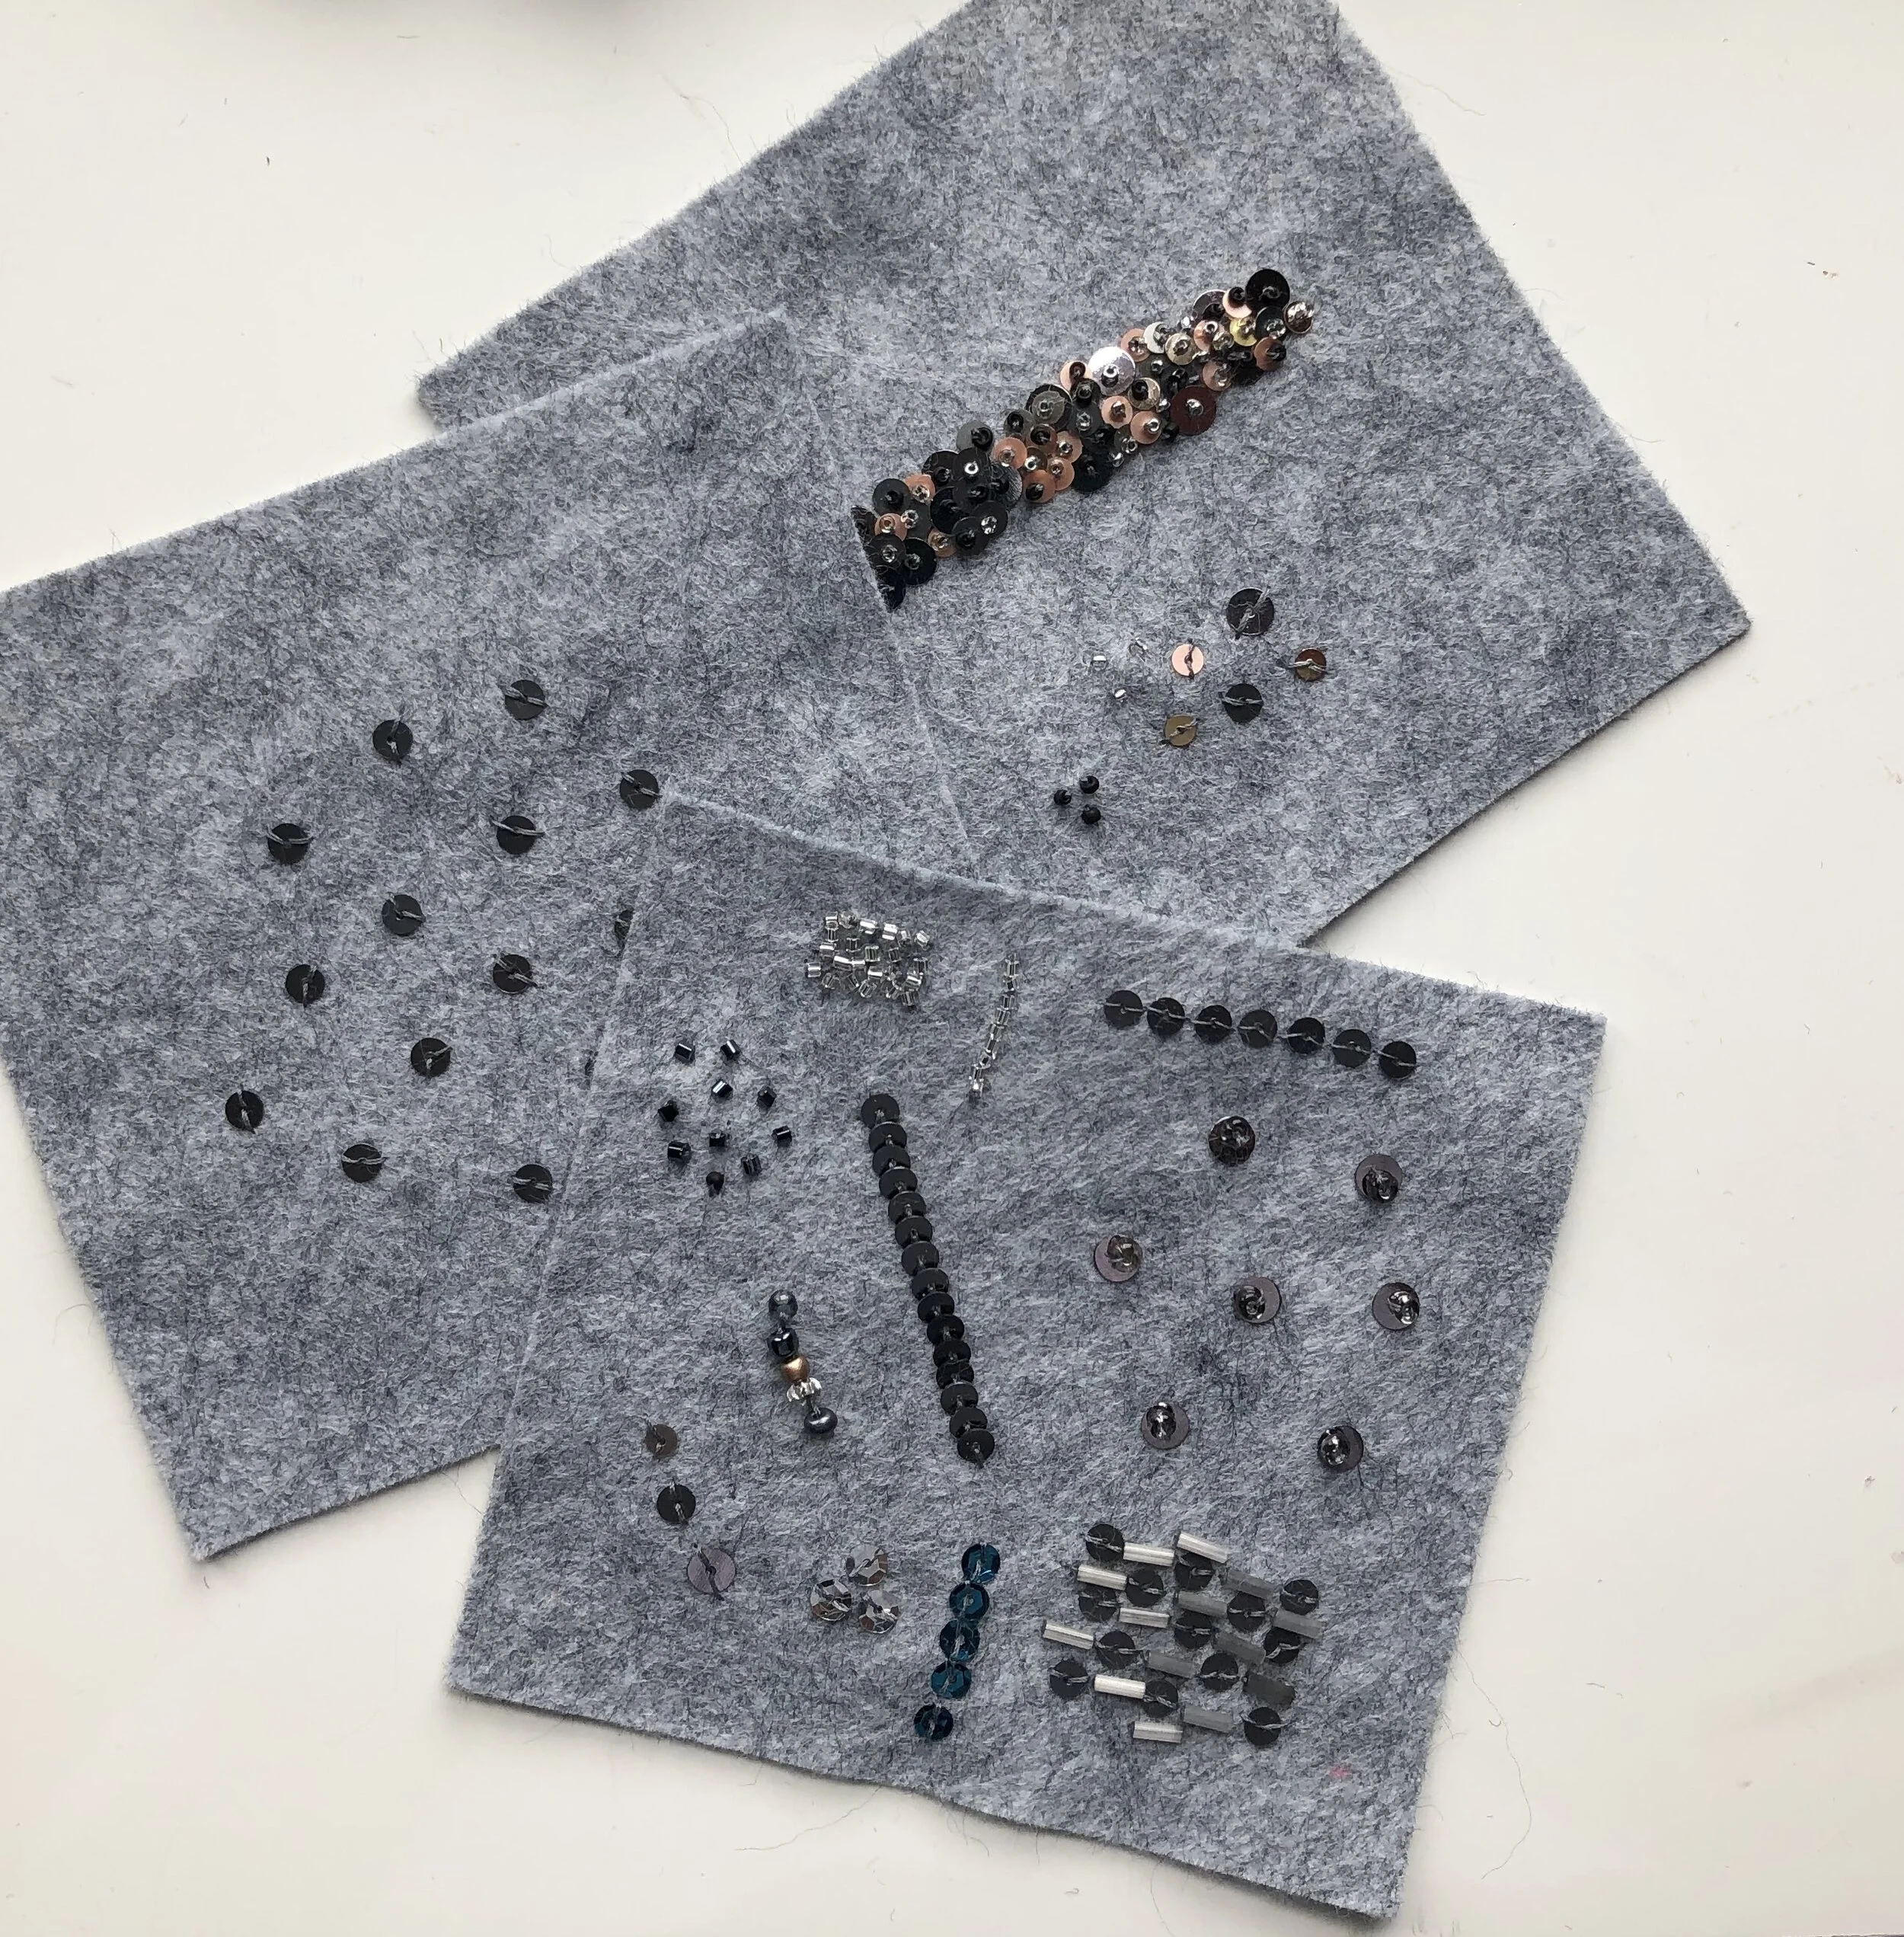
HOW TO HAND SEW OVERLAPPING SEQUINS
Sequins come in a variety of shapes and sizes. The ones that I chose are flat and matte rather than the sparkly cupped shaped ones. Sequins size range from 2mm all the way to 30mm. I tend to like the 3-15mm, as I can use an embroidery needle and thread to apply. While sequins can be applied by machine, I do enjoy hand sewing them. Though it does take some time, for speedier work, you can purchase pre-strung beads and sequins.
To hand sew sequins, the thread should be doubled and kept short to prevent twisting and knotting. Be sure to use a light hand as pulling stitches too tight, will create puckers in the fabric. Run your thread through the beeswax or thread magic.
Before adding the first sequin or bead in my pattern, I do like to make one small stitch in the fabric to secure.
To sew a line of overlapping sequin, begin by inserting your needle from underneath the fabric and pushing up.

Place a sequin on the needle and pull toward the fabric to place.

Bring the needle to the side of the sequin to stitch over the edge and coming back up through the center. Pick up a second sequin, place it so that it just overlaps the first and stitch over the edge to secure. When you pull the thread, it should pull the sequin in its place.


Another view with all of the steps together. Once you get the hang of it, it really does begin to go rather quickly.
HOW TO HAND SEWN SCATTERED SEQUINS

For an all-over effect, this scattered design really packs a punch. I have a skirt that I made years ago that is embellished with an all-over pattern of sequins with a seed bead secured in the center.
HOW TO HAND SEW INDIVIDUAL SEQUINS

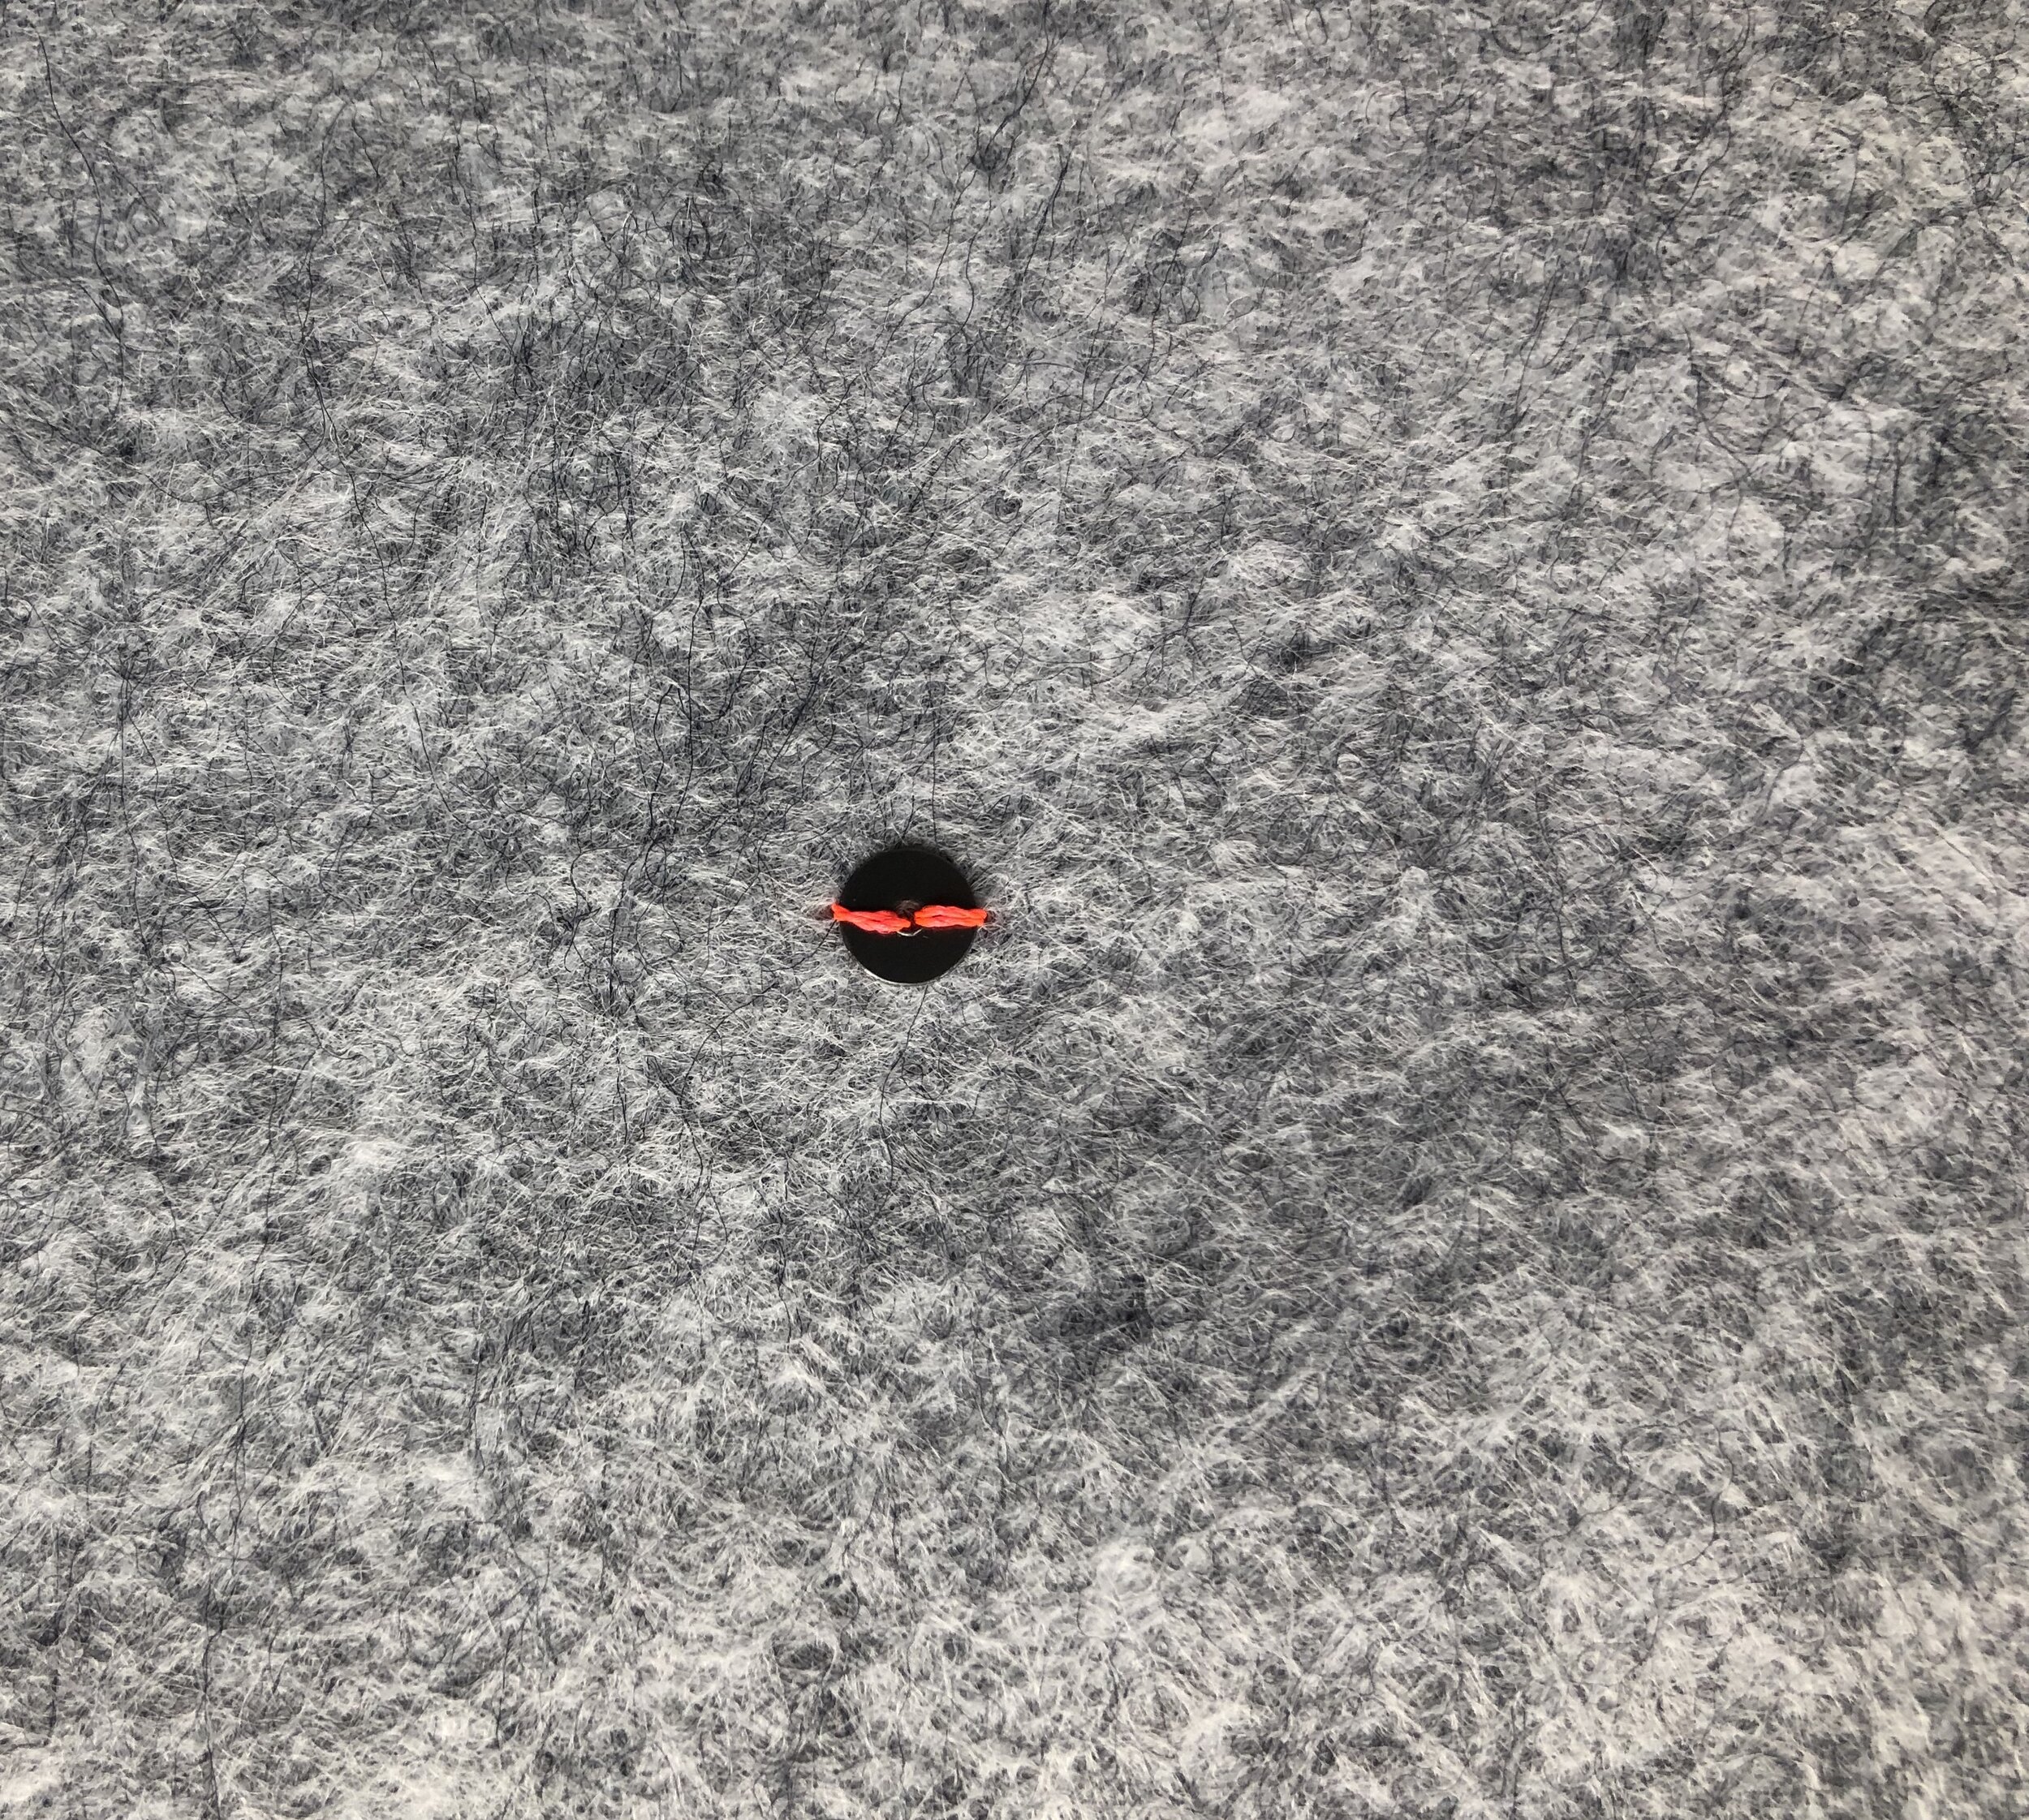
Begin in the same manner as before, with a small hand stitch to secure the thread to the fabric.
insert your needle from underneath the fabric and gently pull up. Thread the sequin to your needle and down the thread to place.

Insert your needle just over the edge of the sequin, through the back and try to come out just to the opposite side.

Push the needle back into the center of the sequin and pull toward the back.

Here are all of the steps again, in order.
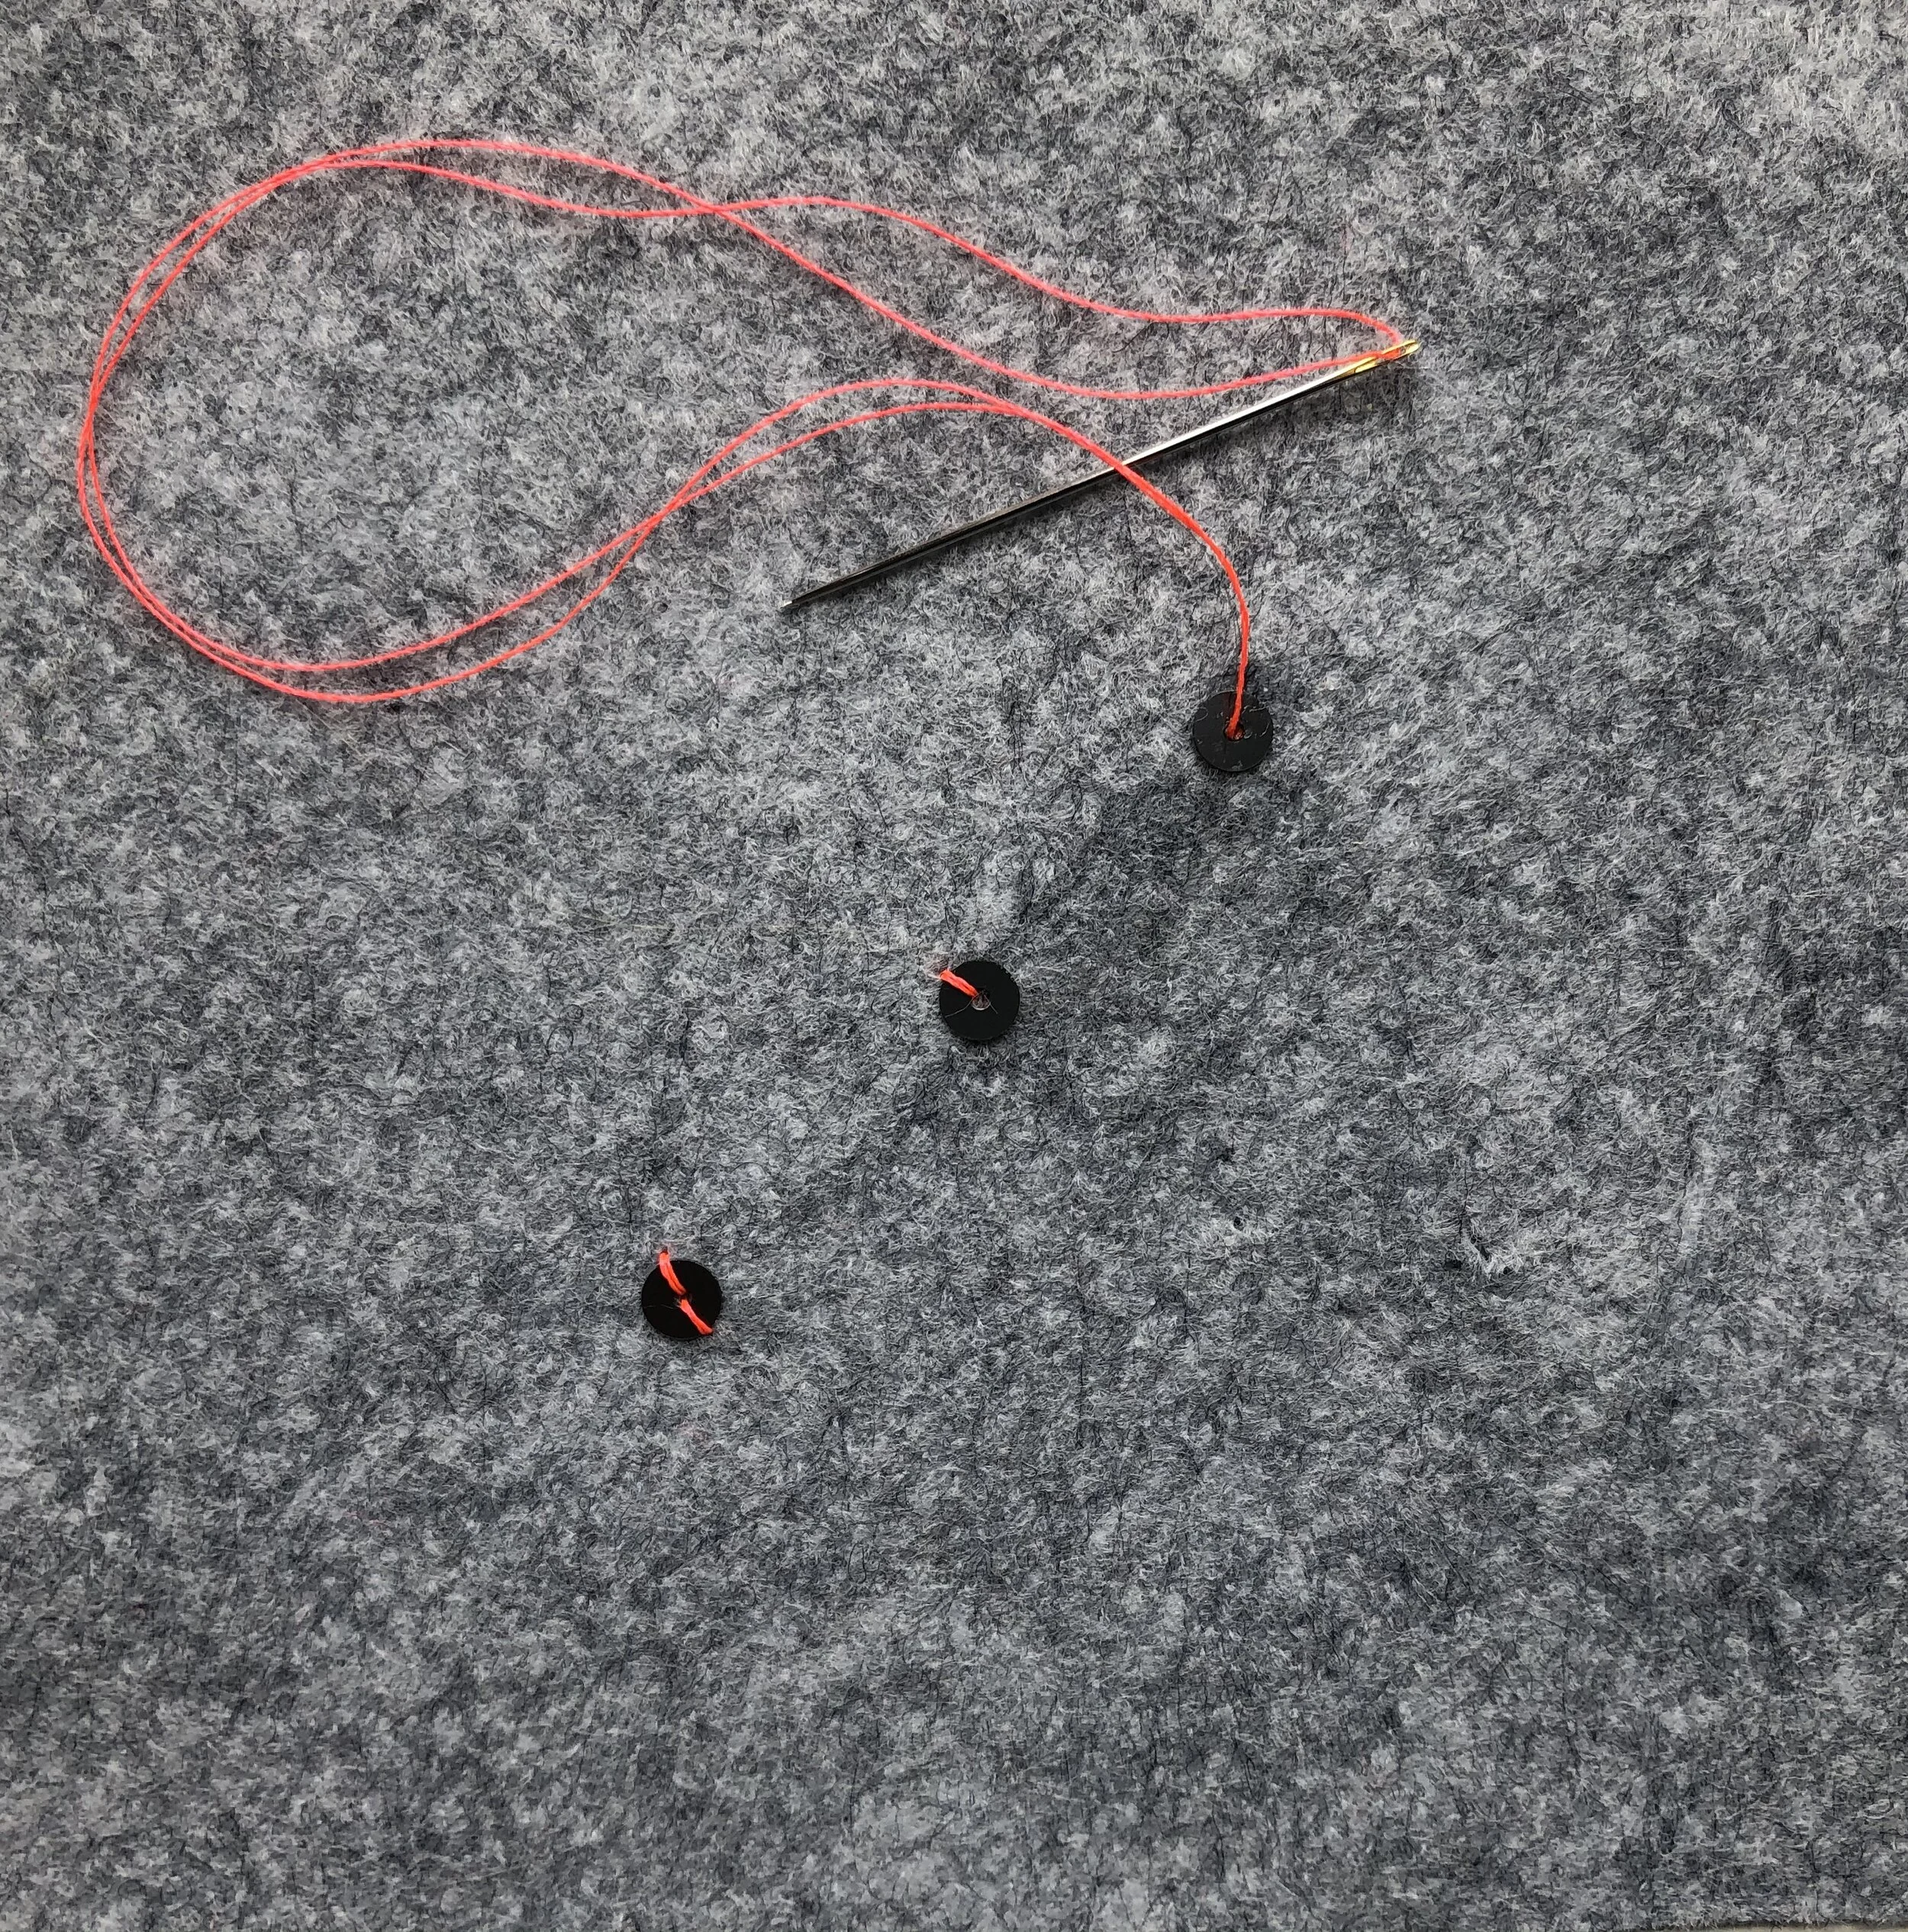
As you complete each sequin, you can knot the thread off at the back of your work or just carry it over to the next sequin.
PUTTING IT ALL TOGETHER

My new/old sweater!
Before applying the sequins to my sweater, I outlined each shape with contrasting thread. Then I began to apply the sequins in an overlapping manner following the outline and filling in as I went along.

Remove basting thread and move onto second row of outlining.

Third row of following the outline.

A few more sequins to fill in the center and it is done!

This repair was to an old sweater and one that I have hand-washed many times. However, if you plan to embellish a garment that you might need to dry clean or that you would like to more easily remove the sequins, you could sew each motif separately onto a pieces of organza or tulle as individual appliqués and then stitch them onto your garment.
I have worn the sweater several times since this repair and I have to say, I do love the sparkly casual feel. While it is a bit dressier than many of my other sweaters, it is now a weekly favorite.
If you enjoyed this tutorial, I do have a Pinterest Board where I frequently pin ideas for refashioning and embroidery. Check them out!
XO, Hilarie

Reflections
Have you ever watched yourself on video? If you have, then you might describe it as an entirely shocking, altogether horrifying experience. Or at least cringe worthy. Growing up in the 70’s and 80’s, cameras were really only brought out on occasion, to document something that you wanted to remember. I can’t recall when my family got a video camera, but it was definitely later in life. Maybe in college? I do know that I was at least old enough to not have had to be on the recorded side of it. As I write this, a thought just struck me, I wonder if this new, young generation of kids will ever feel that way about seeing themselves on screen? Maybe since video has woven its way into the day to day experience, they have a wholly different attitude toward it? Perhaps they have grown accustom to seeing themselves in motion and they are more comfortable with their image as opposed to their reflection?
Have you ever watched yourself on video? If you have, then you might describe it as an entirely shocking, altogether horrifying experience. Or at least cringe worthy. Growing up in the 70’s and 80’s, cameras were really only brought out on occasion, to document something that you wanted to remember. I can’t recall when my family got a video camera, but it was definitely later in life. Maybe in college? I do know that I was at least old enough to not have had to be on the recorded side of it. As I write this, a thought just struck me, I wonder if this new, young generation of kids will ever feel that way about seeing themselves on screen? Maybe since video has woven its way into the day to day experience, they have a wholly different attitude toward it? Perhaps they have grown accustom to seeing themselves in motion and they are more comfortable with their image as opposed to their reflection?
This week, I received a blog post from C&T Publishing. Great, I thought, I wonder what it will be about. Imagine my surprise, upon opening, to be met with my picture and a video that we made at Quilt Market last fall to promote my book. To be honest, I was horrified. As of this moment, I still haven’t watched more than the first minute of it. I clicked on the link and immediately panicked when I saw it already had 12 likes and 3 thumbs down. Uggh. Thumbs down? That put my anxiety into an immediate whirlwind.
After thinking about it for the past few days, I asked myself what advice I would give to a friend or even to my own child when met with a similar situation. That change in perspective is a good reminder that growth does not come without challenges. If I want to write and sell books, I need an audience. People like video content- I get that. So, with the goal of growth in mind, I am putting aside my pride and thin skin and going to watch the video.
To be ever mindful that my work is a direct reflection of my own developing state. My intention in sharing with you is to get over the shock and horror and focus instead on how I can improve. To that end, how can I make it better? Is it content? More practice? Presentation skills? If you have a few minutes, I would truly value your thoughts.
Now, who is ready to learn how to modify purse straps with leather?