

THE PRACTICAL GUIDE TO BUYING YOUR FIRST SEWING MACHINE
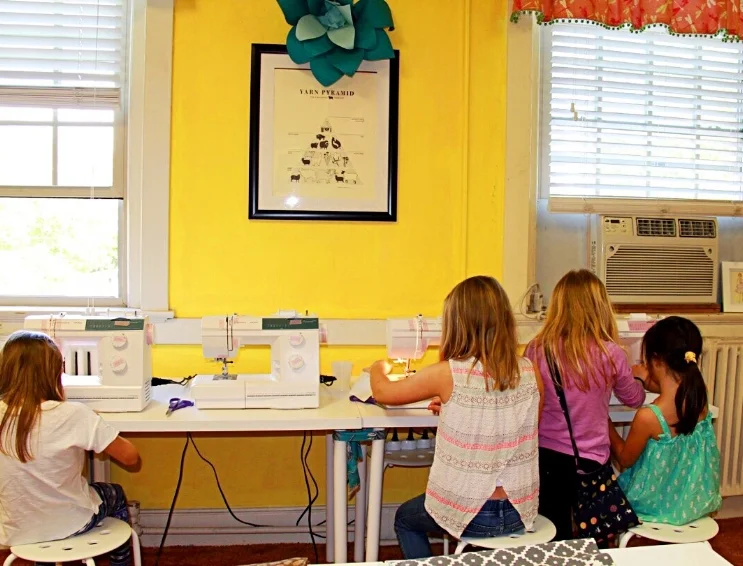
It’s that time of year again! Beginning in early November, each day I get a phone call, text or email requesting recommendations for purchasing a sewing machine. I love these conversations. The person calling (or writing) is interested in supporting the creative talents of someone special to them and wants a bit of guidance in selecting a machine that will meet the needs of the budding enthusiast today and provide them with room for growth.
No doubt about it, if you don’t sew, or haven’t shopped for machines lately, the options can be a bit overwhelming. Fear not, I’ve got your back. This guide will help to simplify your search and help you to make a savvy choice.
THE PRACTICAL GUIDE TO BUYING YOUR FIRST SEWING MACHINE

CLICK HERE FOR MY FREE GUIDE TO FABRICS AND FIBERS
It’s that time of year again! Beginning in early November, each day I get a phone call, text or email requesting recommendations for purchasing a sewing machine. I love these conversations. The person calling (or writing) is interested in supporting the creative talents of someone special to them and wants a bit of guidance in selecting a machine that will meet the needs of the budding enthusiast today and provide them with room for growth.
No doubt about it, if you don’t sew, or haven’t shopped for machines lately, the options can be a bit overwhelming. Fear not, I’ve got your back! This guide will help to simplify your search and help you to make a savvy choice.
I have sewn for more than 45 years and have spent the last 9 years teaching others to sew. In this time, I’ve tried a lot of sewing machines. While machines certainly offer some incredible functions and convenience features, for the most part, they do the same thing; they stitch layers of fabric together. Sounds simple, right? Yes and no. As with so much in life, the devil is in the details.
UNDERSTANDING YOUR SEWING NEEDS AND GOALS
Sewing machines are designed for both utility and for specific needs. The types of projects that you will be making as well as the kinds of fabric you use, will dictate the features you'll need. It may be helpful to jot down your project ideas and a list of the types of fabrics you’ll likely use most.
What types of projects do you plan to make? Are you sewing for kids or with kids? Do you want to make mostly clothing or quilts and home décor items? Will you be sewing with denim or leather? Answering these questions will help you to find a machine that will support your creative work.
You see, sewing requires constant adjustment in both the mechanical settings and in the way that the fabric is manipulated. Depending on the structure of the fabric you are sewing with (woven, non woven, stretch), as well as its weight, and finish, the machine settings will need to be adjusted to facilitate a smooth stitch. Some machines will automatically make many of these adjustments for you, while others need to be changed manually.
GET MY FREE COMPREHENSIVE GUIDE TO UNDERSTANDING FABRICS AND FIBERS.
Have you ever walked into a fabric store and felt completely overwhelmed? I hear you! To help you to find the perfect fabric for your project, I’ve written a guide to understanding fabrics and fibers. You will learn the characteristics of plant fibers, animal fibers, and synthetics, as well as fabric structure and finish. I also provide some general guidelines for needle selection, thread, stitch type and length, seam finish, pressing, handling and care. Be sure to grab it before you leave!
Choosing a well-designed sewing machine makes learning to sew a much more enjoyable process. A sewing machine is an investment and something that you will likely be using for a very long time. Even if you don’t use it every day, when you sit down to sew, you want it to work. For that, dependability is key.
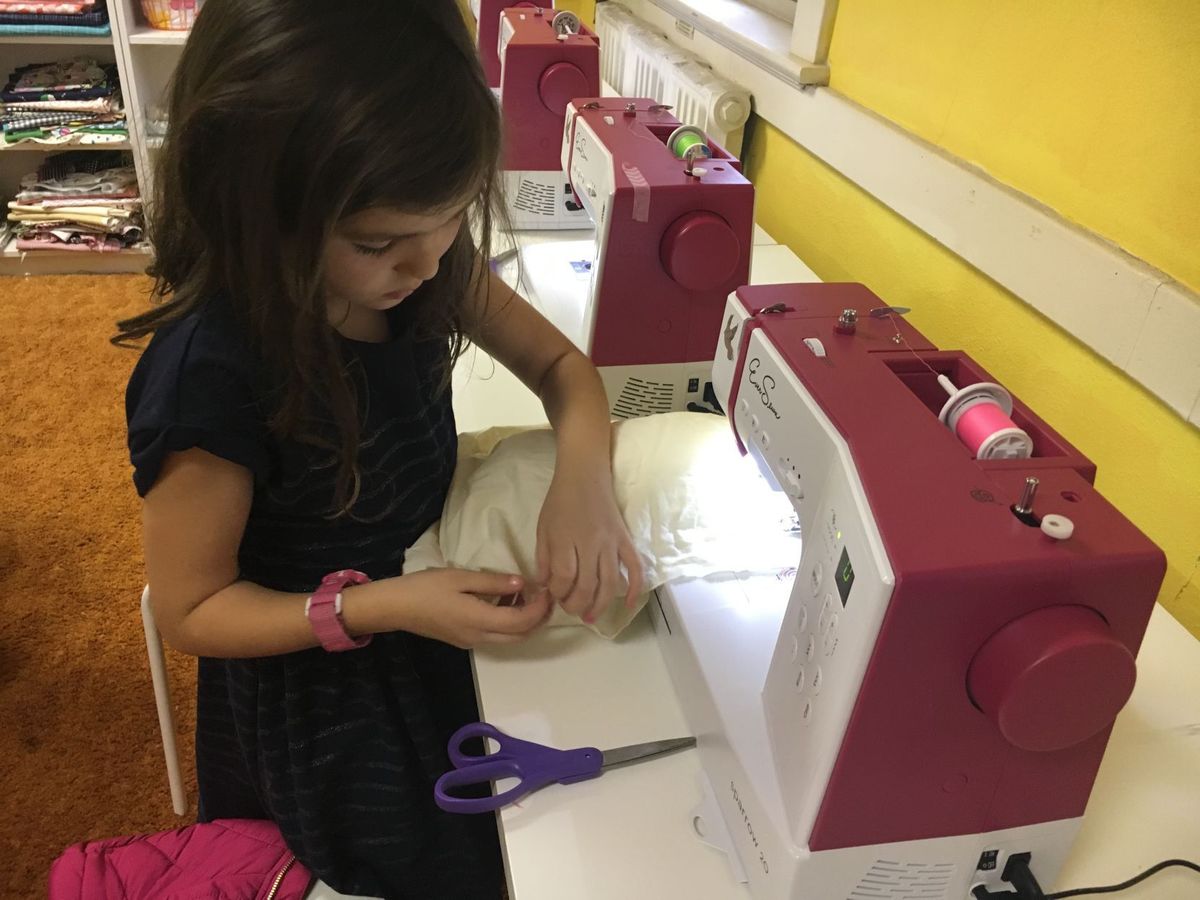
TYPES OF SEWING MACHINES
Sewing machines fall into three broad categories based on motor type: Mechanical, Electronic, and Computerized.
I generally suggest that beginners purchase a mechanical machine. There are a few reasons for this. The first, they are great machines to learn on. Everything you need to control the stitching is right there in front of you. This makes it easier to begin to understand the working relationship between the needle, the stitch type, width, length, the thread, fabric, and the resulting stitch. When something goes wrong, and it will, the more you know about the machine, the easier it is to trouble shoot. As you progress in skills and want more features, a mechanical machine will be a great back up to take to classes, or when your more expensive machine needs repairs or is just too fussy to deal with.
If you have been sewing for a bit and want some extra features, an electronic machine might be a good fit. Electronic machines strike a balance between simplicity and functionality, offering room to grow into more advanced sewing without the complex interface of a computerized machine. You will find lots of decorative stitches and even an alphabet, plus convenience features such as a thread cutter, needle up/down button and automatic needle threader, speed control, and automatic thread tension adjustment. Electronic machines still require the user to control the settings, but with buttons rather than dials.
Once you have gained some skills and are ready for advanced features, Computerized machines are an option to consider. They are loaded with all types of stitches as well as specialized and convenience features. (Most of which you will never use). However, if you sew a lot, you may want to try one out. You can expect to find built in tutorials, embroidery function, a large work area, the ability to programming the machine for thread weight, needle type and size, and weave of fabric.
TRY BEFORE YOU BUY
A sewing machine dealer or local fabric shop is going to be your best bet for purchasing a machine. If you are new to sewing, you can go in and talk with a salesperson. They will ask you a few questions to assess they type of machine that will suit your needs and budget, then invite you to sit down to try a few out. The staff are knowledgeable and want to help you find the best machine for your needs. Plus, many dealers offer free classes with the purchase of a machine as well as on site repairs.
I really encourage you to shop at a few dealers to try their machines. Dealers generally specialize in a single brand or two of machines. When you find a machine that you love, you will know it immediately.
Pro tip: When I shop for a machine, I like to bring my own thread and a few different types and weights of fabric to test how the machine behaves. This way I can see how it sounds, feels, and stitches.
FEATURES
Domestic sewing machines of all types will offer a straight stitch, zig zag stitch and a buttonhole function. They also come with a set of accessories including, a basic set of presser feet, a standard foot, a zipper foot, and a buttonhole foot. You may also get a few extra bobbins, a seam ripper, a cleaning brush, a package of needles, a screwdriver, and a manual.
Some machines may offer additional accessories such as an extension table, walking foot, overlock foot, blind hem foot, or even an invisible zipper foot. These items can always be purchased separately. You will just need to make sure that they are compatible with your machine.
The types of fabric and projects that you make will dictate the other accessories and features that you will need. Since I primarily sew clothing and accessories, these are among my favorites.
A variable stitch width and length This allows you to customize the length and width each stitch.
Needle up/ down the needle up/down feature works as an extra hand. It is terrific when sewing corners and points so that your actual hands are free to guide the fabric.
Bright LED lights. Essential for being able to see what you are doing.
Adjustable presser foot pressure. Not all fabrics feed through the sewing machine with the standard pressure. Some will drag and others are thick causing the machine to leave marks. The ability to adjust the pressure can improve the quality of your stitching.
Auxiliary spool pin I’m impatient and frequently too short on time. An auxiliary spool pin allows me to wind a new bobbin without having to unthread the sewing machine. While I can do without a lot of features, this one is very important to me.
A good stretch stitch for sewing knits. When sewing, you want the stitches to sit flat and embed only slightly in the fabrics surface. Knit fabric can be tricky to sew with because they stretch. While you can sew knits with a zig zag stitch, the stretch stitch looks and lasts better. If you plan on sewing with knits, take a sample sized fabric with you and try the stitch out.
Walking Foot or Dual Feed These allow each layer of fabric to feed evenly without shifting and sliding. They are great for sewing leather, matching plaids, and stripes as well as for working with thicker fabric.
Optional feet and accessories Sewing machines come with a variety of sewing feet attachments. The ability to just purchase a specialty tool or foot for my machine means that I will use it for more projects and when some new accessory comes out- instead of upgrading my machine, I can just get that new foot or needle plate and experiment.
BUDGET
Within these categories of machines, there are a broad range of prices. While you do need to keep a budget in mind, you do not have to break the bank to get a good sewing machine. At the same time, you also don't want to shy away from quality. To get a quality machine that will last, plan to spend at least $300.
A note on buying a sewing machine for kids. As cute as they are, you want to steer away from toy machines. They are often more frustrating than they are functional. Instead, opt for a real sewing machine that will provide a solid foundation with which to learn and grow. You will want to look for a sturdy mechanical or electronic sewing machine equipped safety features such as a foot pedal, speed control, and finger guard. Kids are hard on sewing machines. A better-quality machine with all metal parts, a wide, sturdy base, and a warranty will be a wise investment. It might even get you sewing too!
RECOMMENDATIONS
Before I make any specific sewing machine recommendations, there are a few things that I’d like to note.
The machines that I recommend are ones that I personally own or have sewn on. This list is not comprehensive, and I do not receive anything from these companies if you click on the link or purchase. These are just the machines that I prefer and trust.
I am a BERNINA brand ambassador. Which means that I am a representative of the company and get to learn all about the exciting new machines and accessories. If you are in the market for a BERNINA Sewing Machine, please contact me and I will be happy to discuss with you.
BERNINA is a 5th generation family-owned company based in Switzerland. They manufacturer the highest quality of sewing machines, which are produced in modern factories that pay their employees a living wage. The factories were updated about a decade ago with an eye toward sustainability and reducing their carbon footprint. BERNINA also has a diffusion line of machines called bernette. I use bernette machines in my classroom.
This might sound like an advertisement- it’s not. I do not receive anything for sharing my opinion or get any monetary benefit from your purchase. It’s just my honest opinion.
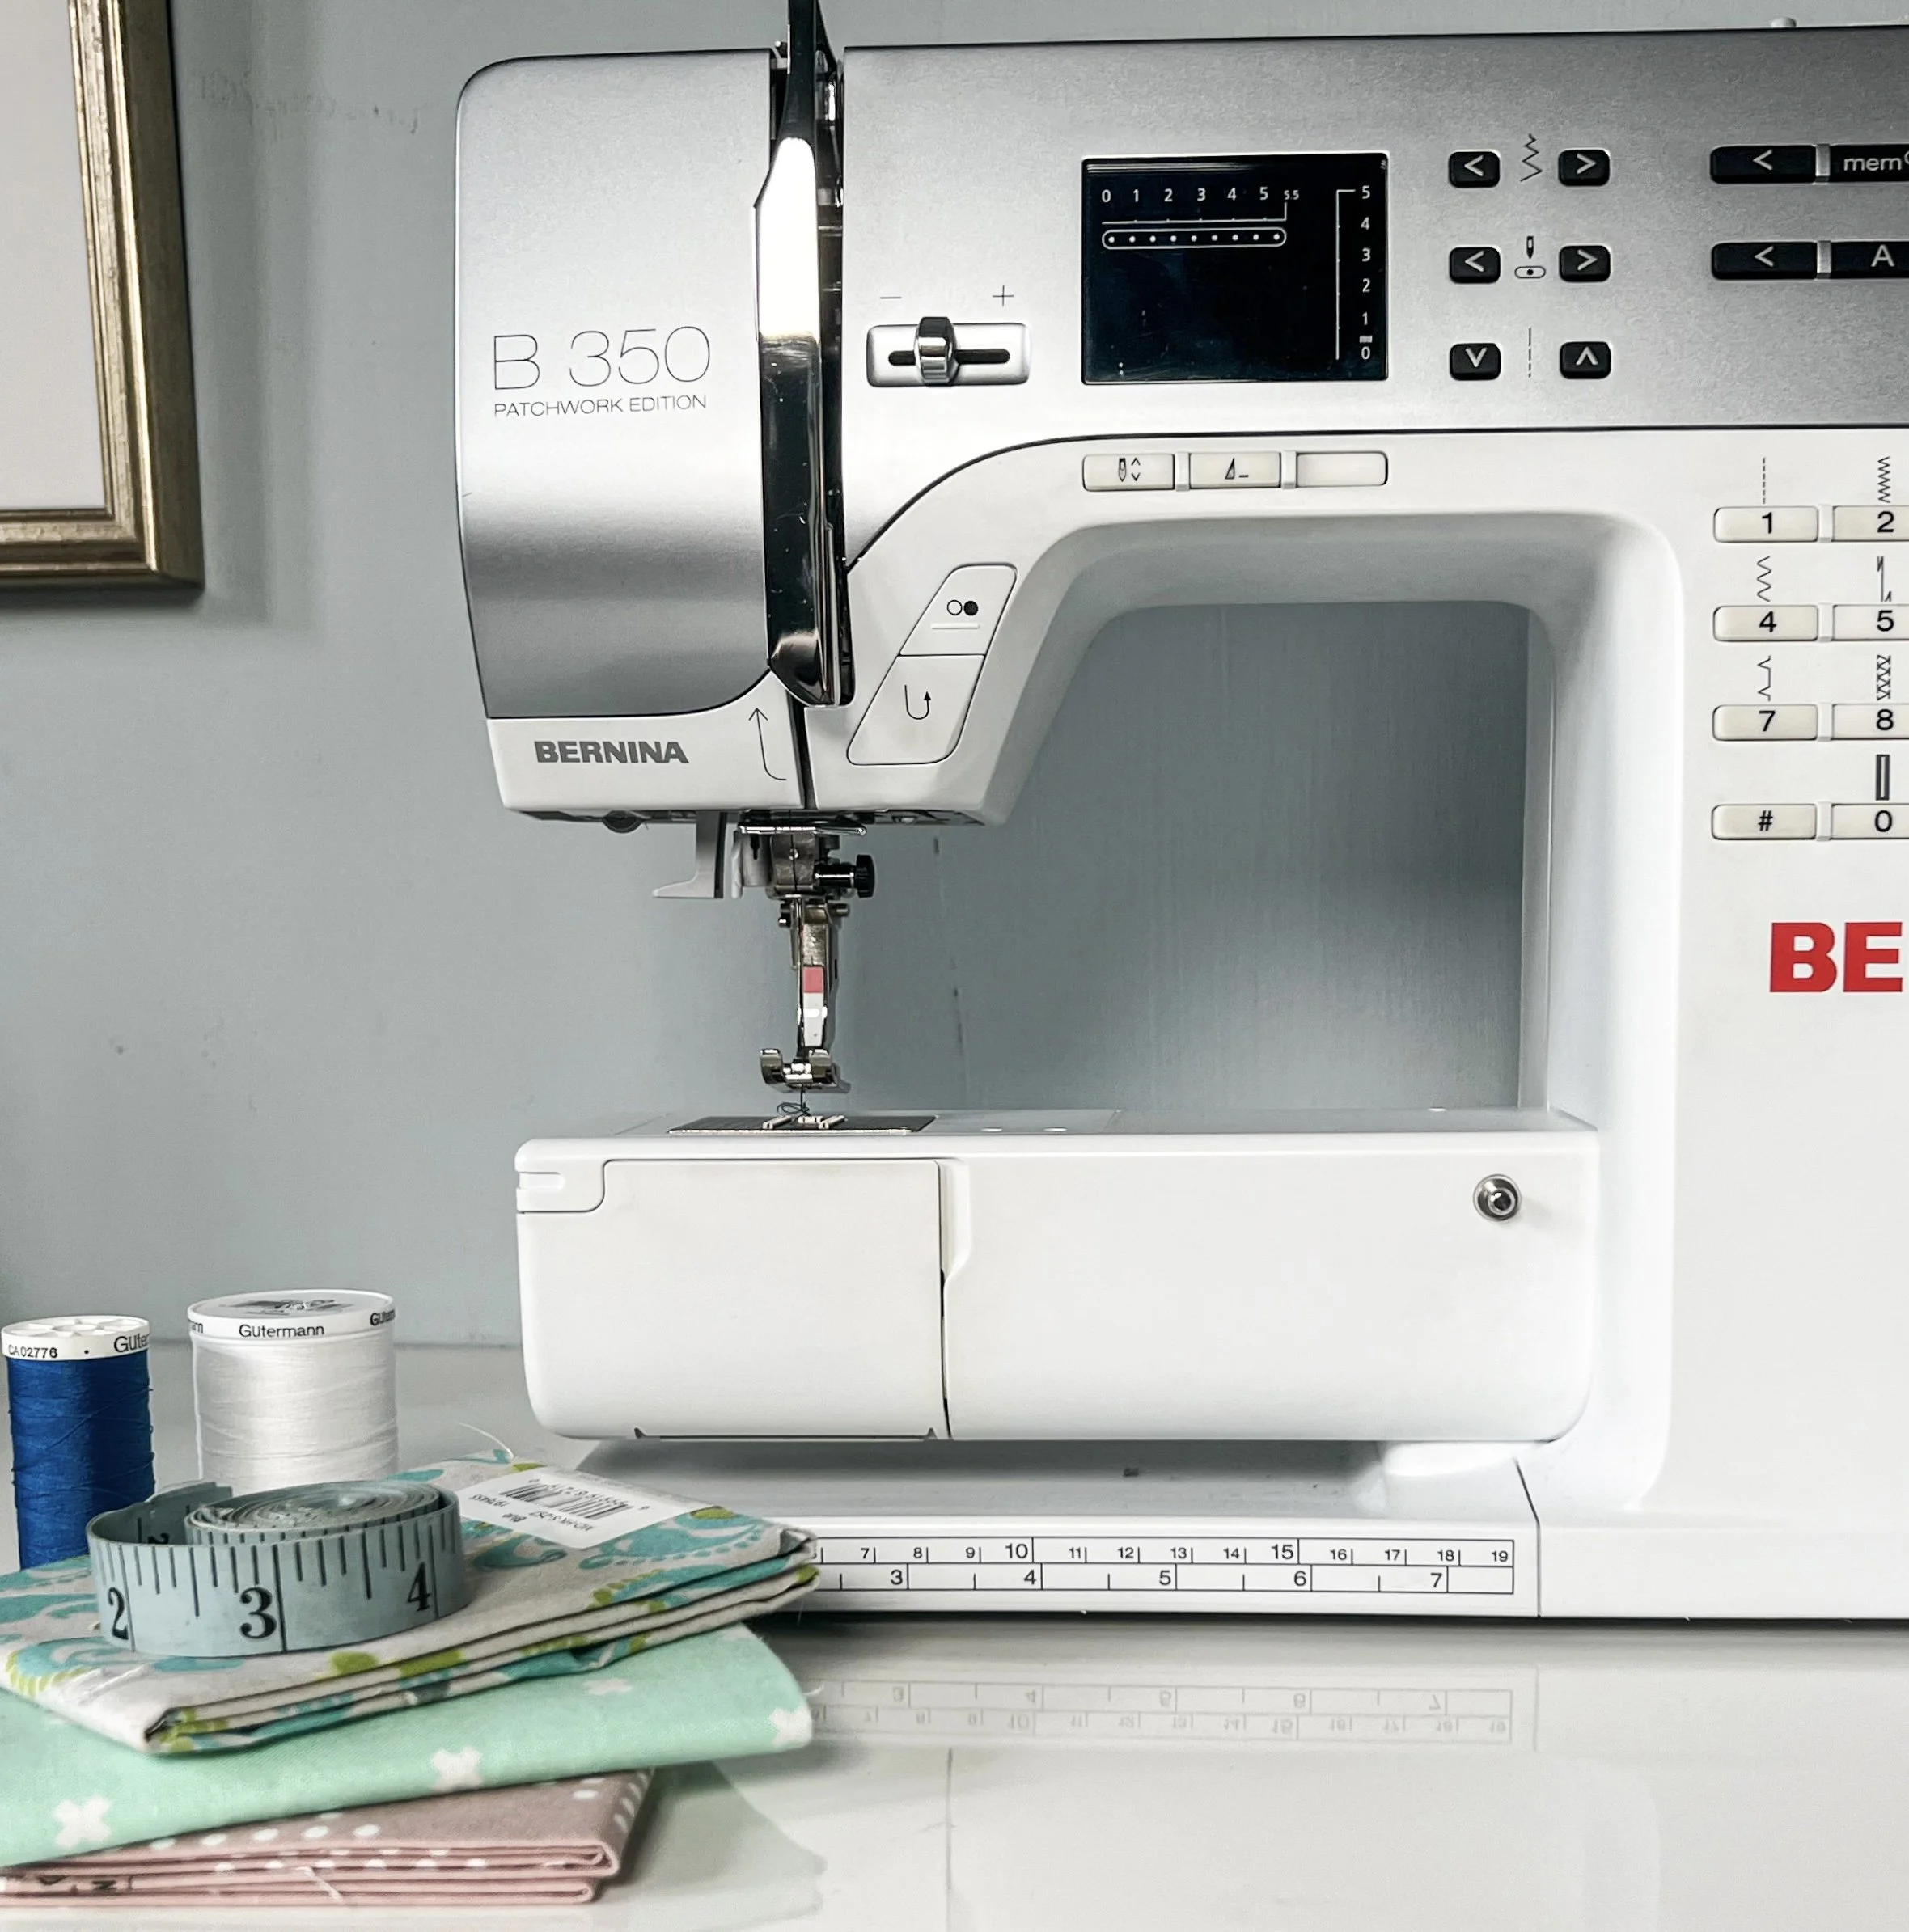
At my home studio, I have two main machines; BERNINA 350PE and 590E. (The 350PE is no longer available, but this one is similar). The 350PE is hands down my favorite sewing machine ever. It has all the features you would expect from an electronic machine, with the ability to add new feet and accessories, but still simple to use. I basically turn it on, thread it and go. It sews through anything. (All of the bags in my first book, Sew Bags: The Practical Guide to Making Purses, Totes, Clutches & More, were made on this machine).

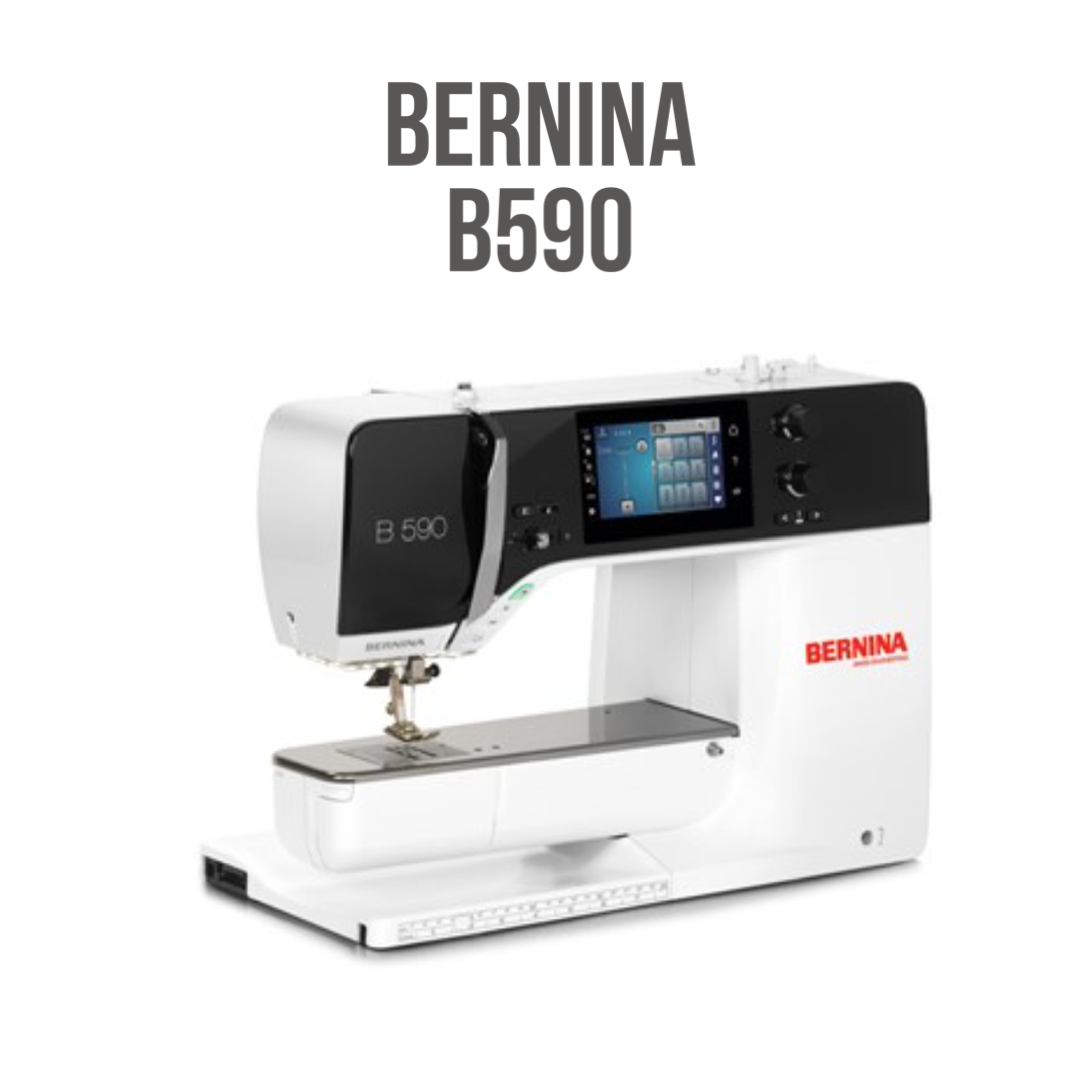
The 590E is my fancy machine, meaning I mostly use it for creative sewing or for precision sewing (the tricky stuff!) as it allows me to fine tune every detail. From typing in the exact brand, color, and weight of thread to programming my foot pedal, no detail is too small to customize. Fussy, right? Yes, but sometimes a project calls for perfection.
I have written a few other posts over the years on sewing machines. My recommendations haven’t changed. However, some of the specific machines may be discontinued or have updated models.
At Little Stitch Studio, I have suite of bernette B38s as well as a B79 for quilting and embroidery. These machines are quite impressive and suitable for all types of sewing projects and levels of experience. bernette machines are available in mechanical, electronic, and computerized models. They are solid machines that have intuitive features, sturdy construction, and lots of accessories.
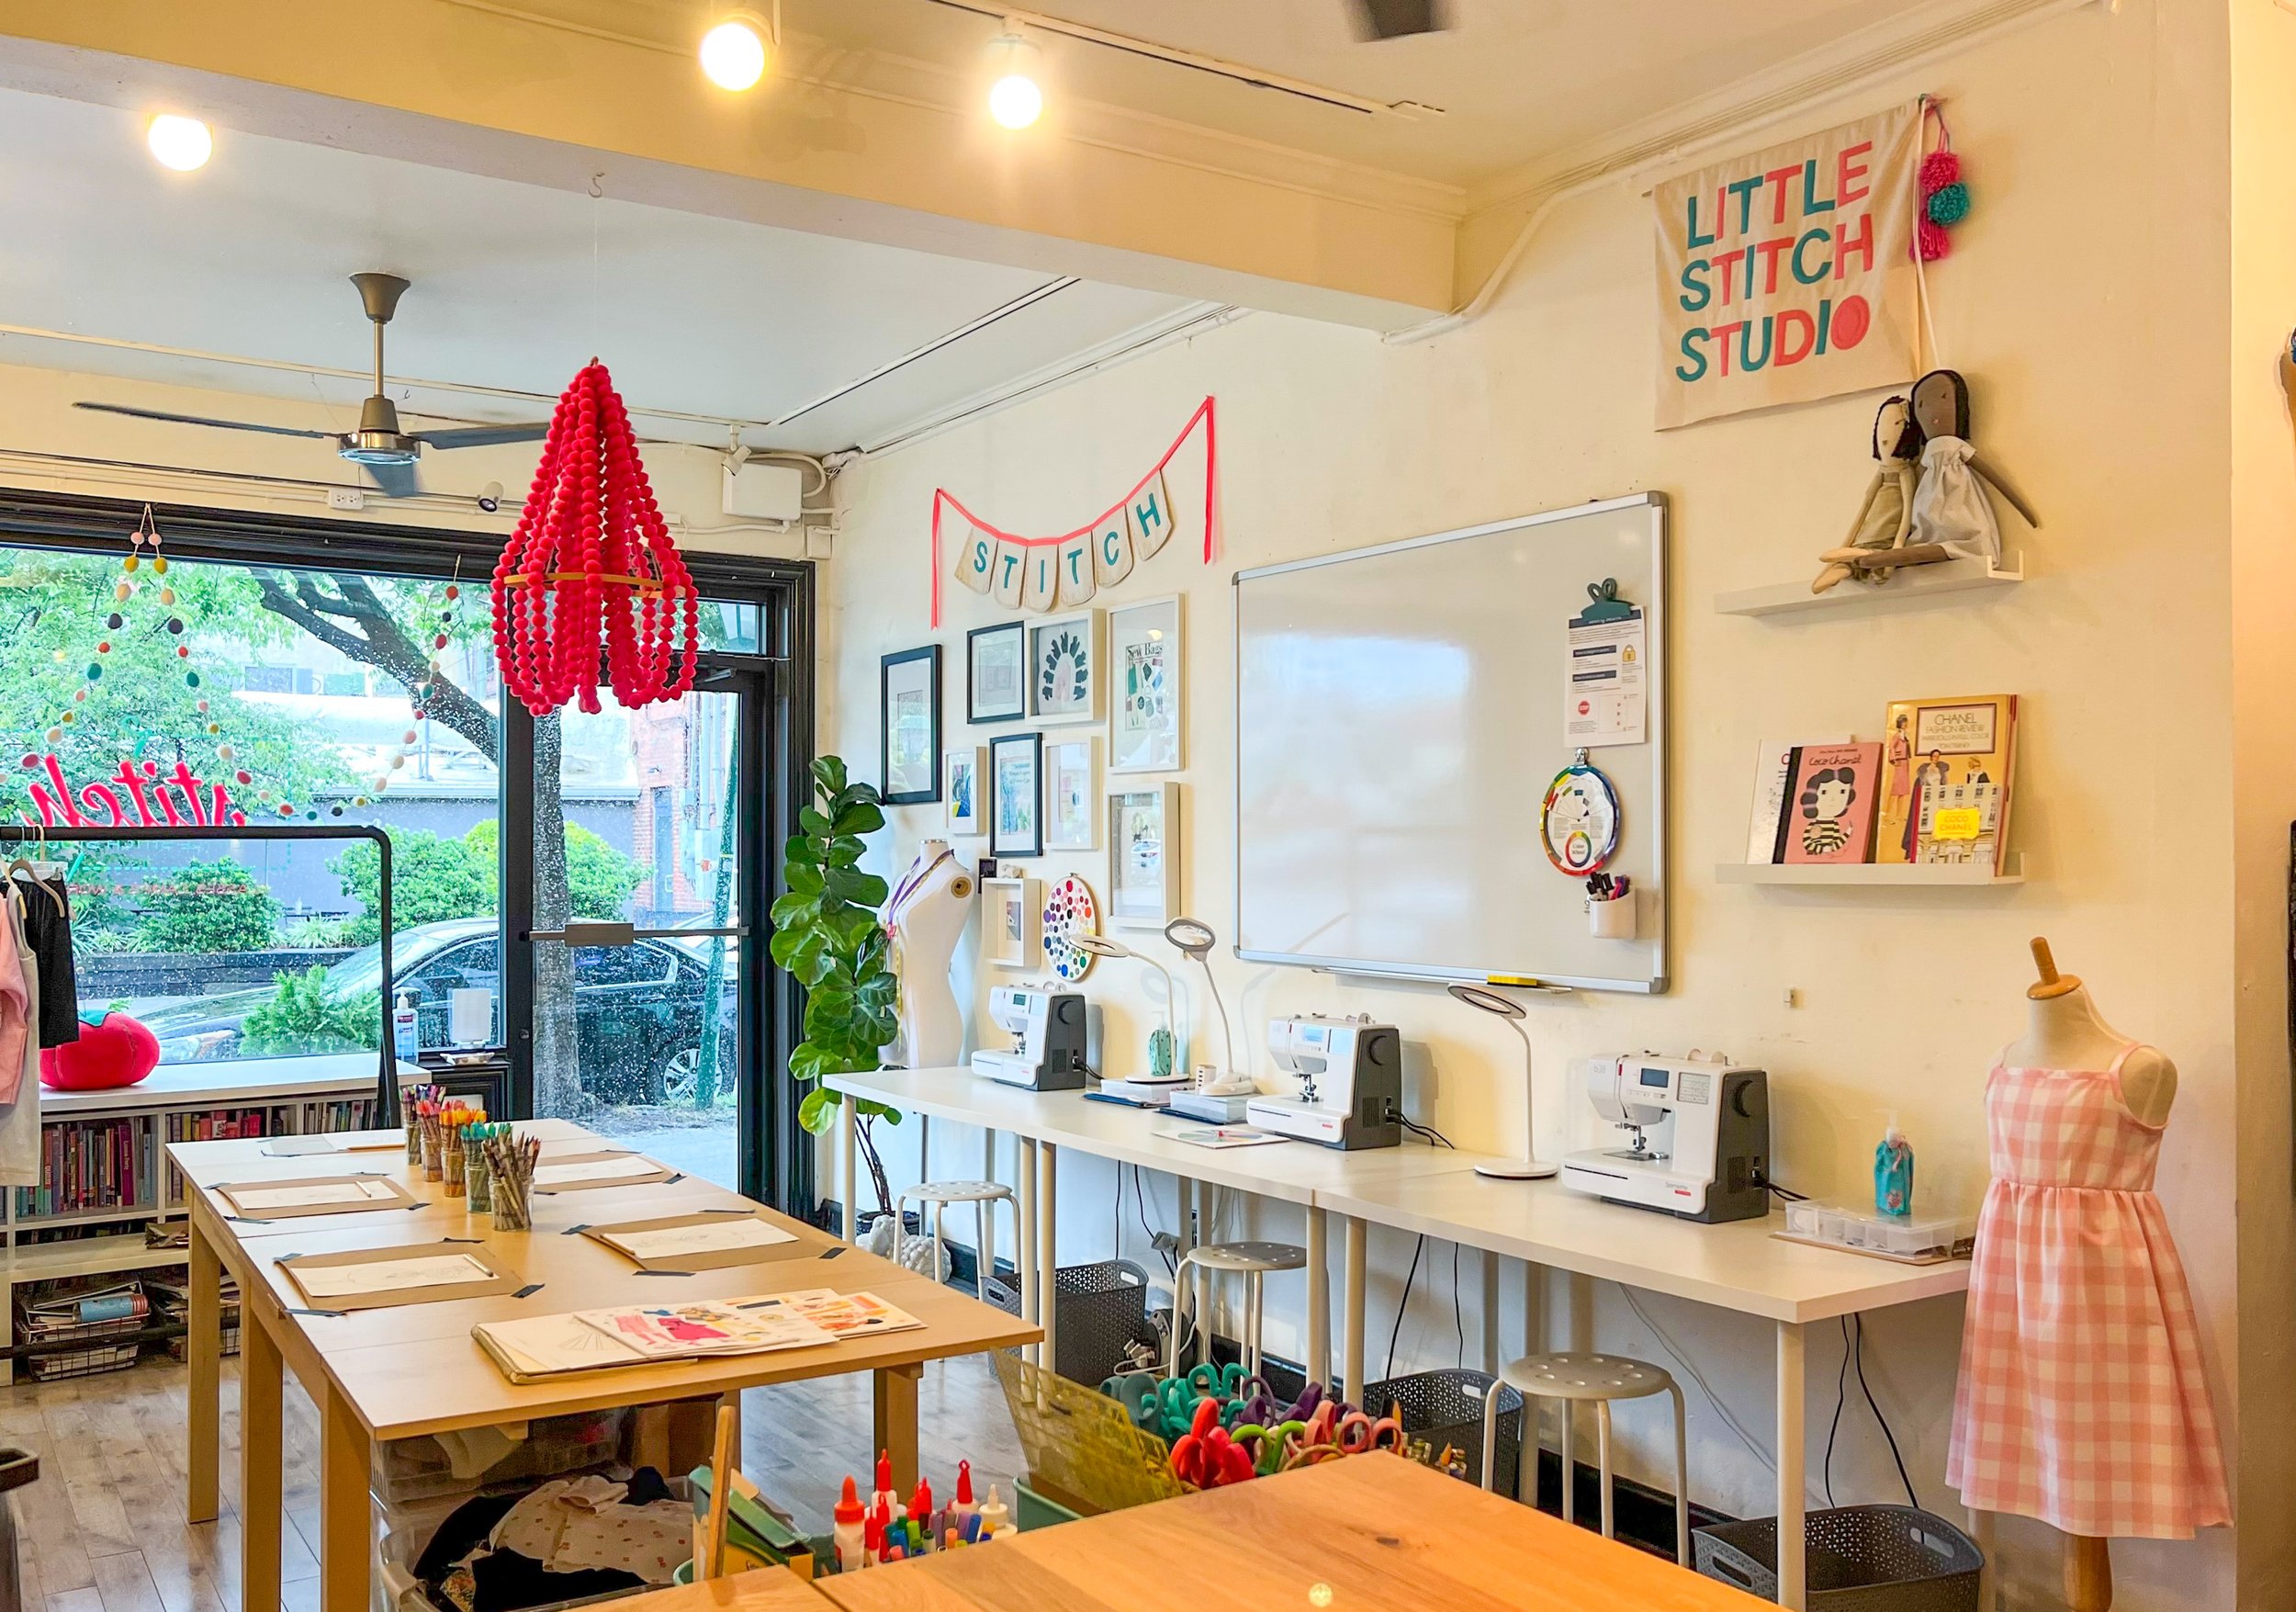
Little Stitch Studio, Norfolk, VA
The b38 is the top model of the 30 series bernette machines. This means that it has the most features and functions. There are some others that I highly recommend for consideration.

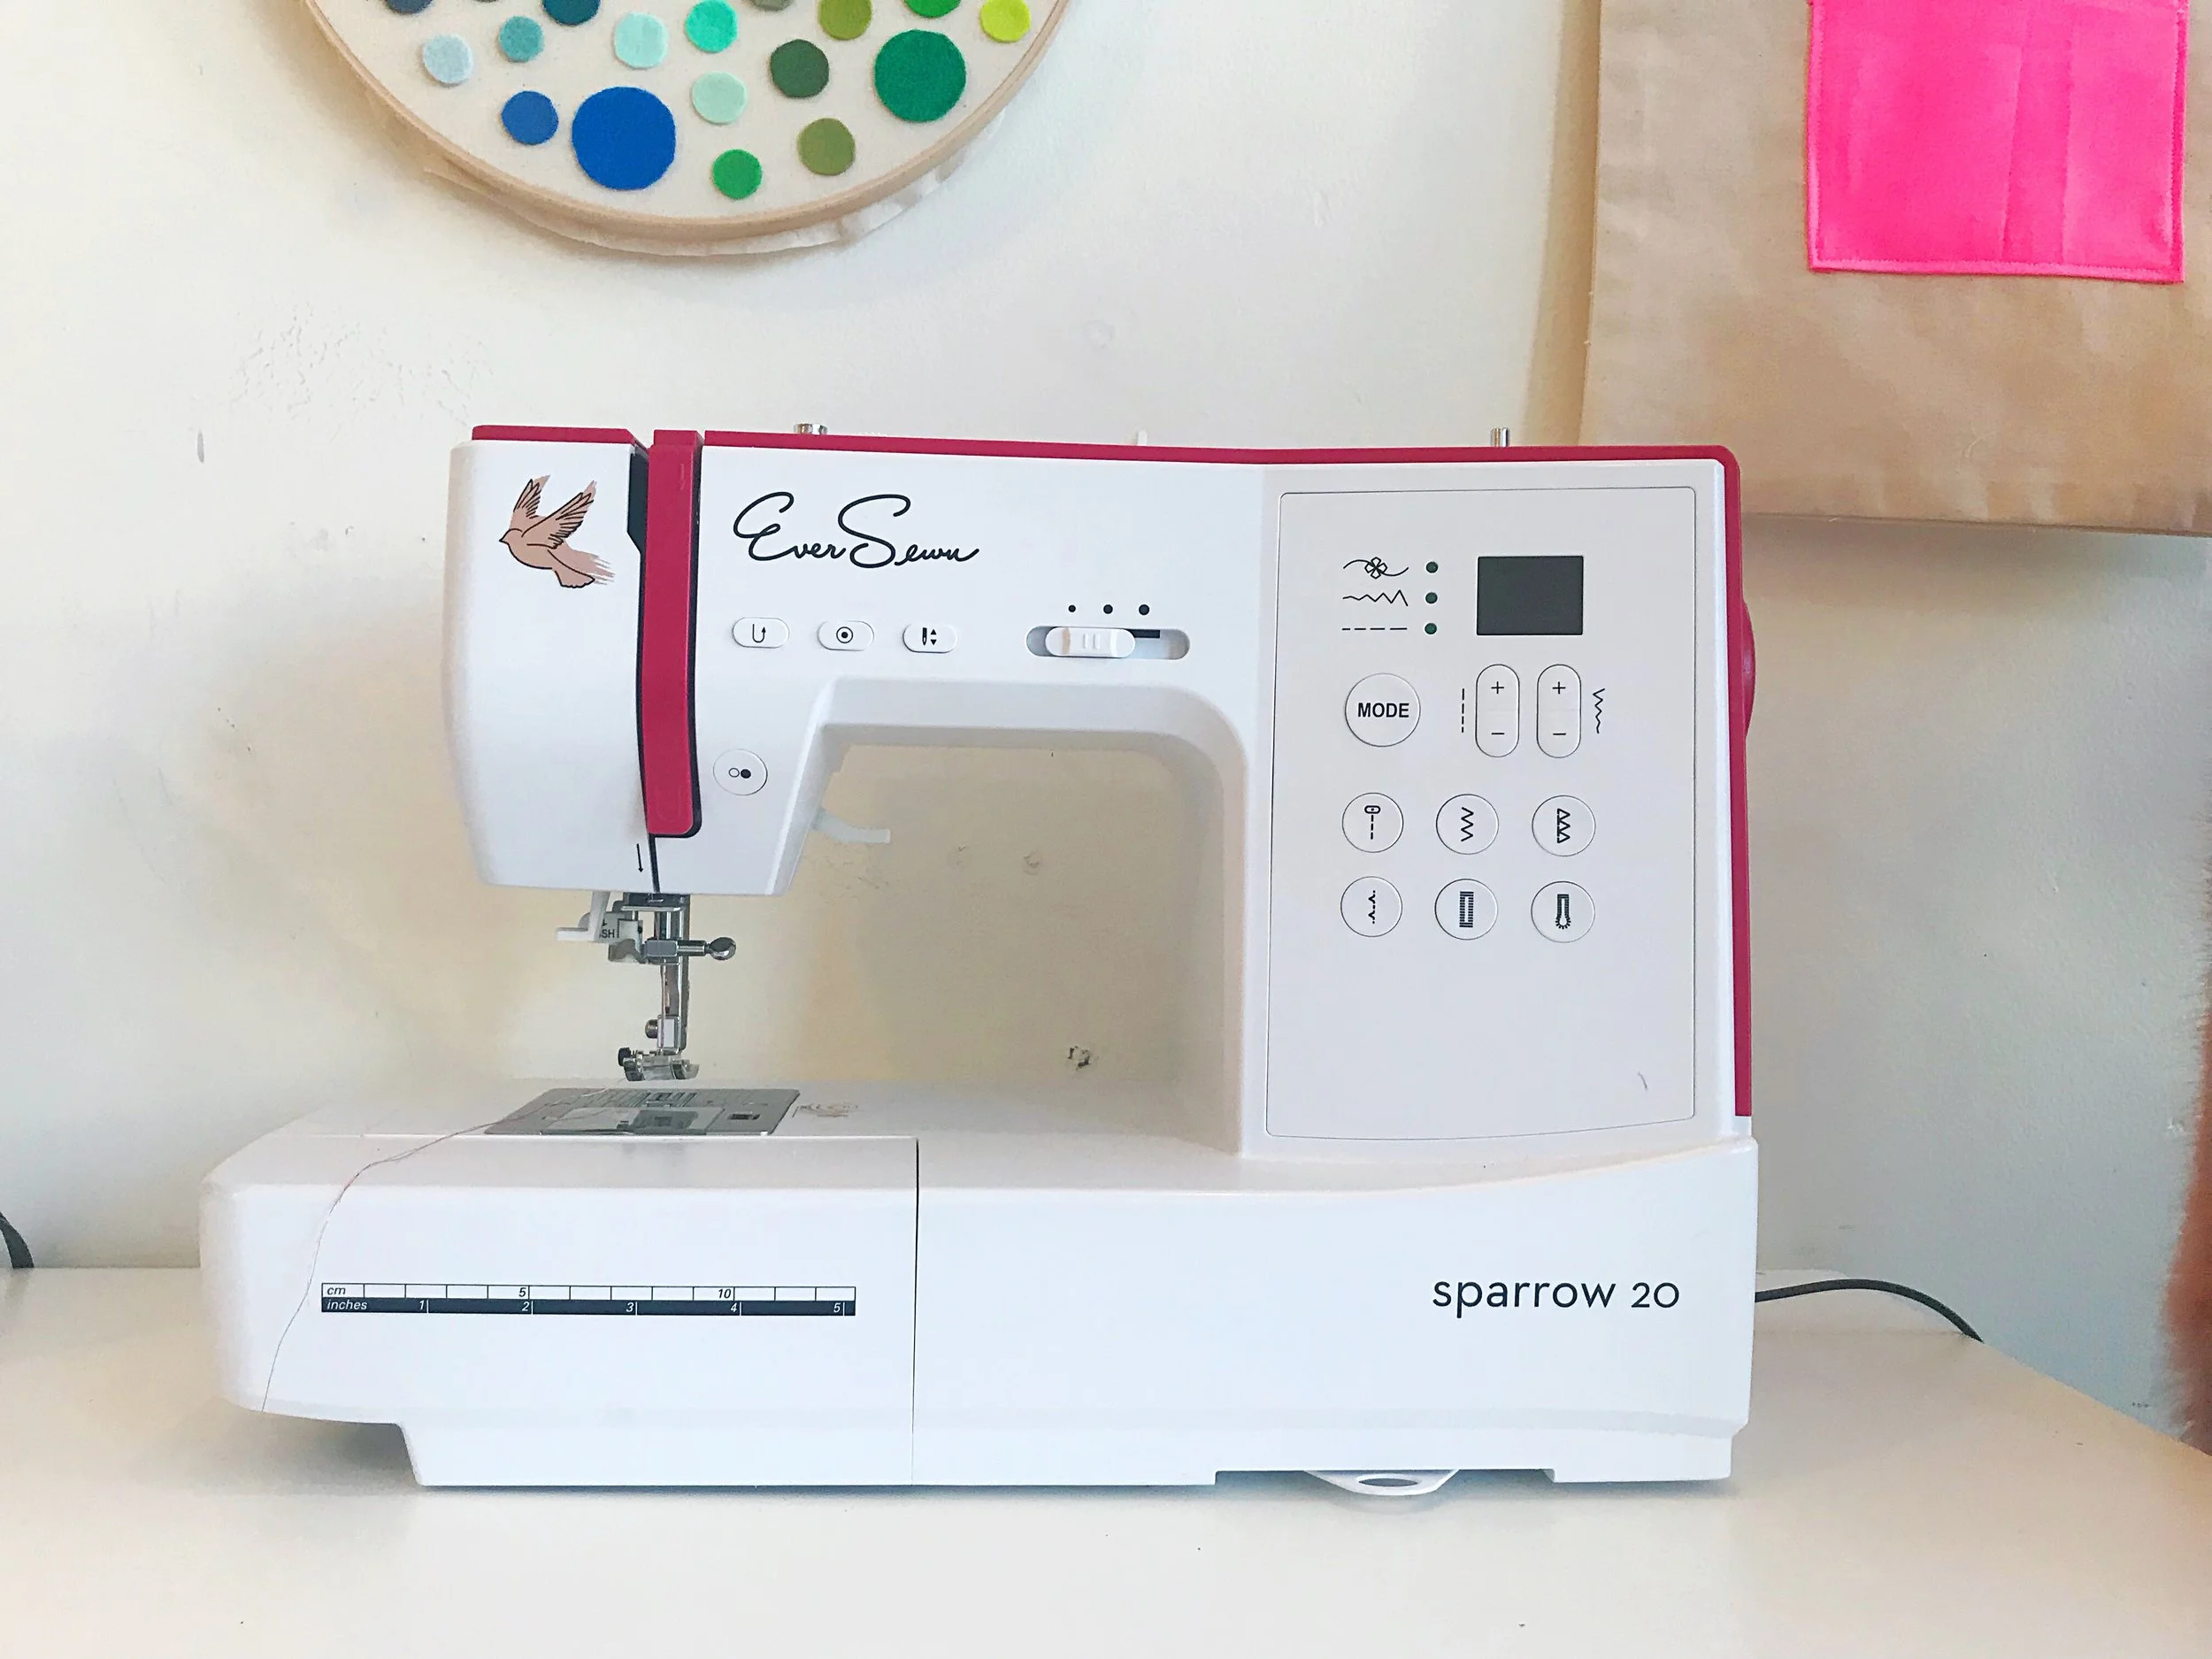
Kid Favorite: The Eversewn Sparrow line features mechanical, electronic, and computerized sewing machines. They are some of the most kid friendly machines that I have used. They have a solid weight, intuitive features and sew reliably well. The machines were designed to appeal to a younger customer, one who is enthusiastic about sewing and wants a machine that is both durable and packed with thoughtful features that are typically available in more expensive machines.
Janome, Juki, Pfaff, Baby lock and Viking are among the best sewing machines available. You can’t go wrong with any of them. I will highlight a few individual models but know that these are reliable brands that will last and likely to be passed down through generations. I recommend that you look through the websites and compare the features and prices.
This Janome model has been around for a bit and for good reason. It is an “entry-level” mechanical machine from a dependable brand. This machine is an anniversary edition and comes with a little bag of extra accessories.
I have this Juki machine and have recommended it to many friends and students. It has the ability to sew through several layers of fabric and keep an even tension. Plus the little turtle and rabbit icons help the youngest sewers monitor their speed. (Juki is the standard in industrial sewing machines and their domestic machines meet a similar standard).
Pfaff is another cult favorite brand, with good reason. (I had a young student bring a 1980’s Pfaff into class last week. It belonged to her grandmother and is still going strong! That goes to show you the value of quality and longevity).
Before I purchased my first BERNINA sewing machine, I was a longtime Husqvarna Viking user. In fact, the first machines that I purchased for my studio when I began teaching were the Emerald 118. The Emerald 118 is a mechanical machine that is straight forward, no bells and whistles, but durable and produces a quality stitch. If you plan to do a lot of heavy duty sewing, this is a machine that you will want to seriously consider.

My first location in a room at Ghent Methodist Church, in Norfolk, VA. Those sweet little girls are all teenagers now.
Brother machines are very popular for their price and convenience of buying them just about anywhere. I have some students (both kids and adults) that have them and have no complaints. They are machines that work and have loads of features. You can buy a fully computerized one for less than $300. It is important to note that I make this recommendation with reservation, as Brother machines have an attractive price and they do sew just fine. However, they are made in China and use a lot of plastic parts; this means that they are not going to last forever and is likely that when something breaks, it may not be worth fixing. I certainly don’t mean this to sound snobbish, instead, please understand that I value well made products that are built to last and to be maintained.
In conclusion, choose a machine that aligns with your sewing goals, the types of projects you'll undertake, and the materials you'll use. Whether it's for you or for a child, the right machine can make the journey into sewing a delightful one. And remember, I'm always here to help with personalized machine recommendations and advice to ensure your sewing success.
Happy Sewing!
XO, Hilarie

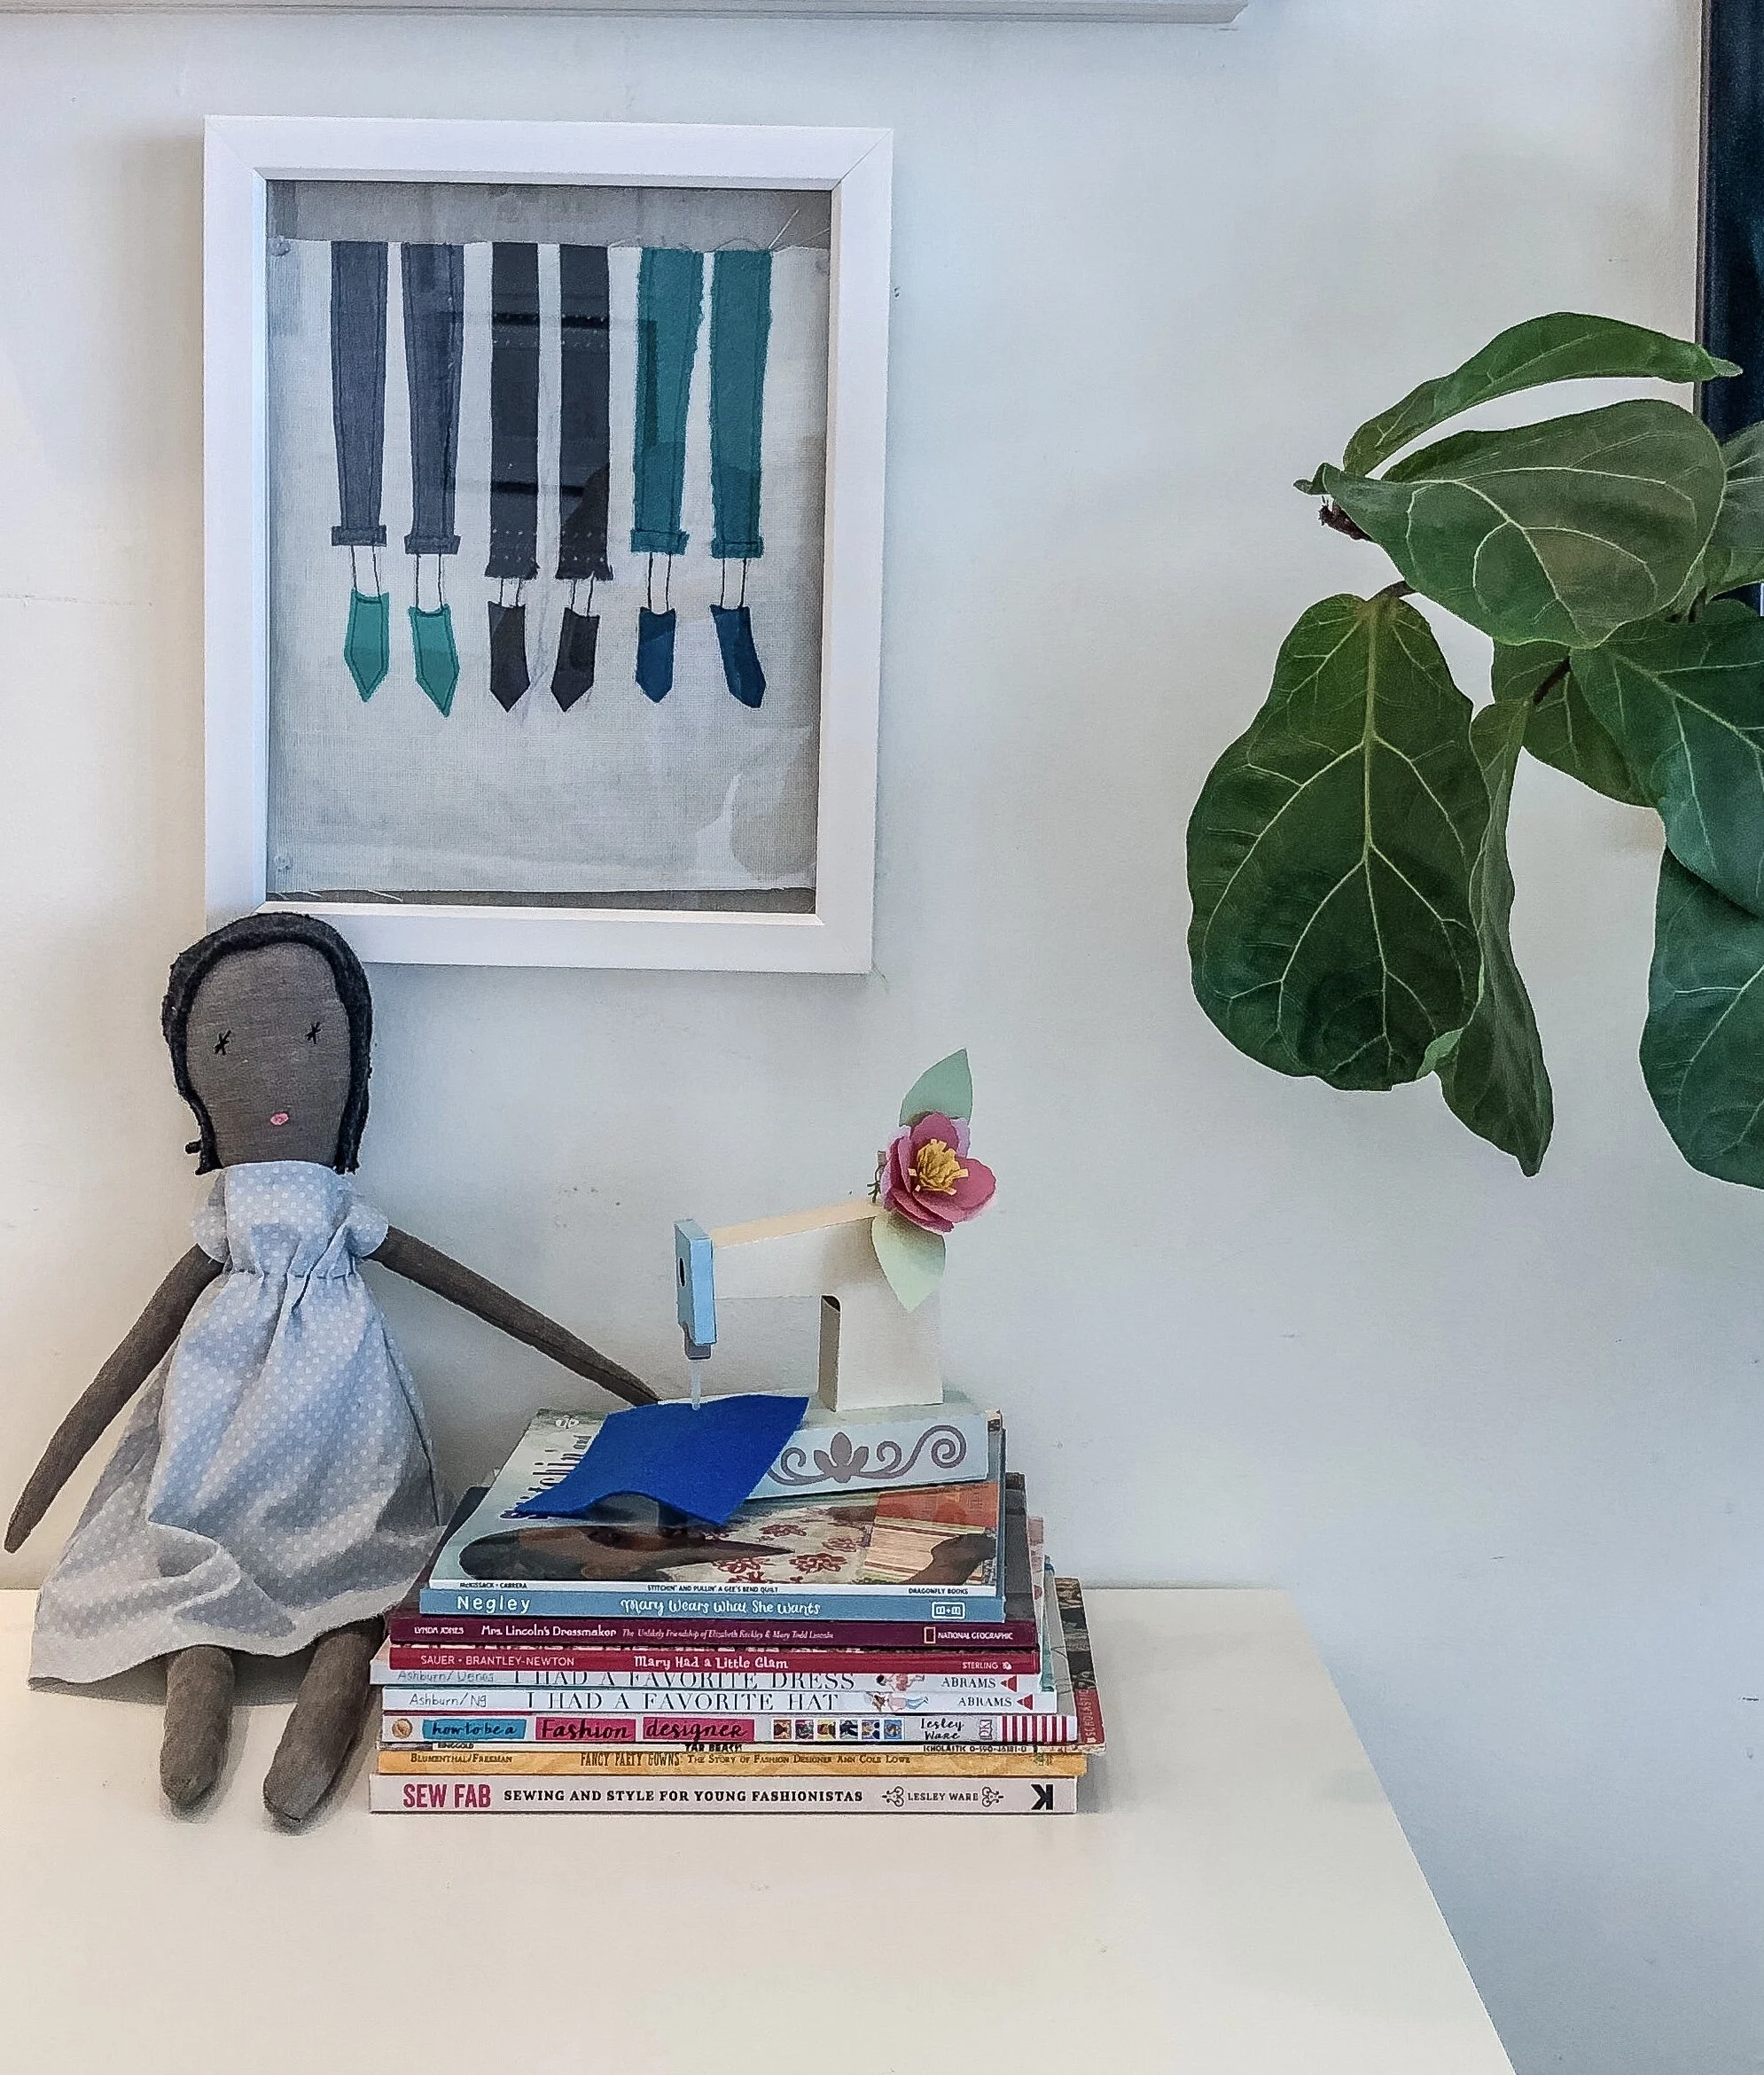
10 Children's Books About Fashion and Sewing that Feature Black Characters
In recent years, I have found an increase in the number of books that are both fashion and sewing related that feature kids with black and brown skin. This expanded diversity not only allows kids the opportunity to see themselves in these stories but also helps broaden the perspective of all children by fostering their sense of empathy and connection with characters who might look different from themselves.

Children love seeing faces like theirs within the pages of their books. For many years it was often challenging to find books starring kids of color, Ezra Jack Keats comes to mind, but few others. In recent years, I have found an increase in the number of books that are both fashion and sewing related that feature kids with black and brown skin. This expanded diversity not only allows kids the opportunity to see themselves in these stories but also helps broaden the perspective of all children by fostering their sense of empathy and connection with characters who might look different from themselves.
To help you discover a few new titles perfect for reading with your kids, I’m sharing a few of my favorite books for elementary school readers. Whether they're sewing quilts or navigating friendships, designing gowns or standing their ground, these characters exude confidence, happiness — and individuality.
Elementary School Readers
Fancy Party Gowns, Blumenthal, A Story about Ann Cole Lowe
Mary Had a Little Glam, Sauer
I had a Favorite Dress, Ashburn
I had a Favorite Hat, Ashburn
Stitchin’ and Pullin’: A Gee’s Bend Quilt, Patricia McKissack
Mary Wears What She Wants, Negley
Tar Beach , Faith Ringold
Later Elementary and Middle School Readers
Mrs. Lincoln’s Dressmaker, Lynda Jones The story of Elizabeth Keckley
How to be a Fashion Designer, Leslie Ware
Sew Fab, Leslie Ware

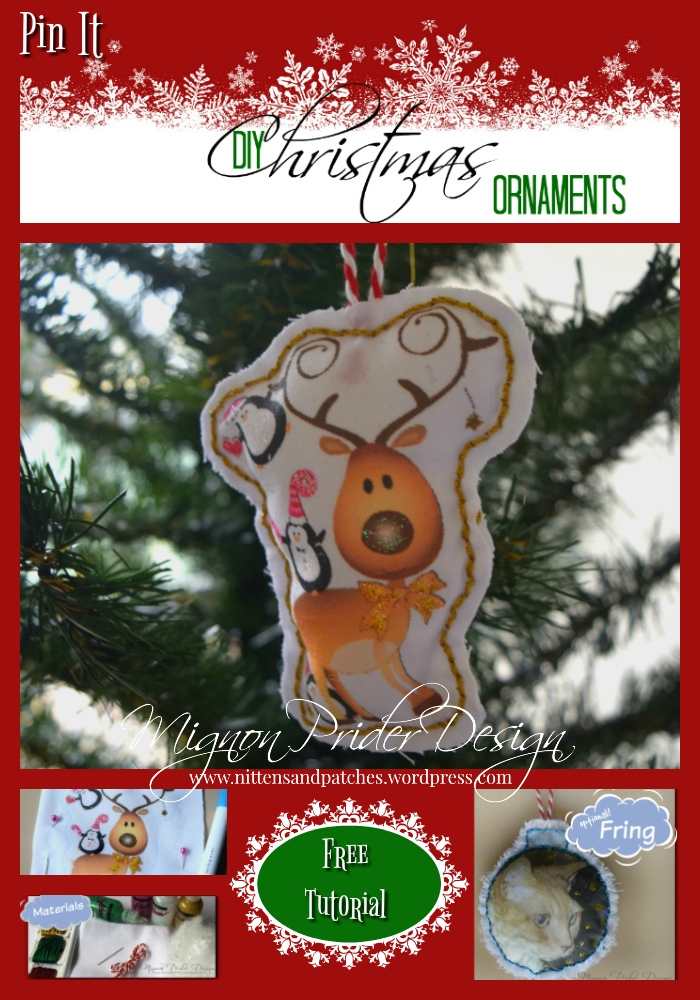
DIY Easy Mini Felt Bunny Ornaments
Easter is on Sunday! Since quarantine began, I am never really quite sure what day it is anymore. Somehow in all of this uncertainty, I hadn’t gotten around to putting out any type of seasonal decoration. With a daughter called Bunny, we generally take Easter decorating pretty seriously around here. So, in an effort to jump start on all things Bunny, here is a quick hand-sewing project for you to make and enjoy.
DIY Easy Mini Felt Bunny Ornaments

Easter is on Sunday! Since quarantine began, I am never really quite sure what day it is anymore. Somehow in all of this uncertainty, I hadn’t gotten around to putting out any type of seasonal decoration. With a daughter called Bunny, we generally take Easter decorating pretty seriously around here. So, in an effort to jump start on all things Bunny, here is a quick hand-sewing project for you to make and enjoy.
DIY Easy Mini Felt Bunny Ornaments Free Pattern and Tutorial

MATERIALS

These mini felt bunnies sew together pretty quickly and it is likely that you already have the supplies on hand.
To make an assortment 2 1/2-inch bunny place ornaments:
9 X 12-inch sheets of felt in assorted colors; each sheet will make one bunny plus a little felt left over.
Embroidery Floss or Pearle Cotton (if you don’t have either, thread is fine.)
A Felt Mini Bunny Ornament template available for free download here, printed and cut out.
Craft glue
Embroidery needle
Scissors
PATTERN
FINISHED SIZE
About 2.5” inches high, plus ears
CUTTING

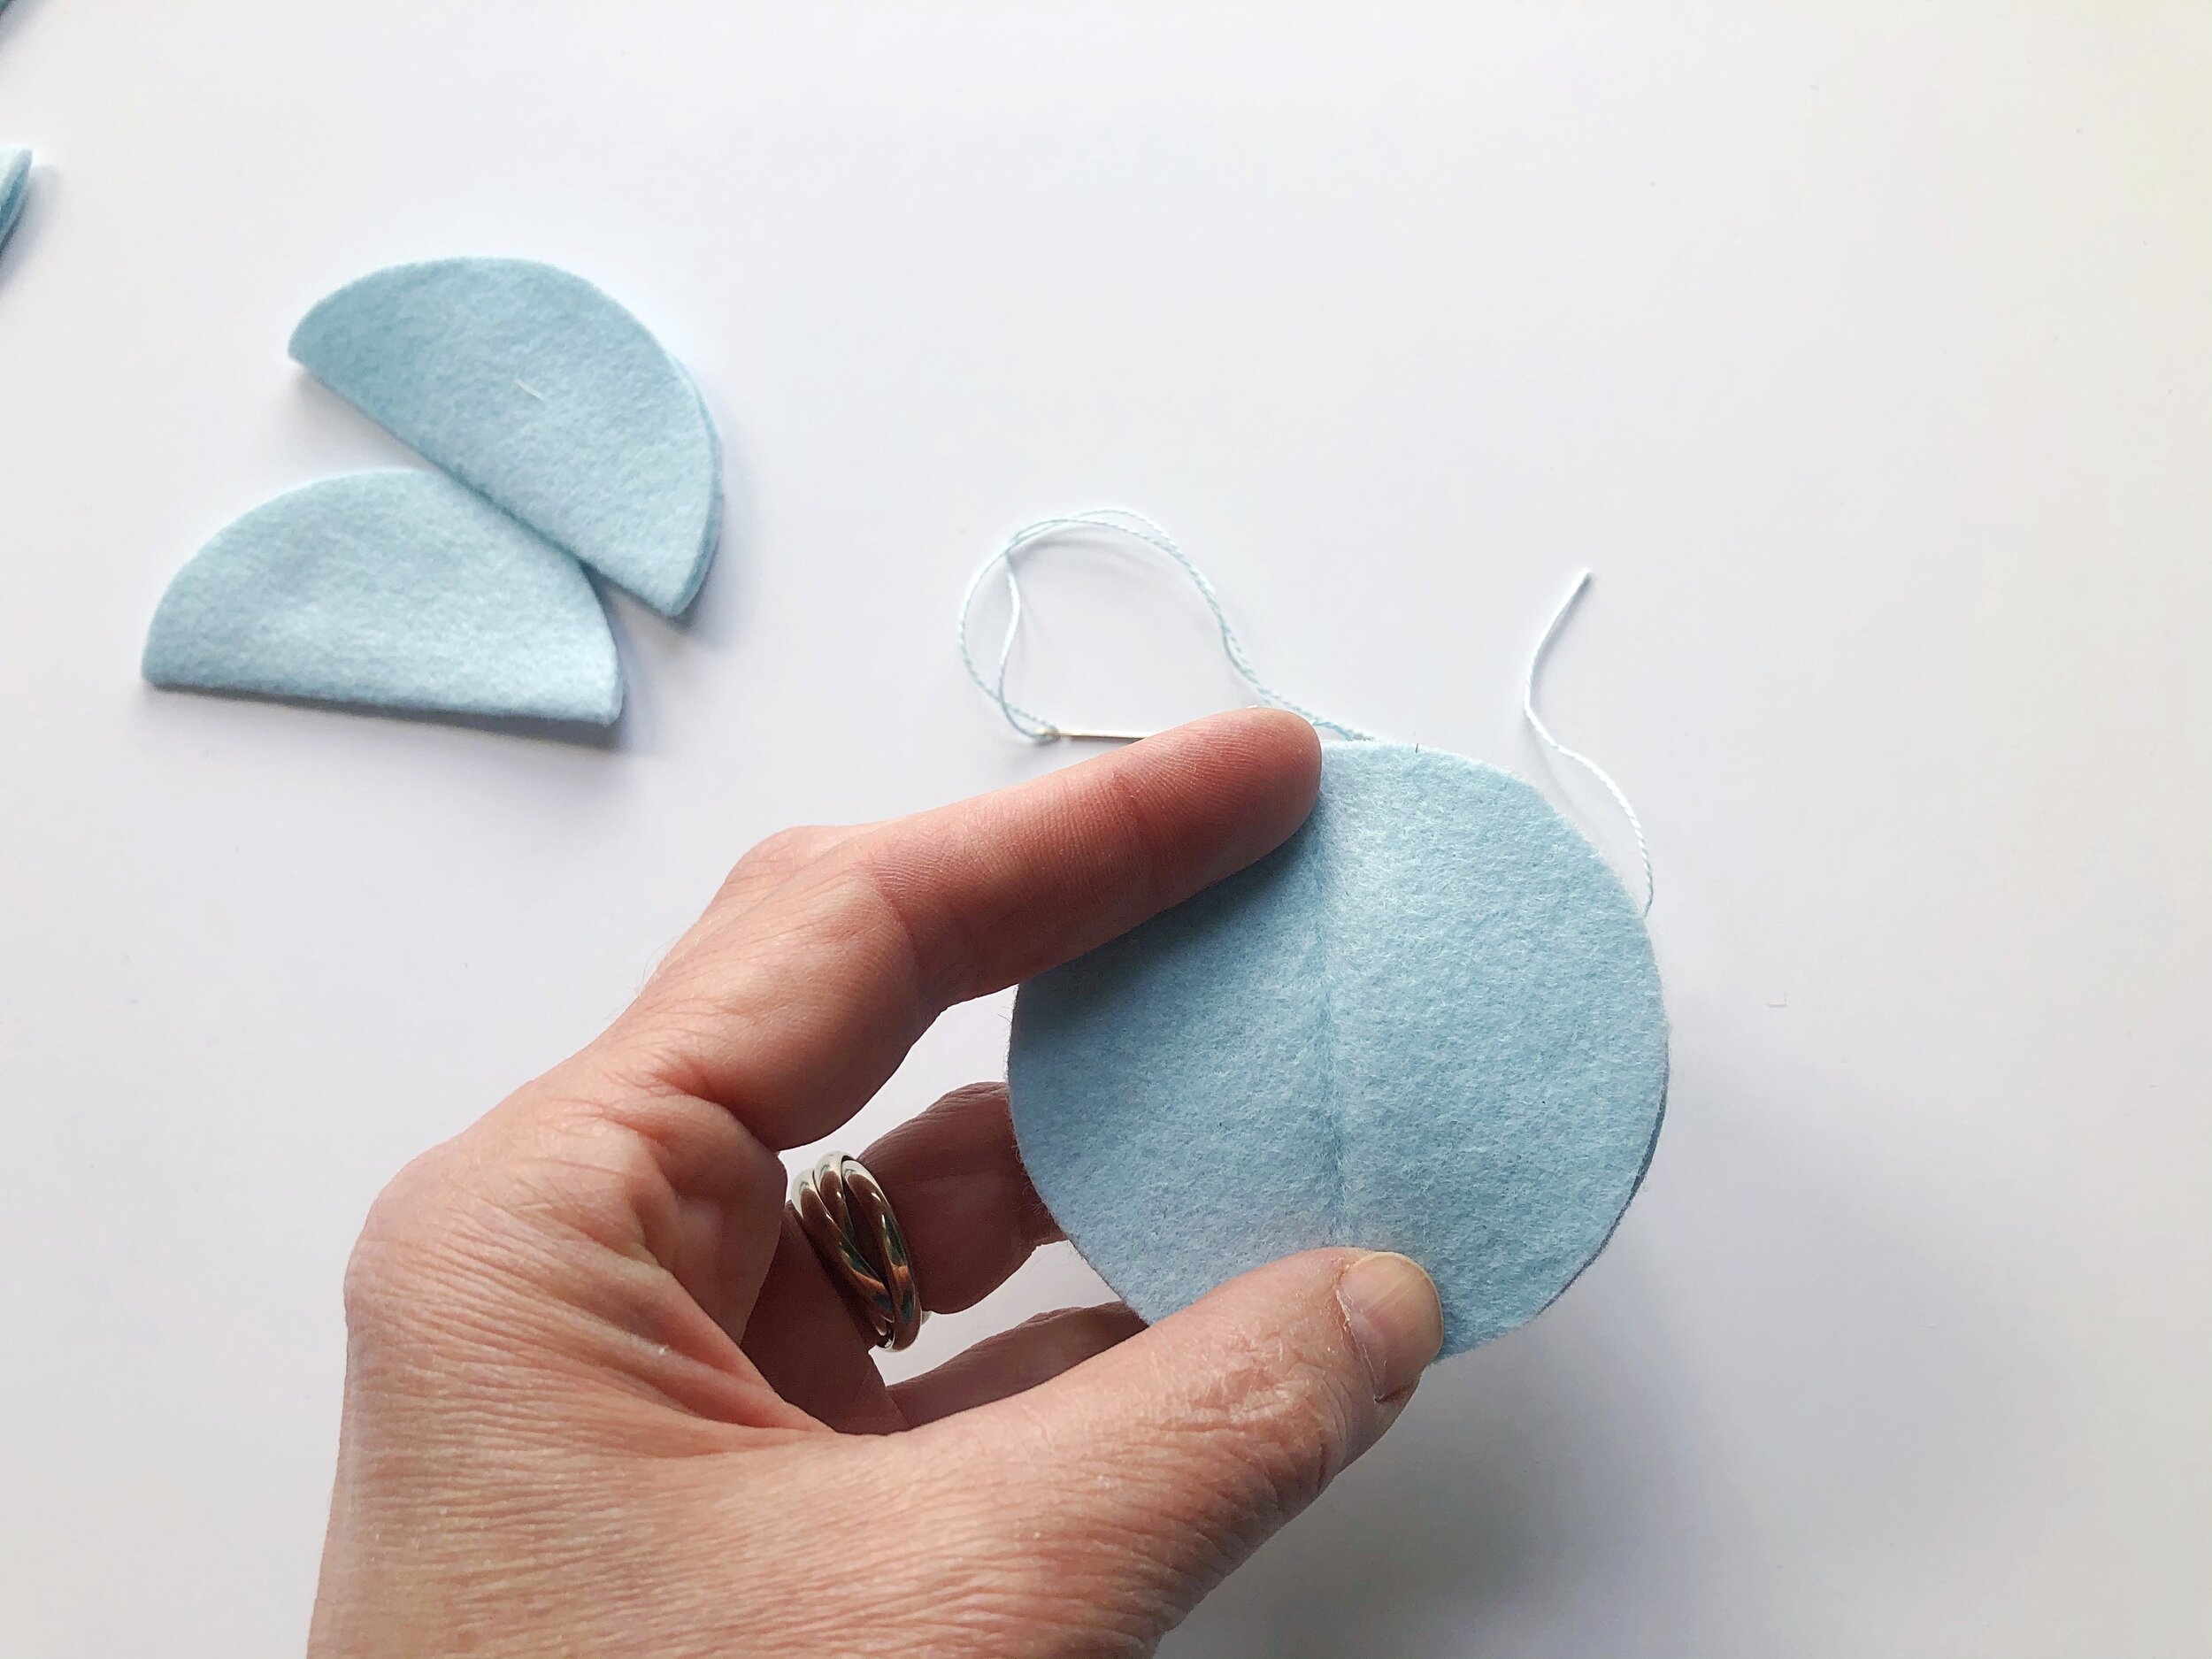
Cut eight circles from the felt and two ears

Press each of the cut circles in half, making a crease along the center. Place the ears aside for now.
SEWING

Cut a piece of thread about 20” long. Thread a needle and knot the end to tie. Insert the needle from the back of one of the circles and make a small stitch to secure.
*This thread should be long enough to complete one bunny. The idea is to keep sewing with the same strand of thread between all layers. If you run out- no worries. Just tie off the end and rethread another strand.

Fold the circle in half. Grab a second circle, keeping it folded in half as well, and align both so that the straight fold of each piece mirrors the fold of the other.
You might find it helpful to think of each piece as a folded tortilla.


Stitch the two pieces together along their crease lines with a small hand stitch.

Try to keep your stitches even and be sure that both circles are aligned. Sew across the entire fold and stop. Keep your working thread- do not cut.

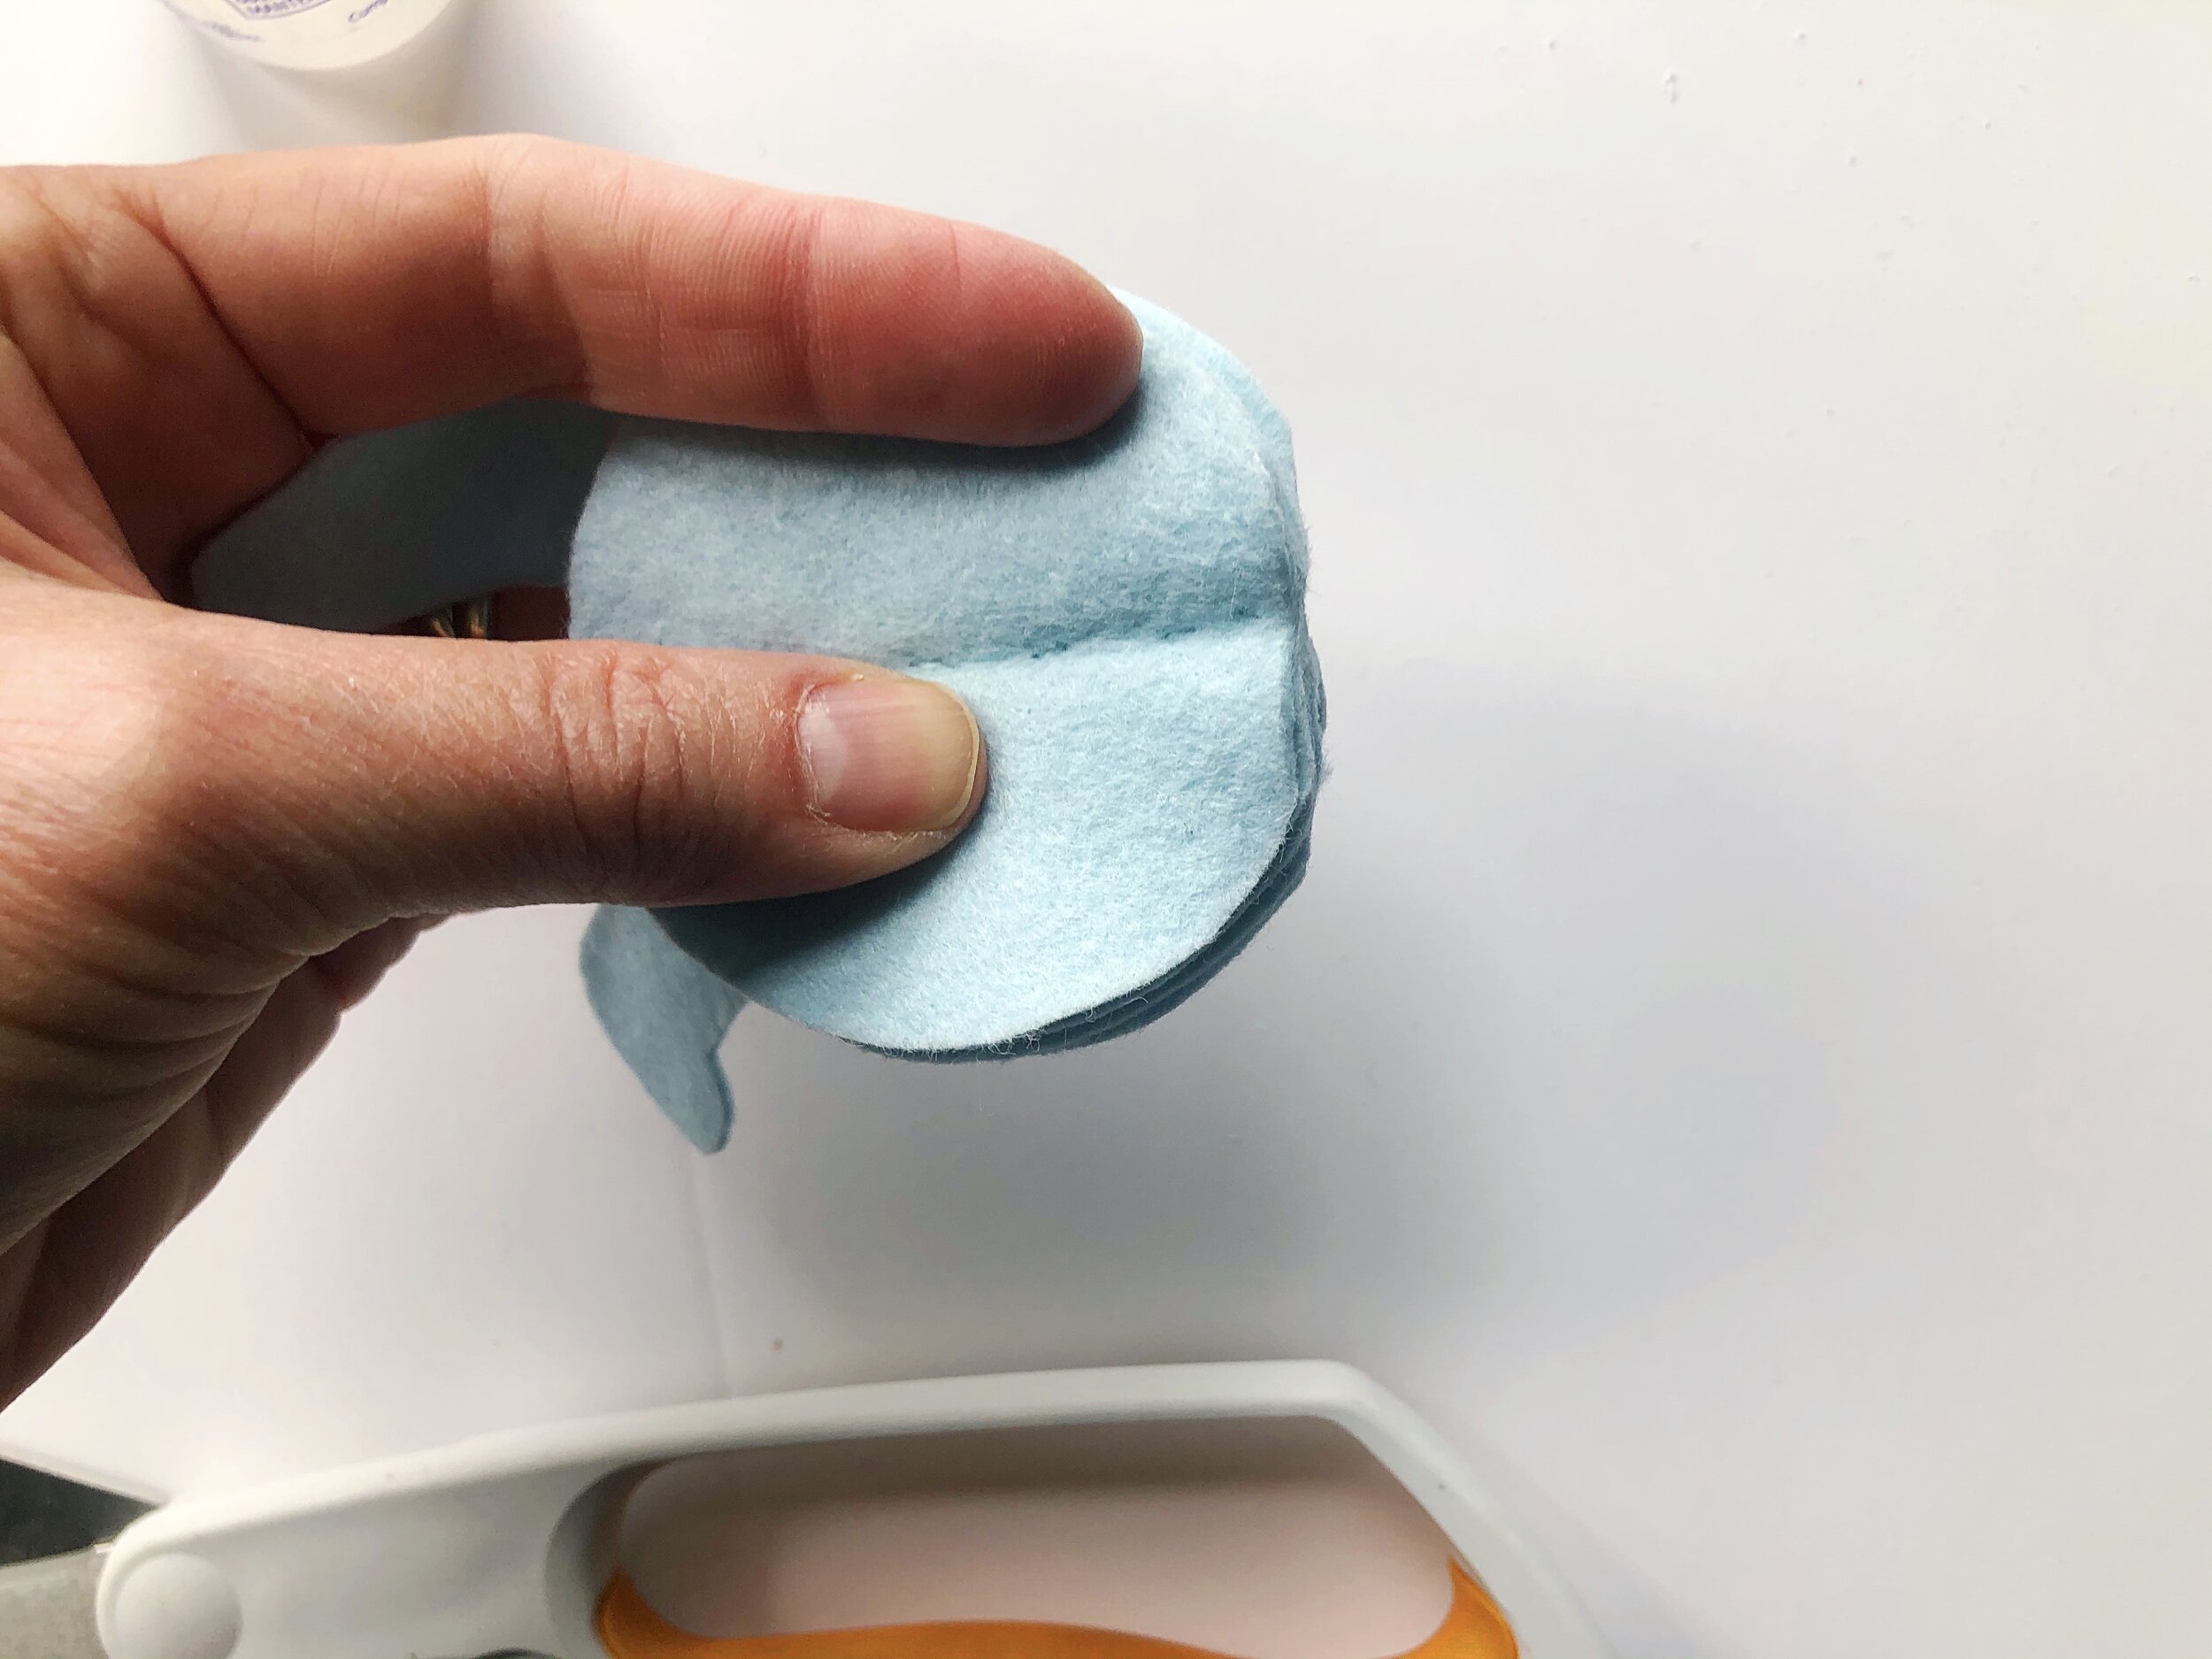
Fold the pieces that have just been sewn in half, like two tortillas.
Grab two more felt circles and layer them with the just sewn pieces in between.

Doesn’t it look like a tortilla sandwich? Make sure that the center fold creases remain aligned with the center seam of the inner layer


With the working thread, sew these two new pieces together along their center fold lines in the same manner as before.
Sew to the end of the folded crease. Remember-don’t cut your thread.

Now we are going to repeat that same step again, by folding all of the circles closed and placing the two more felt circles on the top and bottom. Be sure to align the creases.
Sew these two pieces together through the center as before. At this point the felt is getting a bit bulky to sew through. Just be patient- you are almost finished.


Repeat this process for the final two creased circles, layering them opposite to one another through the center and stitch.

Sewing is complete!
FINISHING

Give each section a little tug to straighten, then divide the circle in half to place the ears.

For the ears, I dabbed a bit of glue on each side and placed the ear. You may need to pinch it for a minute or two to set.
If you plan to have your bunny sit, you may need to flatten the bottom just a bit. To do this, I pinched the circle in half and gave it a bit of a trim. Just watch your stitching. If you happen to cut through- add a bit of glue and pretend it never happened.
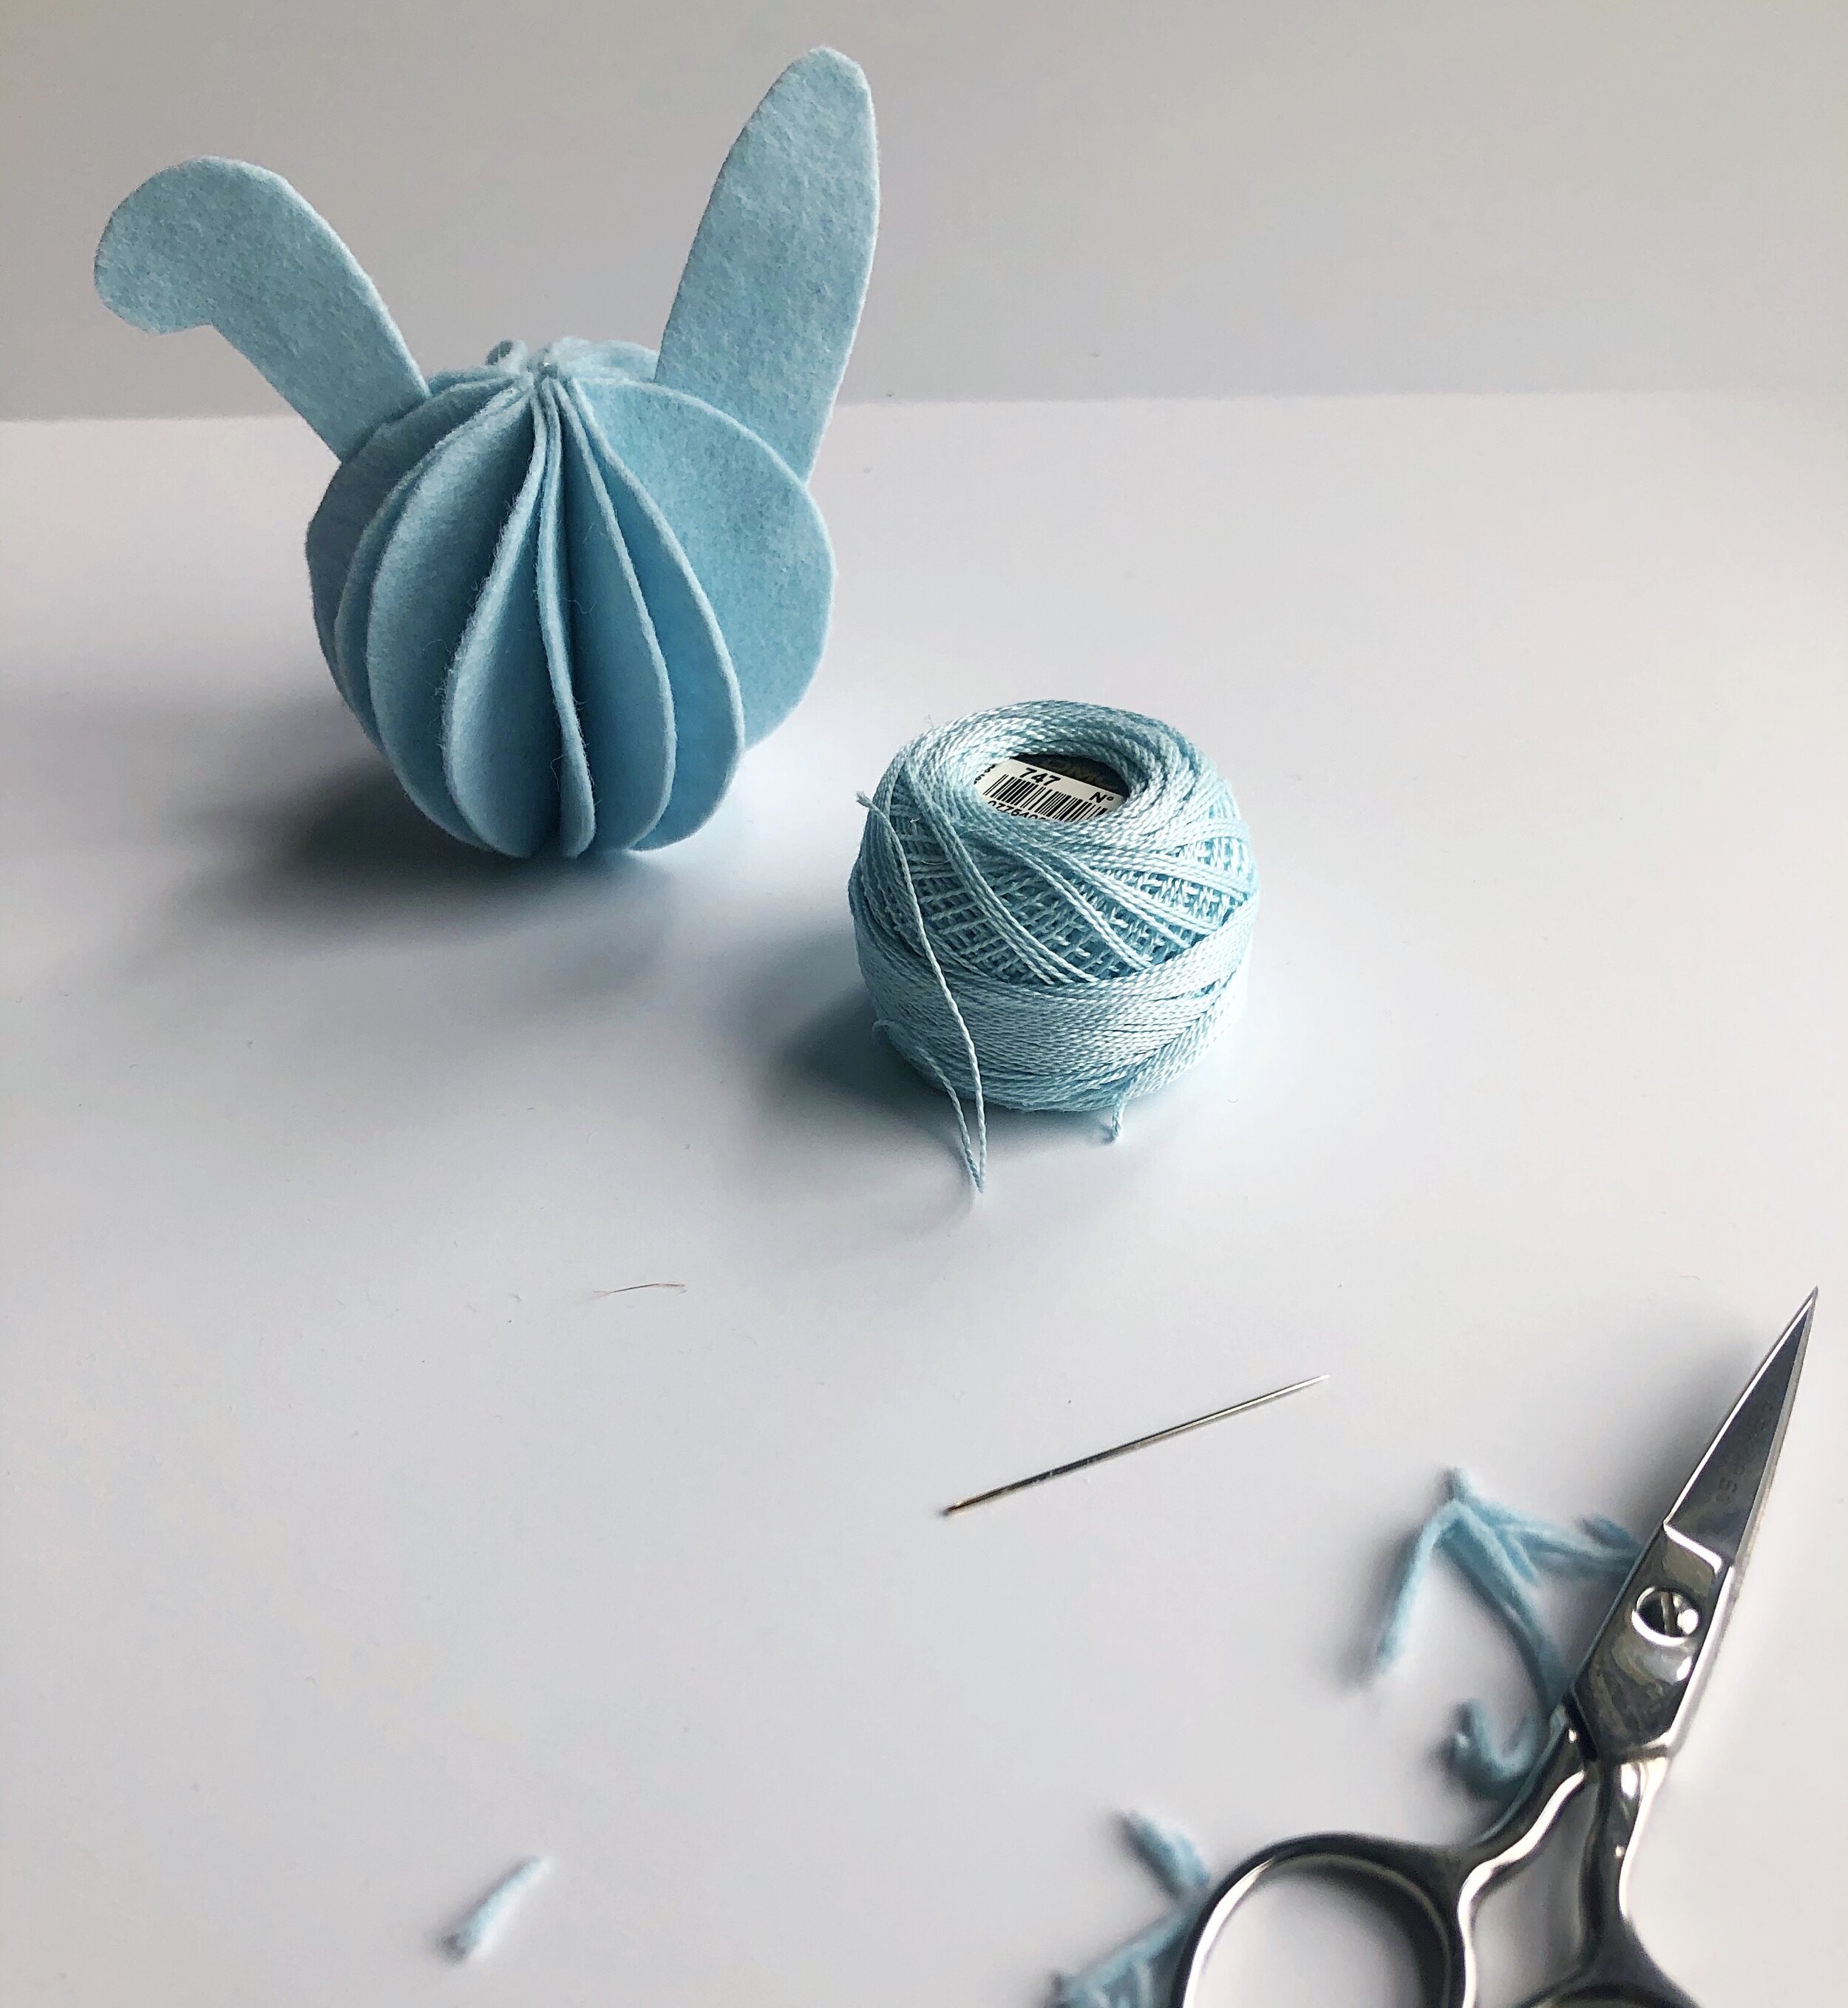
All done! Doesn’t it remind you a bit of a weeble?

Wouldn’t these look adorable strung as an Easter bunny garland?


I made one into a chick by cutting two hearts for wings and one tiny heart for a beak.
This Easter may be the perfect opportunity to focus on renewal. Let it serve as a reminder that life goes on and that love is greater than fear. With that sentimant in mind, I wish you all a lovely Easter holiday.
XO, Hilarie

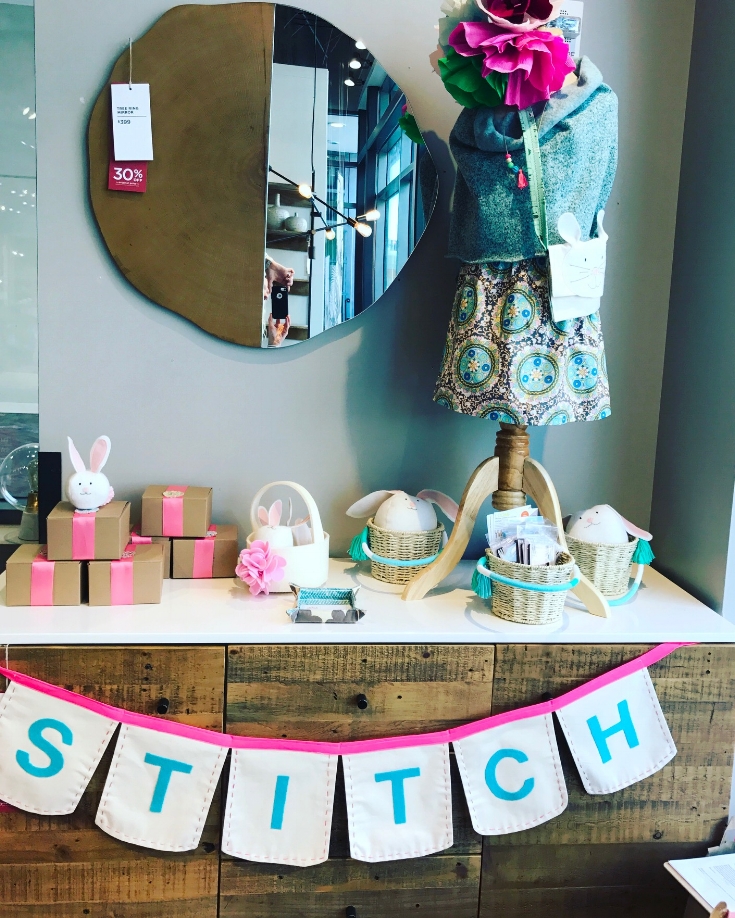
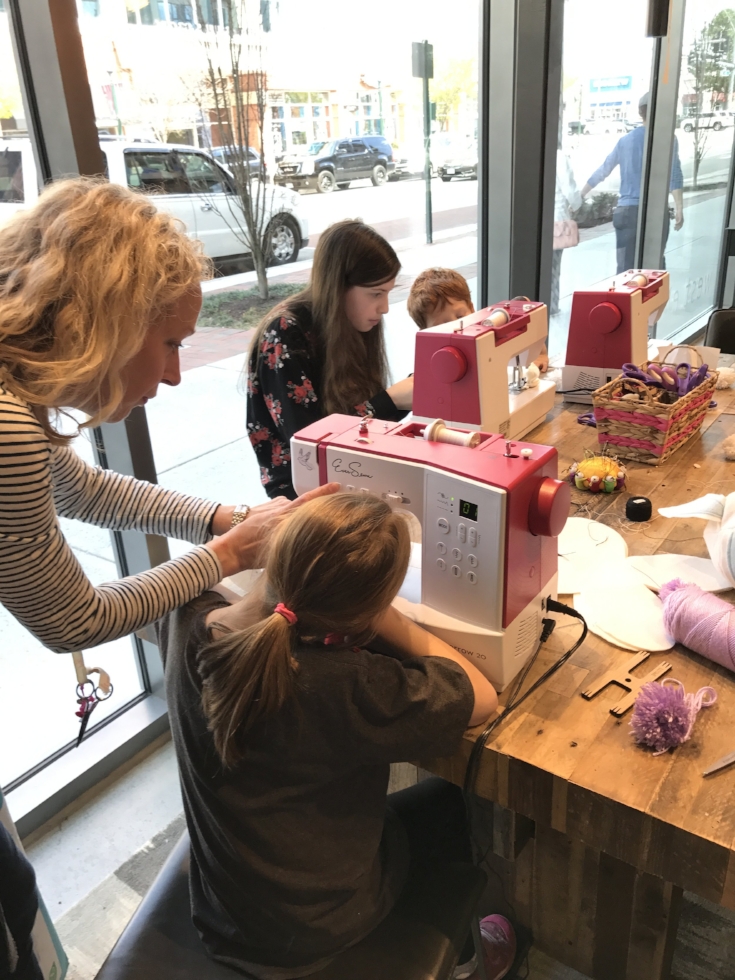
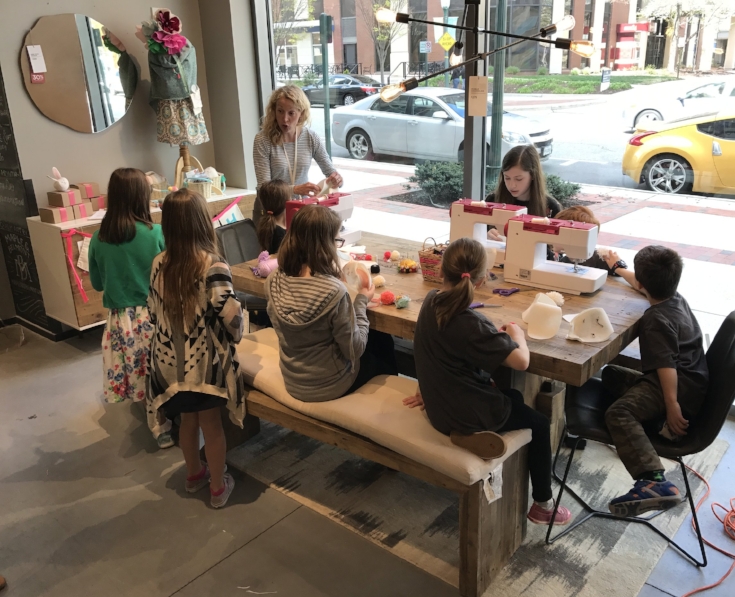
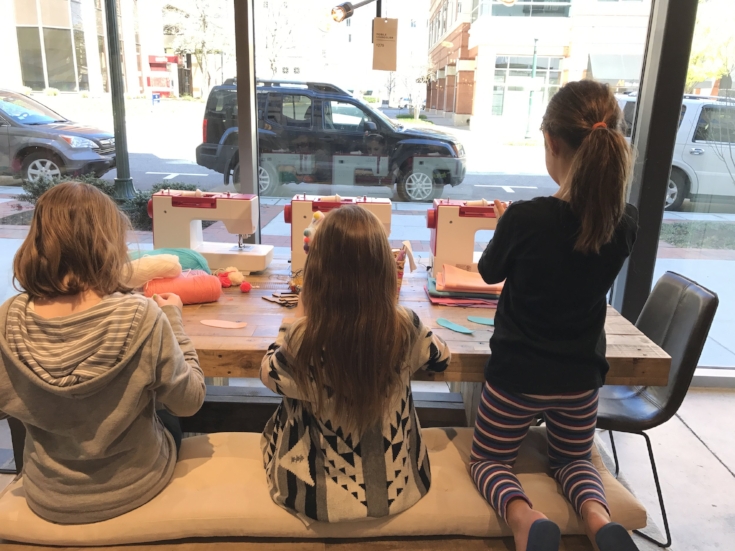
Pop-up Workshop at West Elm VB
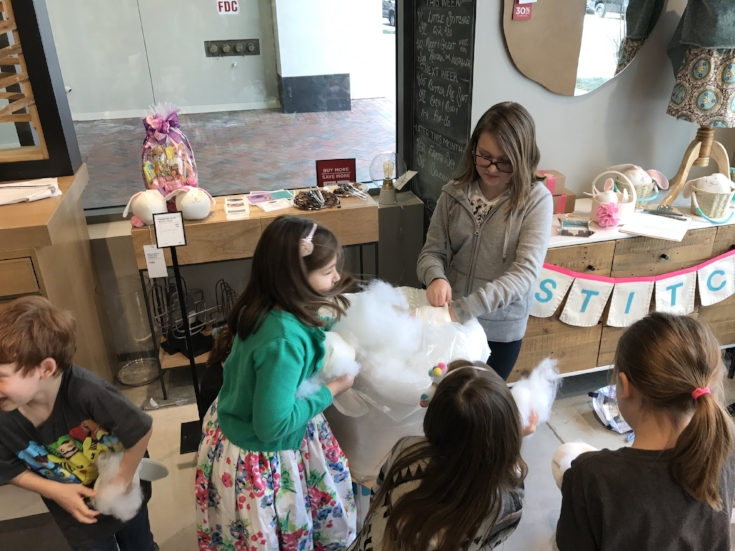
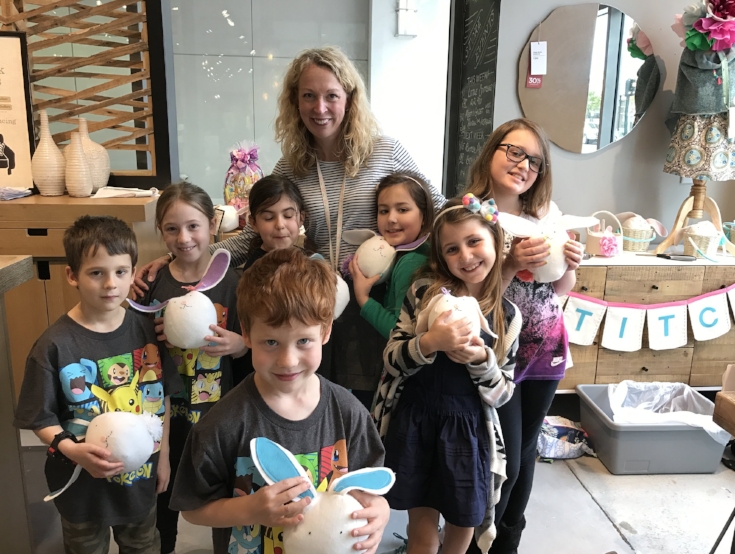
I'm excited to share a bit of the sewing workshop that I held at West Elm, VA Beach last weekend. Earlier this year, I heard that West Elm was looking for local crafters to feature. I sent an email introducing myself and telling a bit about what I do. The next thing I knew, we had a meeting and decided to schedule a Spring Sewing Workshop. Thrilled at the chance to collaborate, I went home and set to work designing a fun little project.
I'm excited to share a bit of the sewing workshop that I held at West Elm, VA Beach last weekend. Earlier this year, I had heard that West Elm was looking for local crafters to feature. I sent an email introducing myself and telling a bit about what I do. The next thing I knew, we had a meeting and decided to schedule a Spring Sewing Workshop. Thrilled at the chance to collaborate, I went home and set to work designing a fun little project.
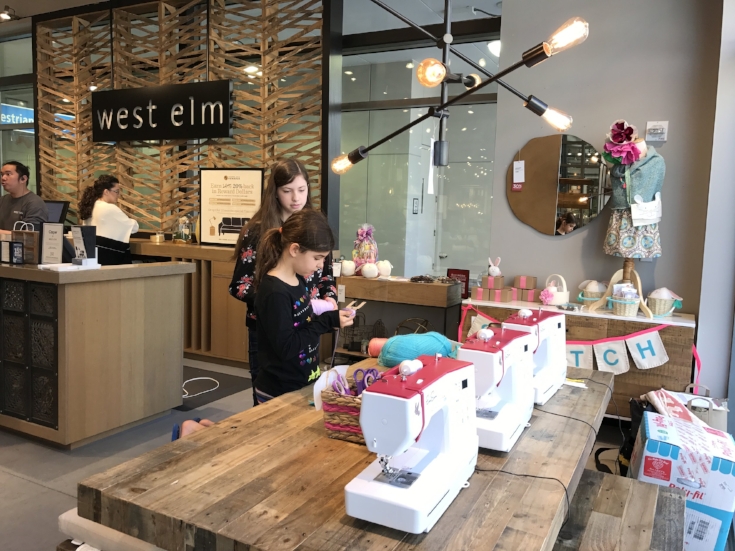
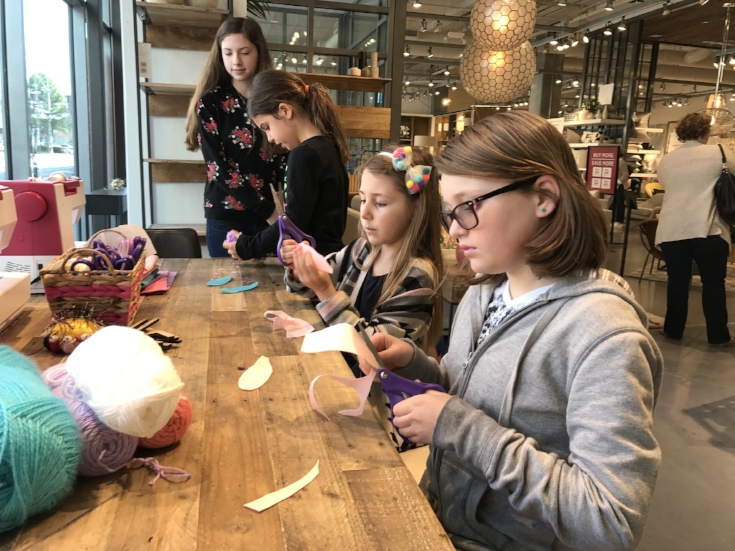

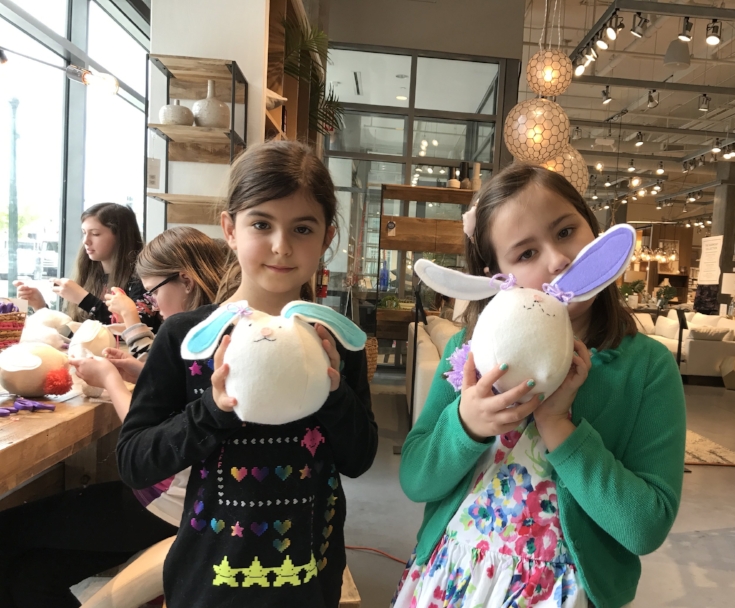
We set up shop at the West Elm, VB store for the workshop and exclusive DIY Bunny Kit. I brought machines, hand sewing needles, my favorite pompom tools and lots of felt. We divided the kids into groups and got to work.
I was so excited to have goodies from The Royal Chocolate. The candies were a hit! They were cut into fine little nuggets- just right for snacking.
Of course, the real joy of sewing with kids begins when the kids start to stuff their softies to bring them to life.
Thank you to the families who came to sew with us. It is such a joy to be able to share my passion for sewing (and making pompoms!). Thank you to the West Elm team for putting this together. We had a ball and look forward to popping-up again!

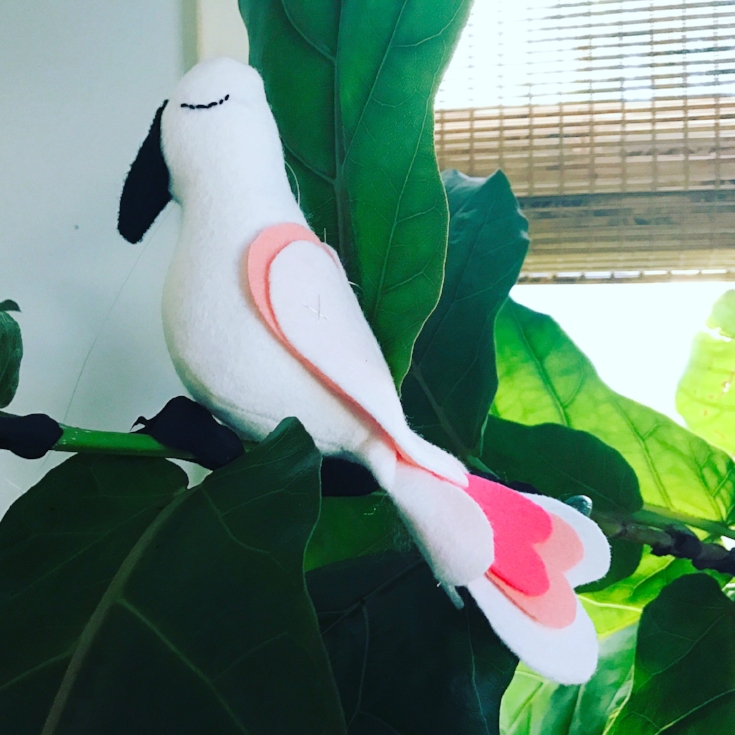
Felt Lovebirds Pattern and Tutorial
Make these pretty felt love birds for Valentine's Day. With these sweet love birds you can show the one you love how much you care.

Make these pretty felt love birds for Valentine's Day. With these sweet love birds you can show the one you love how much you care.
MATERIALS FOR LOVEBIRD
White Felt
Pink Felt in two shades for feathers and wings
Small piece of Black Felt for beak
Handsewing needle
Thread
Black embroidery floss
Metallic thread (optional)
Poly-fil
A free Lovebird Template, printed and cut out (This pattern has a 1"/ 4CM test square. Measure the test square, and if it does not measure correctly, check your print scaling options.)

SIZE
8 1/2"x 4 1/2"
MAKE THE LOVEBIRD
CUT
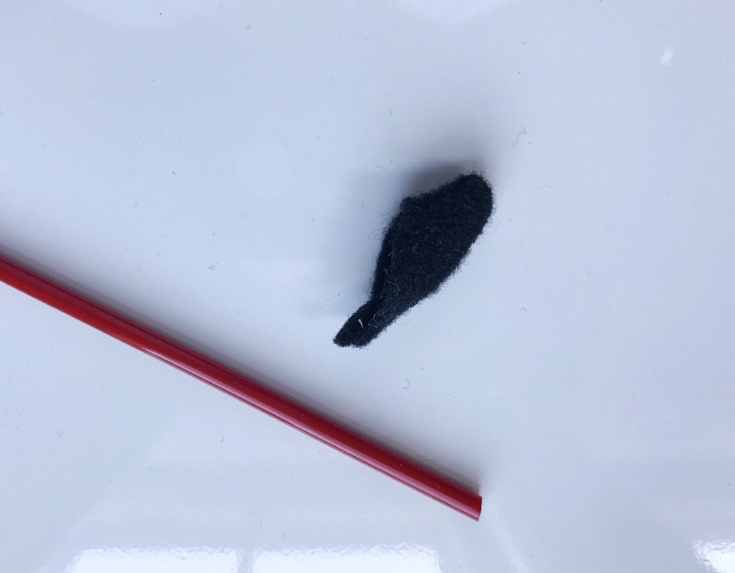
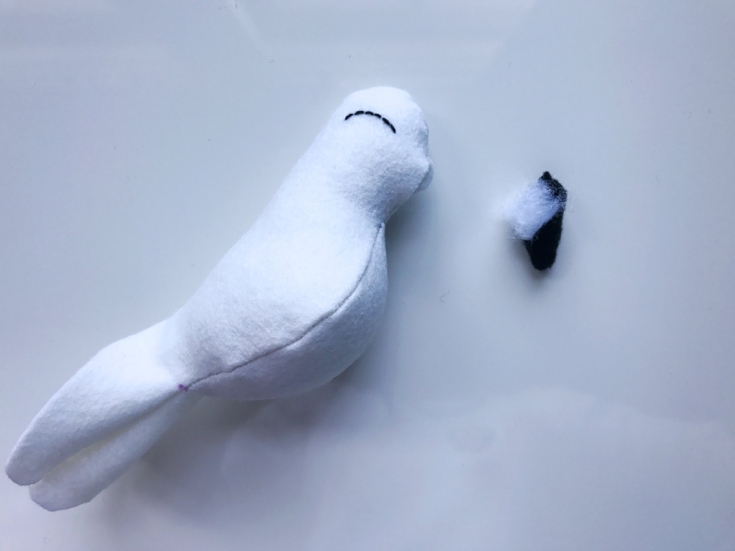
Using the Lovebird Template, cut 2 bird body pieces, 1 gusset, and 1 wing out of white felt. Cut the beak out of black felt and tail feathers from each of the pink. Cut one more set of wings from pink.
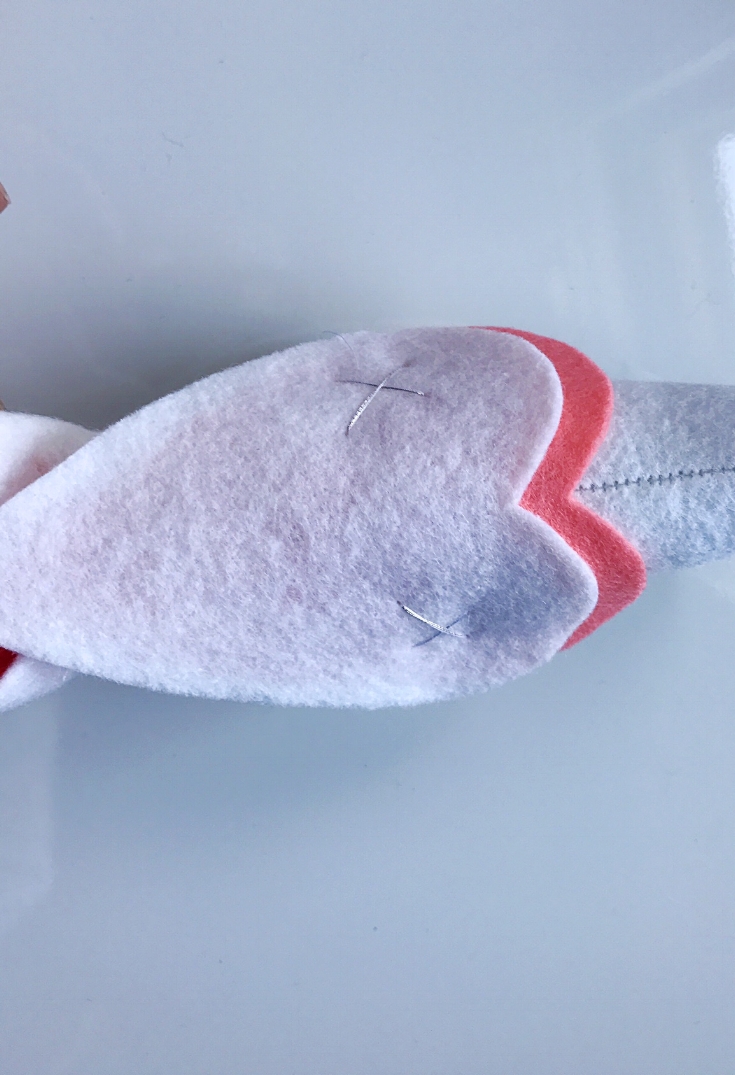
MARK
Using a water-soluble marking pen, Begin marking the fabric with the pattern piece still pinned to it. When you mark a pattern, you always want to begin at the pattern pieces outside edges and work toward the center. Easy, right? Let’s do it! Using a straight pin, pierce the pattern piece and fabric right through the center of the first dot. Carefully lift the pattern paper (while still holding the pinned fabric in place) and mark the fabric with the pen. Repeat on the underside of the next piece of felt so that the sides are mirror images of each other.

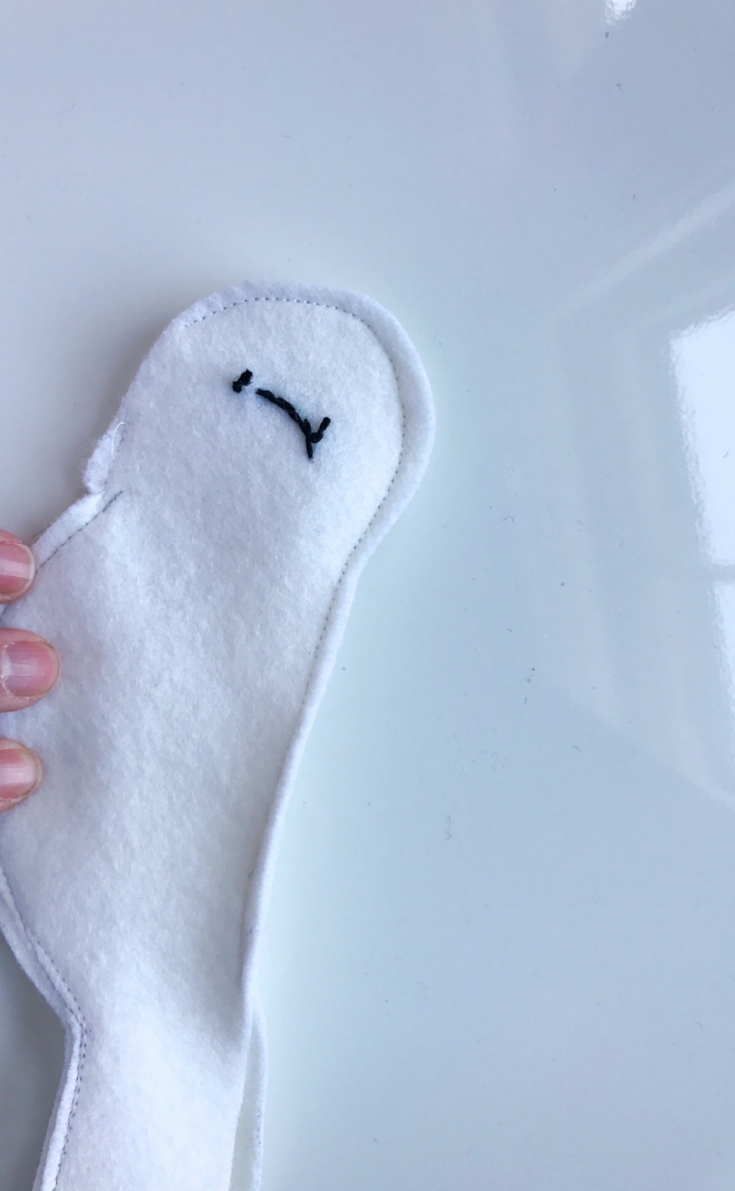
STITCH THE EYES
To sew the eyes, we are going to use a basic running stitch. It's beautiful in its simplicity, utility and function. Vary it with size and color and it adds such vitality and expression your projects.
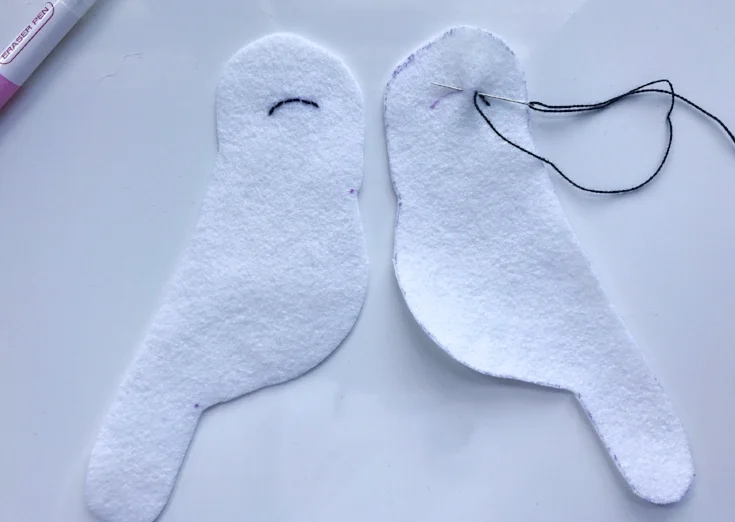
The pieces should be marked as to be mirror images.
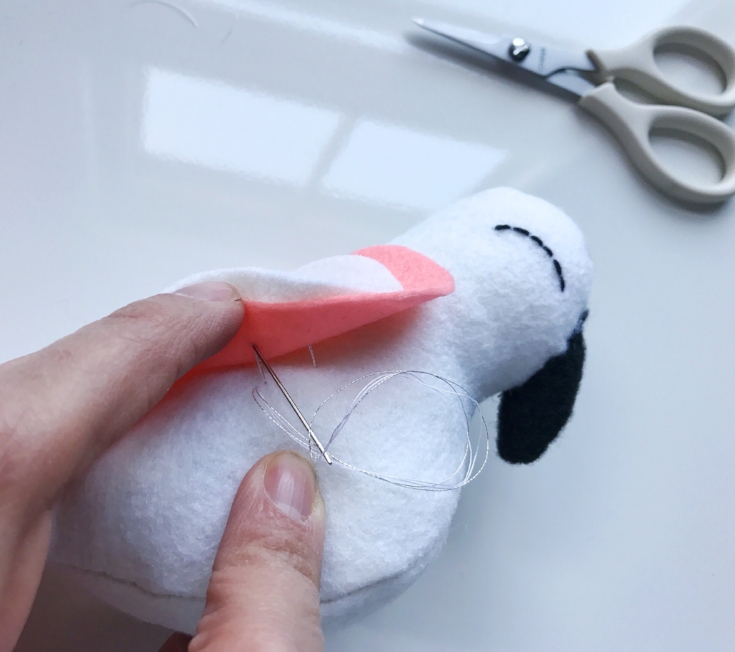
BEAK
Fold the beak along the center line and stitch along the long side using a 1/8" seam.

Turn right side out. It helps to use a tool to push the tiny end through. A chopstick or eraser end of a pencil work well for this.
MAKE THE LOVEBIRD
Take a bird body piece and the gusset, place them with the Right Sides Facing Together and match the markings. Pin and stitch around the outside edges of one side from tip to tail, using a 1/4" seam allowance.
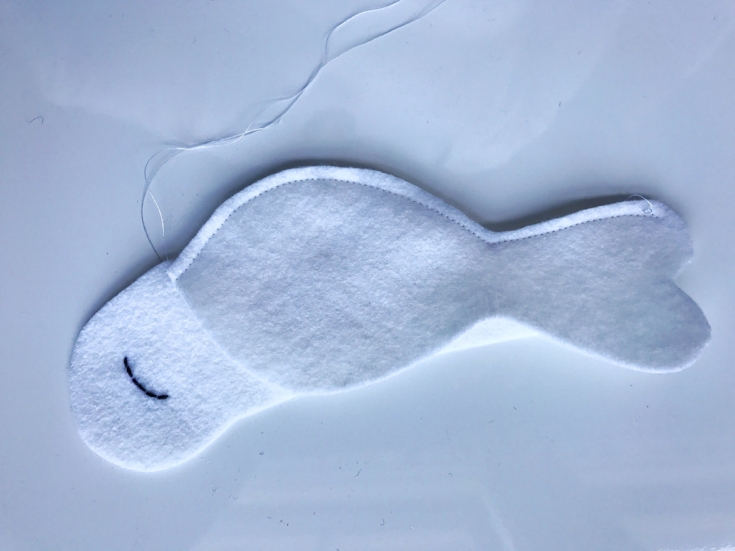
Pin the other bird body to the opposite side of the gusset and stitch.
Pin and sew the bird body together at the center back seam beginning at the dot level to the eye around the head and to the top of the tail. Leave the area where the beak will be attached open.
TURN AND STUFF
Turn the bird body right side out and stuff nice and firm with polyfil.
ATTACH THE BEAK
Add a tiny bit of stuffing to the beak. Pin the beak to the bird and whipstitch around the beak to attach it to the bird body.

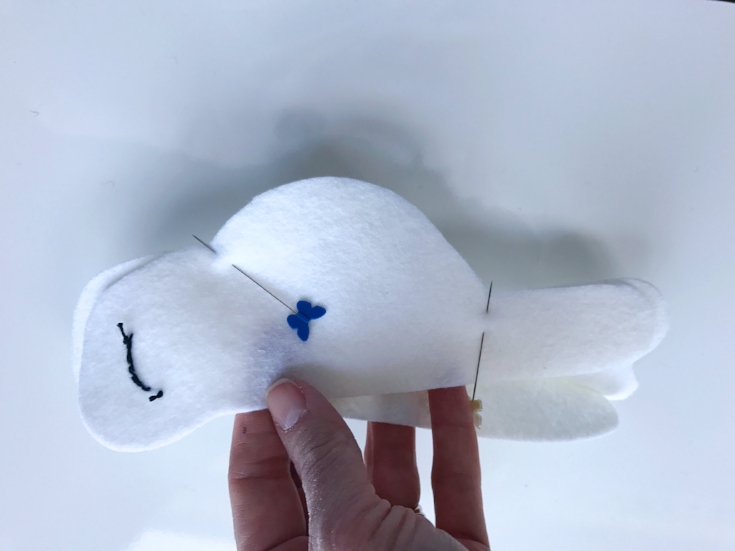
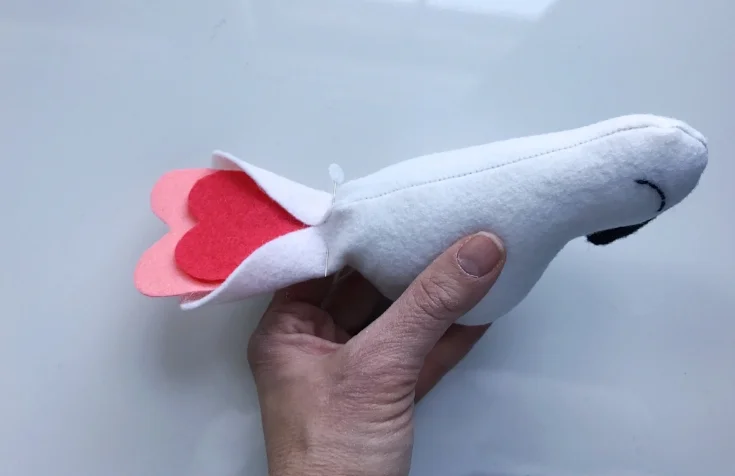
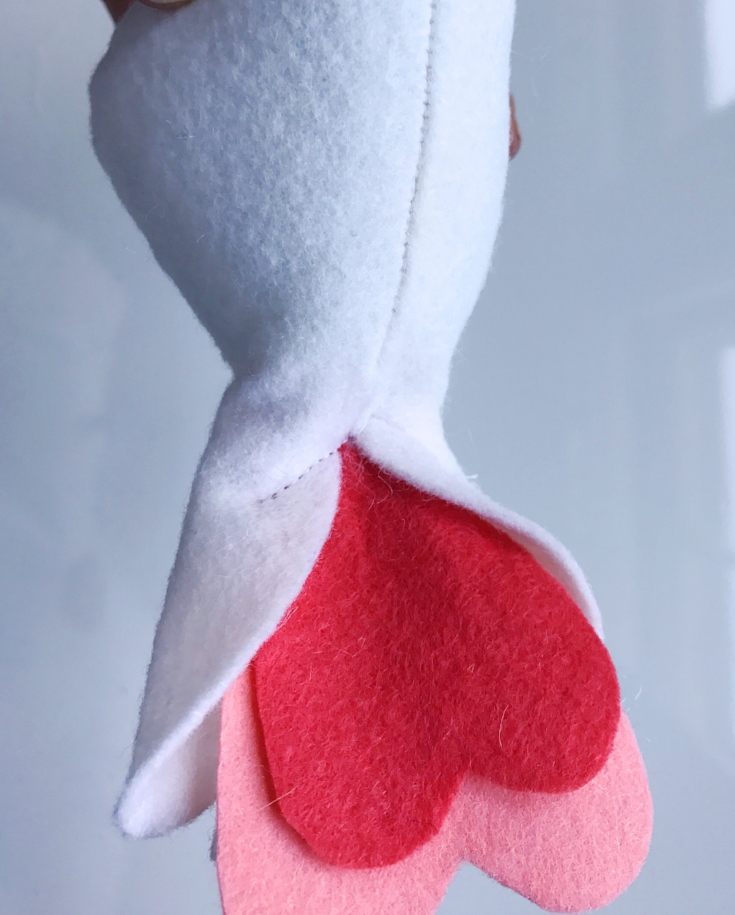
TAILFEATHERS
Insert the tail feathers into the body of the bird. I shifted the layers of feathers a bit to create some visual interest. Pin in place and stitch in an inverted V shape to secure.
WINGS
Arrange the wings and pin to the bird. Again, I shifted the placement of the wings to overlap just a bit.
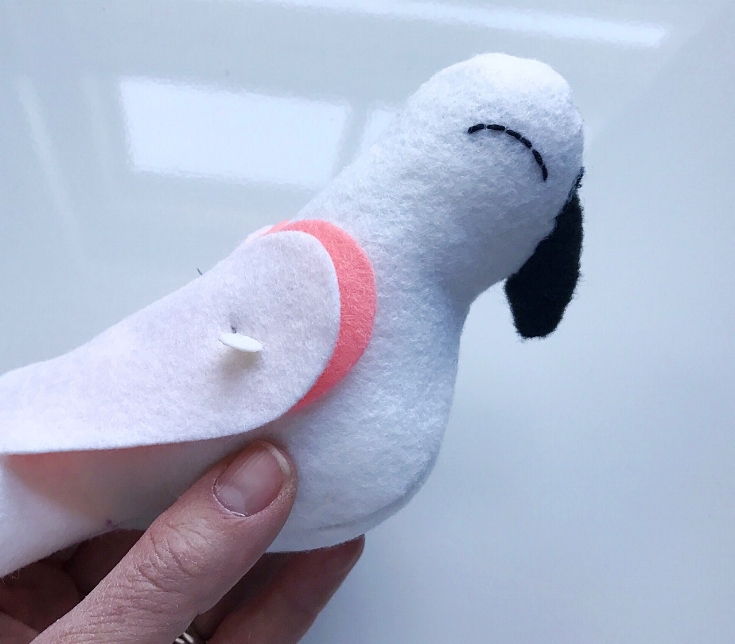
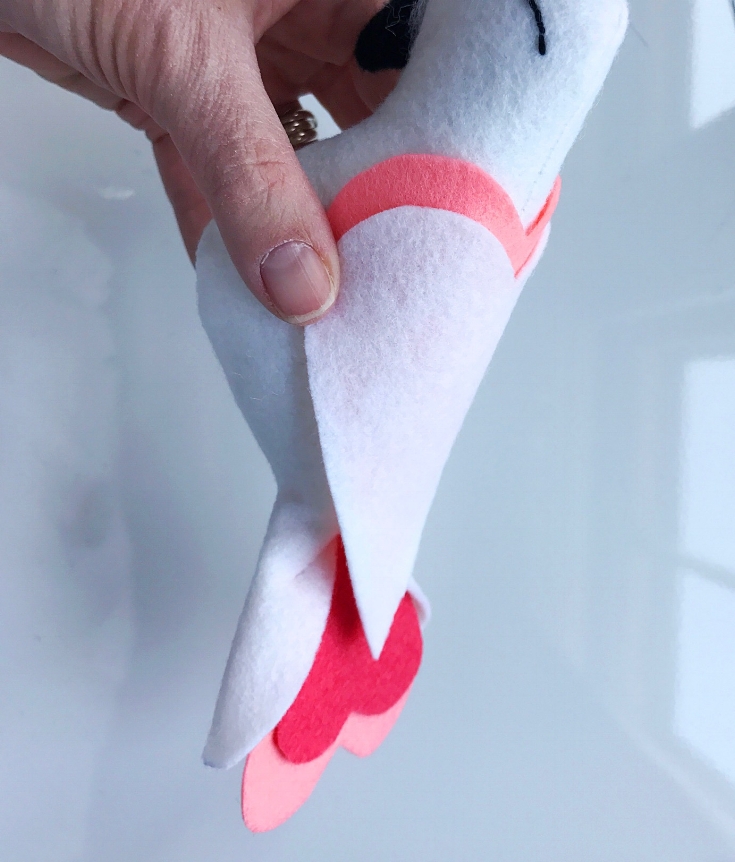
Stitch in place. I used some silver metallic thread to attach the wings and give them a bit of glam. Feel free to add your own touch!
Trim threads and use a quick bit of steam from the iron to get rid of your markings.

Would you like to learn how to make the perch? Come back tomorrow!
XO, Hilarie

In the news!
A couple of weeks ago I received a phone call from Arleen Spenceley, a correspondent at The Virginian-Pilot. She had seen something online about Little Stitch Studio and wanted to learn more. I was thrilled to chat with her about my work and your kids!
A couple of weeks ago I received a phone call from Arleen Spenceley, a correspondent at The Virginian-Pilot. She had seen something online about Little Stitch Studio and wanted to learn more. I was thrilled to chat with her about my work and your kids!
Sew Young Norfolk studio keeps students in stitches several times a week.
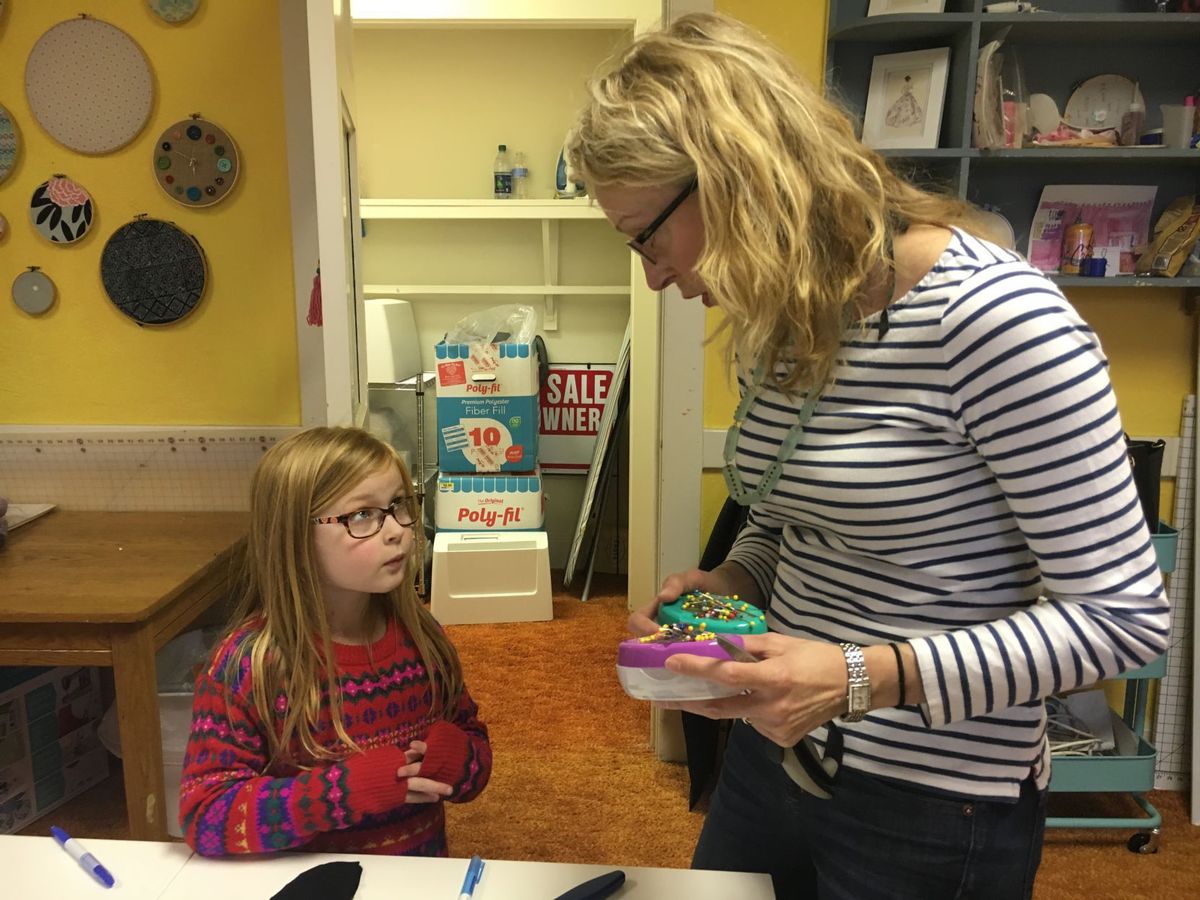
I am forever grateful to my friend Sarah for dropping her daughter off at my house one December afternoon with her new sewing machine that she wanted to learn to use and some cash. A couple of minutes into the lesson, I realized that I might just have something to share.
XOXO, Hilarie

On the Eleventh Day of Christmas, Weaving Edition.
The fun thing with buying gifts for 8 and 9 year olds and “tweens” is using their interests as cues to get gifts that support those interests – or you can introduce that 12 year old to something new and they may discover a lifelong love.

The fun thing with buying gifts for 8 and 9 year olds and “tweens” is using their interests as cues to get gifts that both encourage and develop those interests – or you can introduce a 12 year old to something new and they may discover a lifelong love.
In this 12 Days of Christmas Series, I have tried to choose gift themes that will bring lasting enjoyment to your home. They’re the kinds of gifts that are fun when they’re opened, and then continue to be played and explored with for years.
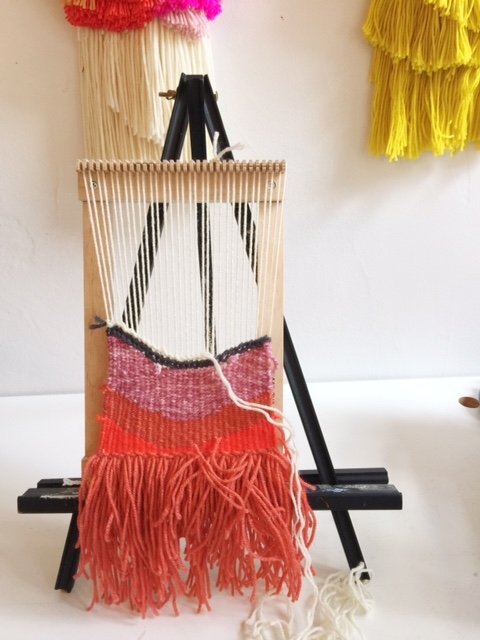
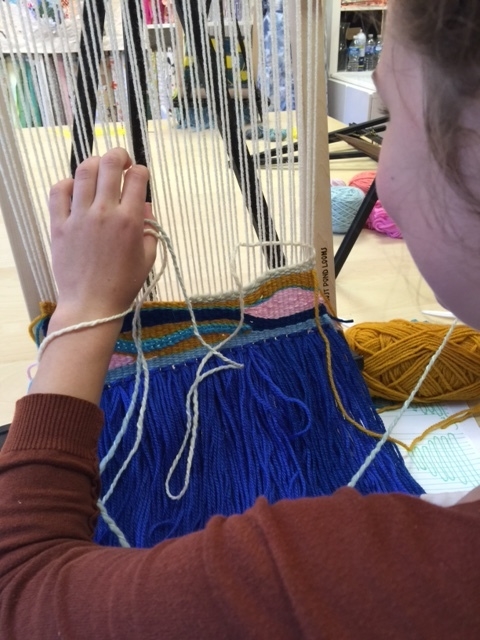
As with so many crafts now, weaving is having a bit of a comeback. I think of this time as a sort of crafter's renaissance. If you are going to learn one new craft this season, let it be weaving. Weaving is a type of textile construction where two sets of threads, the warp and the weft, cross at right angles to create cloth. Weaving is done on a loom, which holds the warp threads under tension allowing them to be intersected by the weft.
Weaving is a tactile medium. Beyond composition, there is a structural element that has dimension and engages many senses. It is an art form that you can appreciate by looking, touching, and using. Wall hangings are a great introduction to weaving and will add instant design cred to a room!
Photograph used with permission. Annabel Wrigley, Little Pincushion Studio.
Photograph used with permission. Annabel Wrigley, Little Pincushion Studio.
There are so many ways to introduce weaving to kids. First of all they will need a loom and some yarn. There are many DIY looms out there but if you are looking for a gift here are a few to consider.

Melissa and Doug weaving loom This is an all-in-one kit at a price you can't beat. A bit of yarn, step by step instructions and a sturdy wood frame.
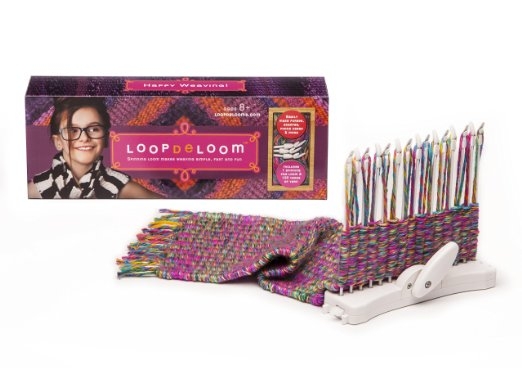
LoopdeLoom I see this one everywhere. Target, Amazon, Michaels, Barnes and Noble. It is based on traditional weaving methods but speeds the process up a bit.
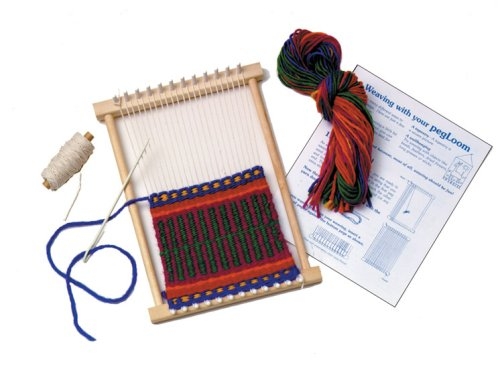
Harrisville Designs Pegloom This is the traditional peg loom that I learned to weave on. This hardwood loom will give your child years of enjoyment.
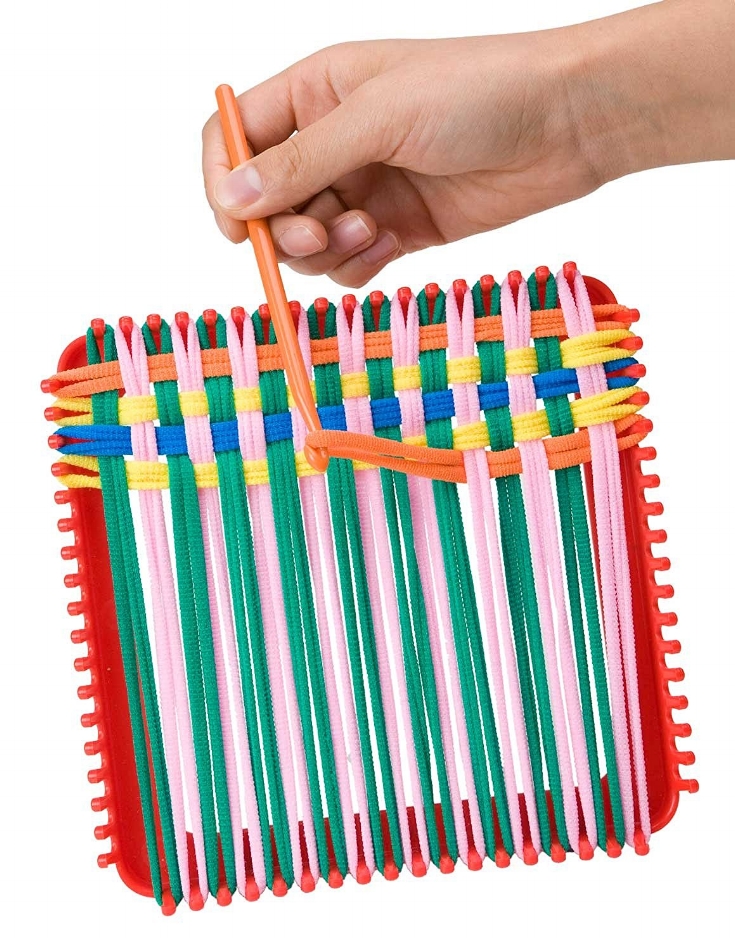
There is always the quintessential potholder loom that I'll bet you had as a child. This is a great way to introduce weaving to the youngest kids.
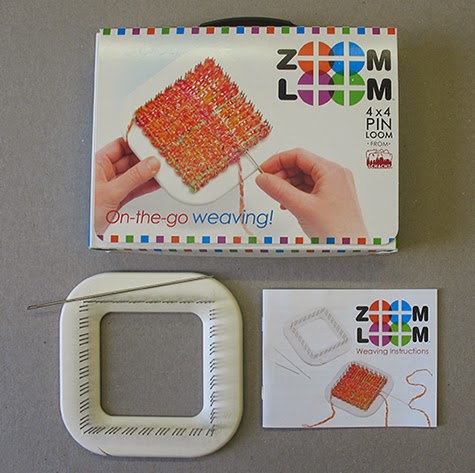
This Zoom Loom Pin Loom would make a really great gift for adults too. I bought this a few years ago and have made dozens of colorful coasters.
All of this talk about weaving has me ready to dust off my loom. Do I have the time to squeeze one more project in by Christmas Eve?
We're set for a busy week here in chez Stitch, so in case I don't pop back here before the weekend, have a wonderful Christmas, everyone, and safe travels for those leaving town.
XO, Hilarie

On the Tenth Day of Christmas.... Stocking Charms
Each year I like to make a new stocking charm for my kids to decorate their stocking. The idea is really simple and fun and jazzes up the stockings a little bit. Candy canes, initials, dolls, bears, whatever comes to mind. With kids out of school this week, this is a quick project that they would love and it might buy you a few minutes of peace.

Each year I like to make a new stocking charm for my kids to decorate their stocking. The idea is really simple and fun and jazzes up the stockings a little bit. Candy canes, initials, dolls, bears, whatever comes to mind. With kids out of school this week, this is a quick project that they would love and it might buy you a few minutes of peace.
I like to think of these as kitchen counter crafts. They require very little time and supplies that you probably already have.

Felt
Scissors
Embroidery floss
Needle
A bit of poly-fil stuffing
Begin by drawing a simple shape that is about 3-4 inches high and at least an inch wide. Cut it out and use it as a pattern. The simpler the shape, the easier it will be to sew. You can always embellish later.
Place it on the felt and cut around. You will need a back and a front. For this tutorial I am using the letter C and a star.

If you are sewing a shape that has an inside and an outside (like this letter C) begin sewing on the inside.
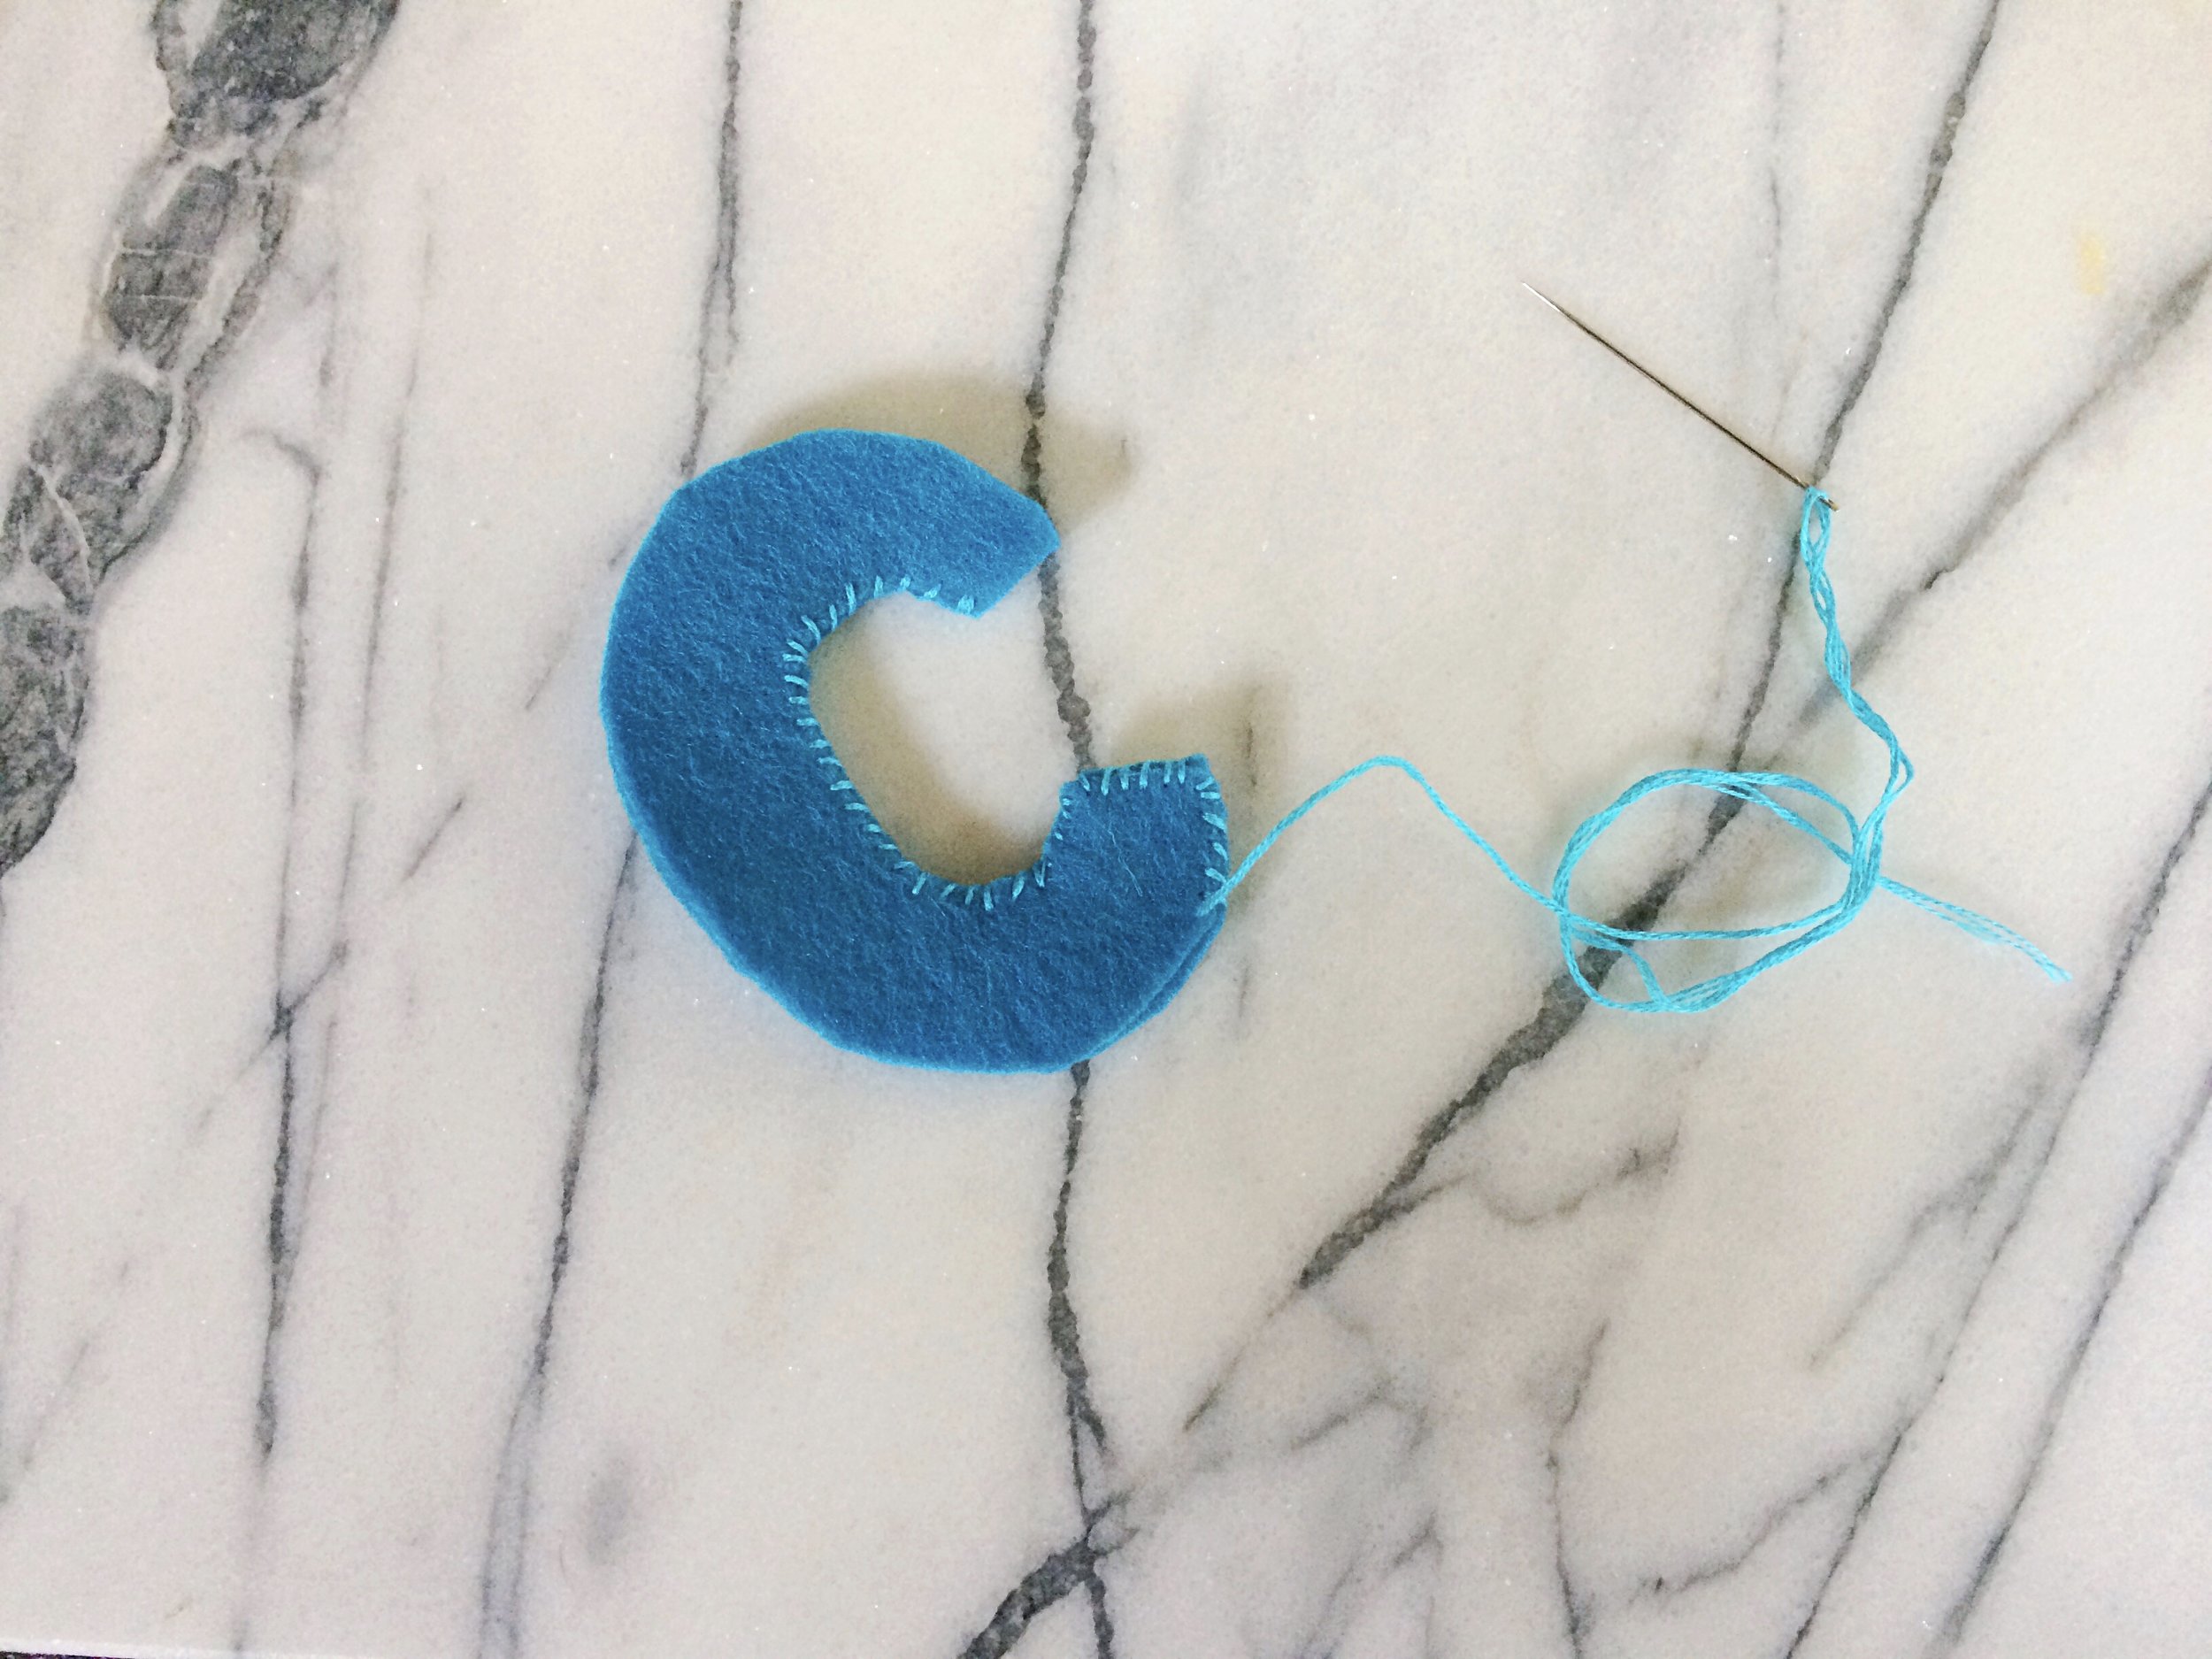
Continue to sew around the edge and a bit up the outside curve.

Once you have an inch or two stitched on both sides, you can begin to gently stuff. I like to take small tufts of poly-fill and push it through a little bit at a time. A chopstick works well for this, as does the eraser end of a pencil. Continue to stitch and stuff until complete. Tie off.
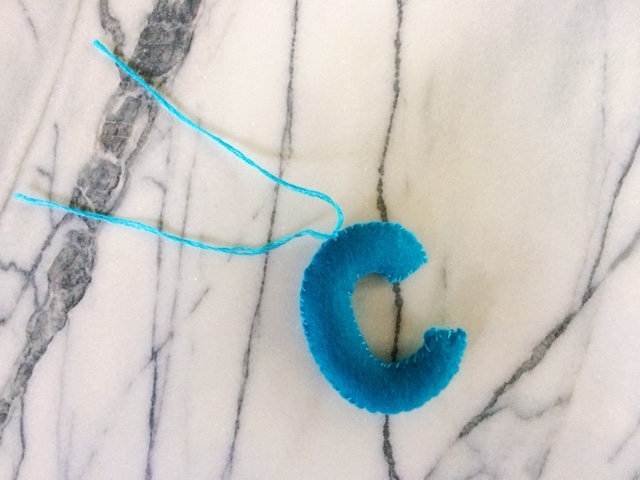
Cut a length of floss to thread through the top of your shape and hang!

The steps are pretty much the same for a shape such as a star. Begin by inserting the needle on the inside corner of one of your shape. (This way the knot will be hidden on the inside).
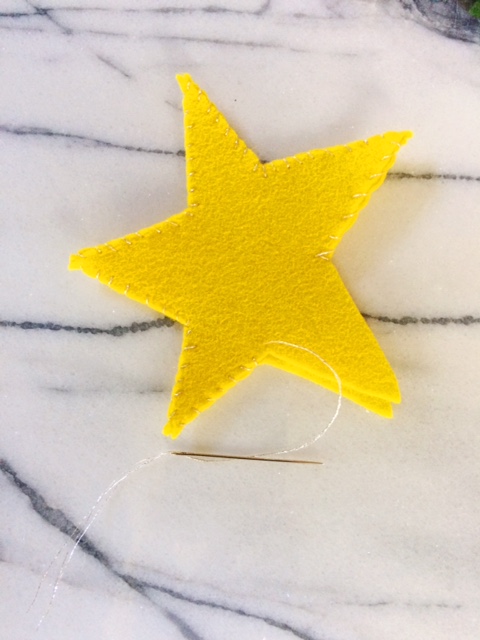
Continue sewing around the shape.

Once most of the shape is stitched, begin to stuff.

Stitch to close. Then either sew a ribbon from the top or a length of floss. Tie and hang with pride.
Which shape will you make first?

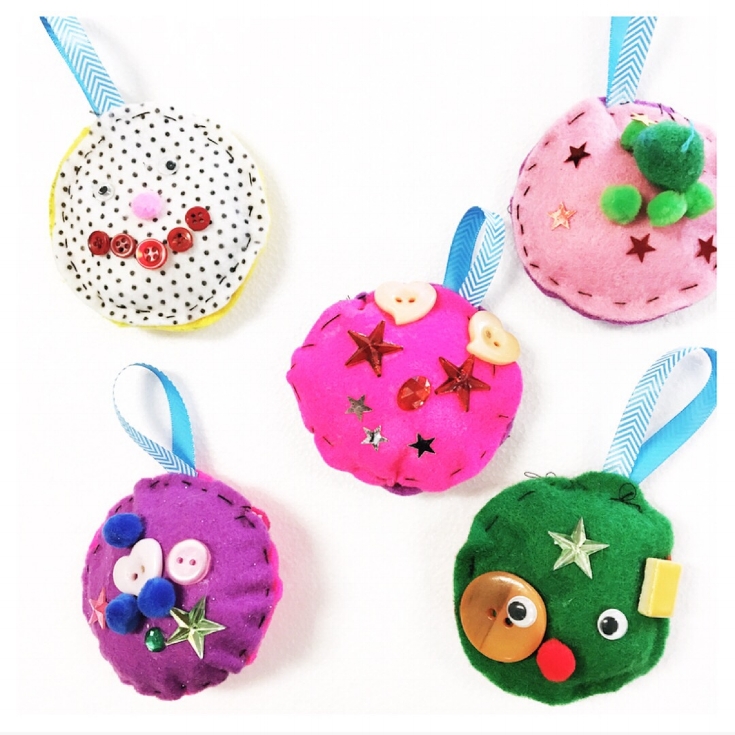
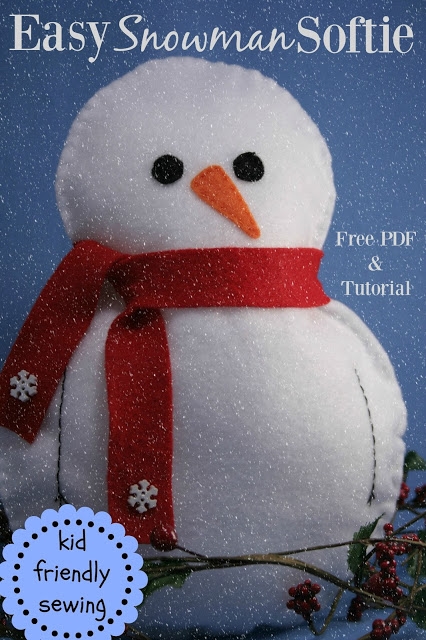
On the ninth day of Christmas... A Sew a Softie Round up
The last two weeks, we've celebrated everything hand-sewing and softie-related and it’s clear you love sewing with kids as much as we do. In this post you will find all of the inspiration you will need to sew an ornament or toy for Christmas.
But perhaps the best part of Sew a Softie for Christmas is the blog tour. These lovely ladies showed us their take on simple sewing projects with kids. So many of our blogger friends have posted darling sewing projects over the past few days, it's hard to know where to start!
Sew a softie for Christmas Round-up

This is the Christmas Treat Cone that I made.

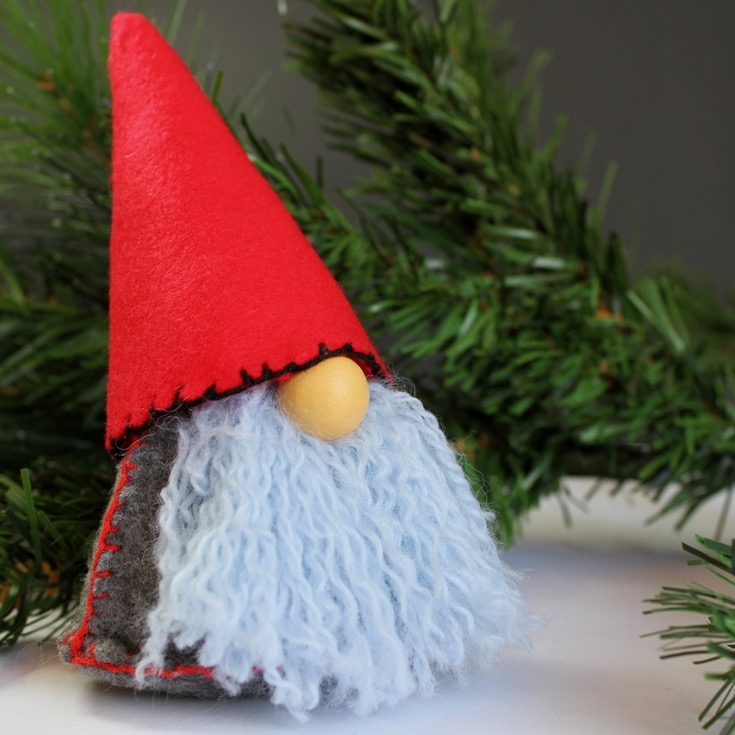

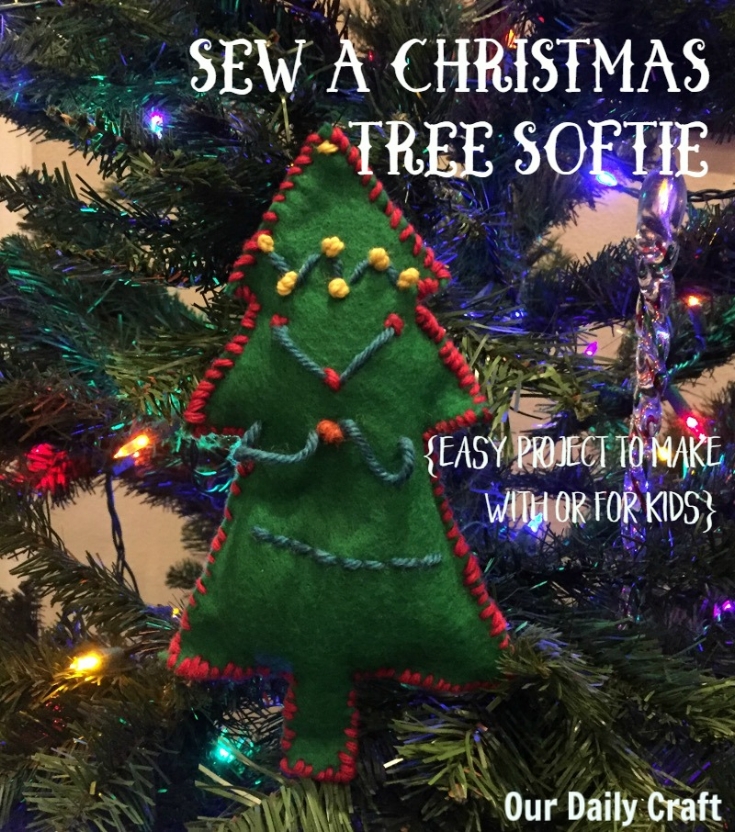
Christmas tree softie http://www.ourdailycraft.com/2016/12/02/sew-christmas-tree-softie/


Thank you so much to everyone who is included here. Such a lot of wonderful sewing you've done with this idea! What are you going to make first?
XO, Hilarie

On the Eighth Day of Christmas....
I know many kids that are asking for a sewing machine and "sewing stuff" for Christmas/ Hanukkah this year. More than a few parents have called to ask me for recommendations for a sewing machine and supplies.
On the Eighth Day of Christmas, I give you a DIY sewing kit.
I know many kids that are asking for a sewing machine and "sewing stuff" for Christmas/ Hanukkah this year. More than a few parents have called to ask me for recommendations for a sewing machine and supplies.
The following are some suggestions to get you started. You don’t need to include all of these items! Pick and choose the ones that you think would best suit the child and your budget.
Also, please note that links to online versions of the following are provided for your convenience. Both so you can click through and see a picture of the item, the price, and (in some cases) reviews and to give you a convenient online location to buy if you prefer to do your shopping online. However, please know that you can find much of these in your local sewing and craft store.
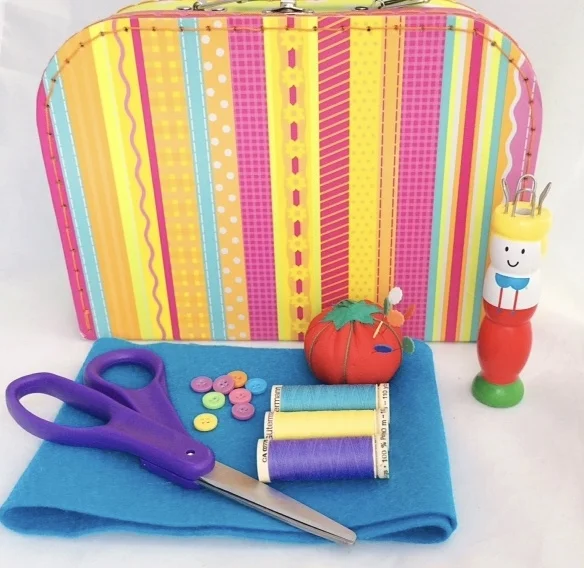
So lets get your kit started. The advantage of putting a kit together yourself vs purchasing one that is pre-assembled is that the quality of these items are far superior to the kits. You can choose the size and quantity to fit your budget and the colors to suit your child. A great sewing box can be filled over time and as their interest grows.
For the kid that loves to sew
Measuring, marking, cutting and sewing are what we are focusing on first.
Tailor's chalk and pens These magic pens are always a hot item in class. Heat of an iron will erase their marks.
Straight pins and a pincushion
You will need two types of scissors to begin. Sharp fabric scissors and small ones to clip threads.
Then you will need thread, needles and fabric to sew.
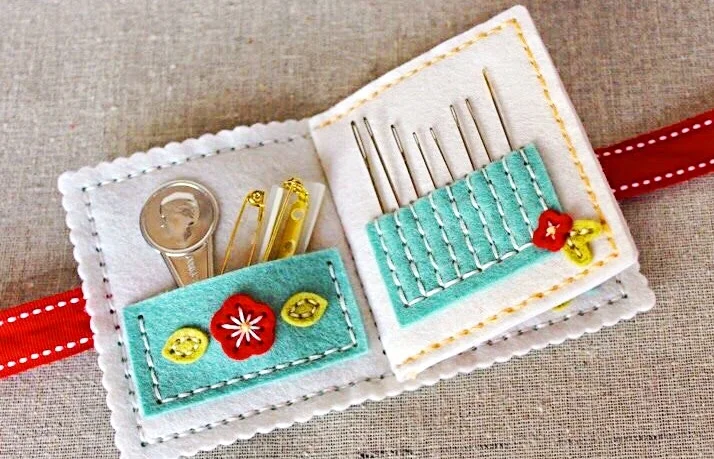
Thread, embroidery floss or pearl cotton, and sewing needles that have a large eye and are easy to thread. A needle threader, a colorful stack of fabric- try some fat quarters, or an assortment of felt to inspire their creativity.
And don't forget about embellishments! A sewing kit for kids would not be complete without a big bag of polyfil and a way to personalize their creation. An assortment of ribbon, beads, ricrac trim and yarn will help to complete any vision your child may have.
With these supplies, you are guaranteed hours of quiet, creative time. I promise!
XO, Hilarie