

The Poppy Convertible Tote PDF Pattern and Tutorial
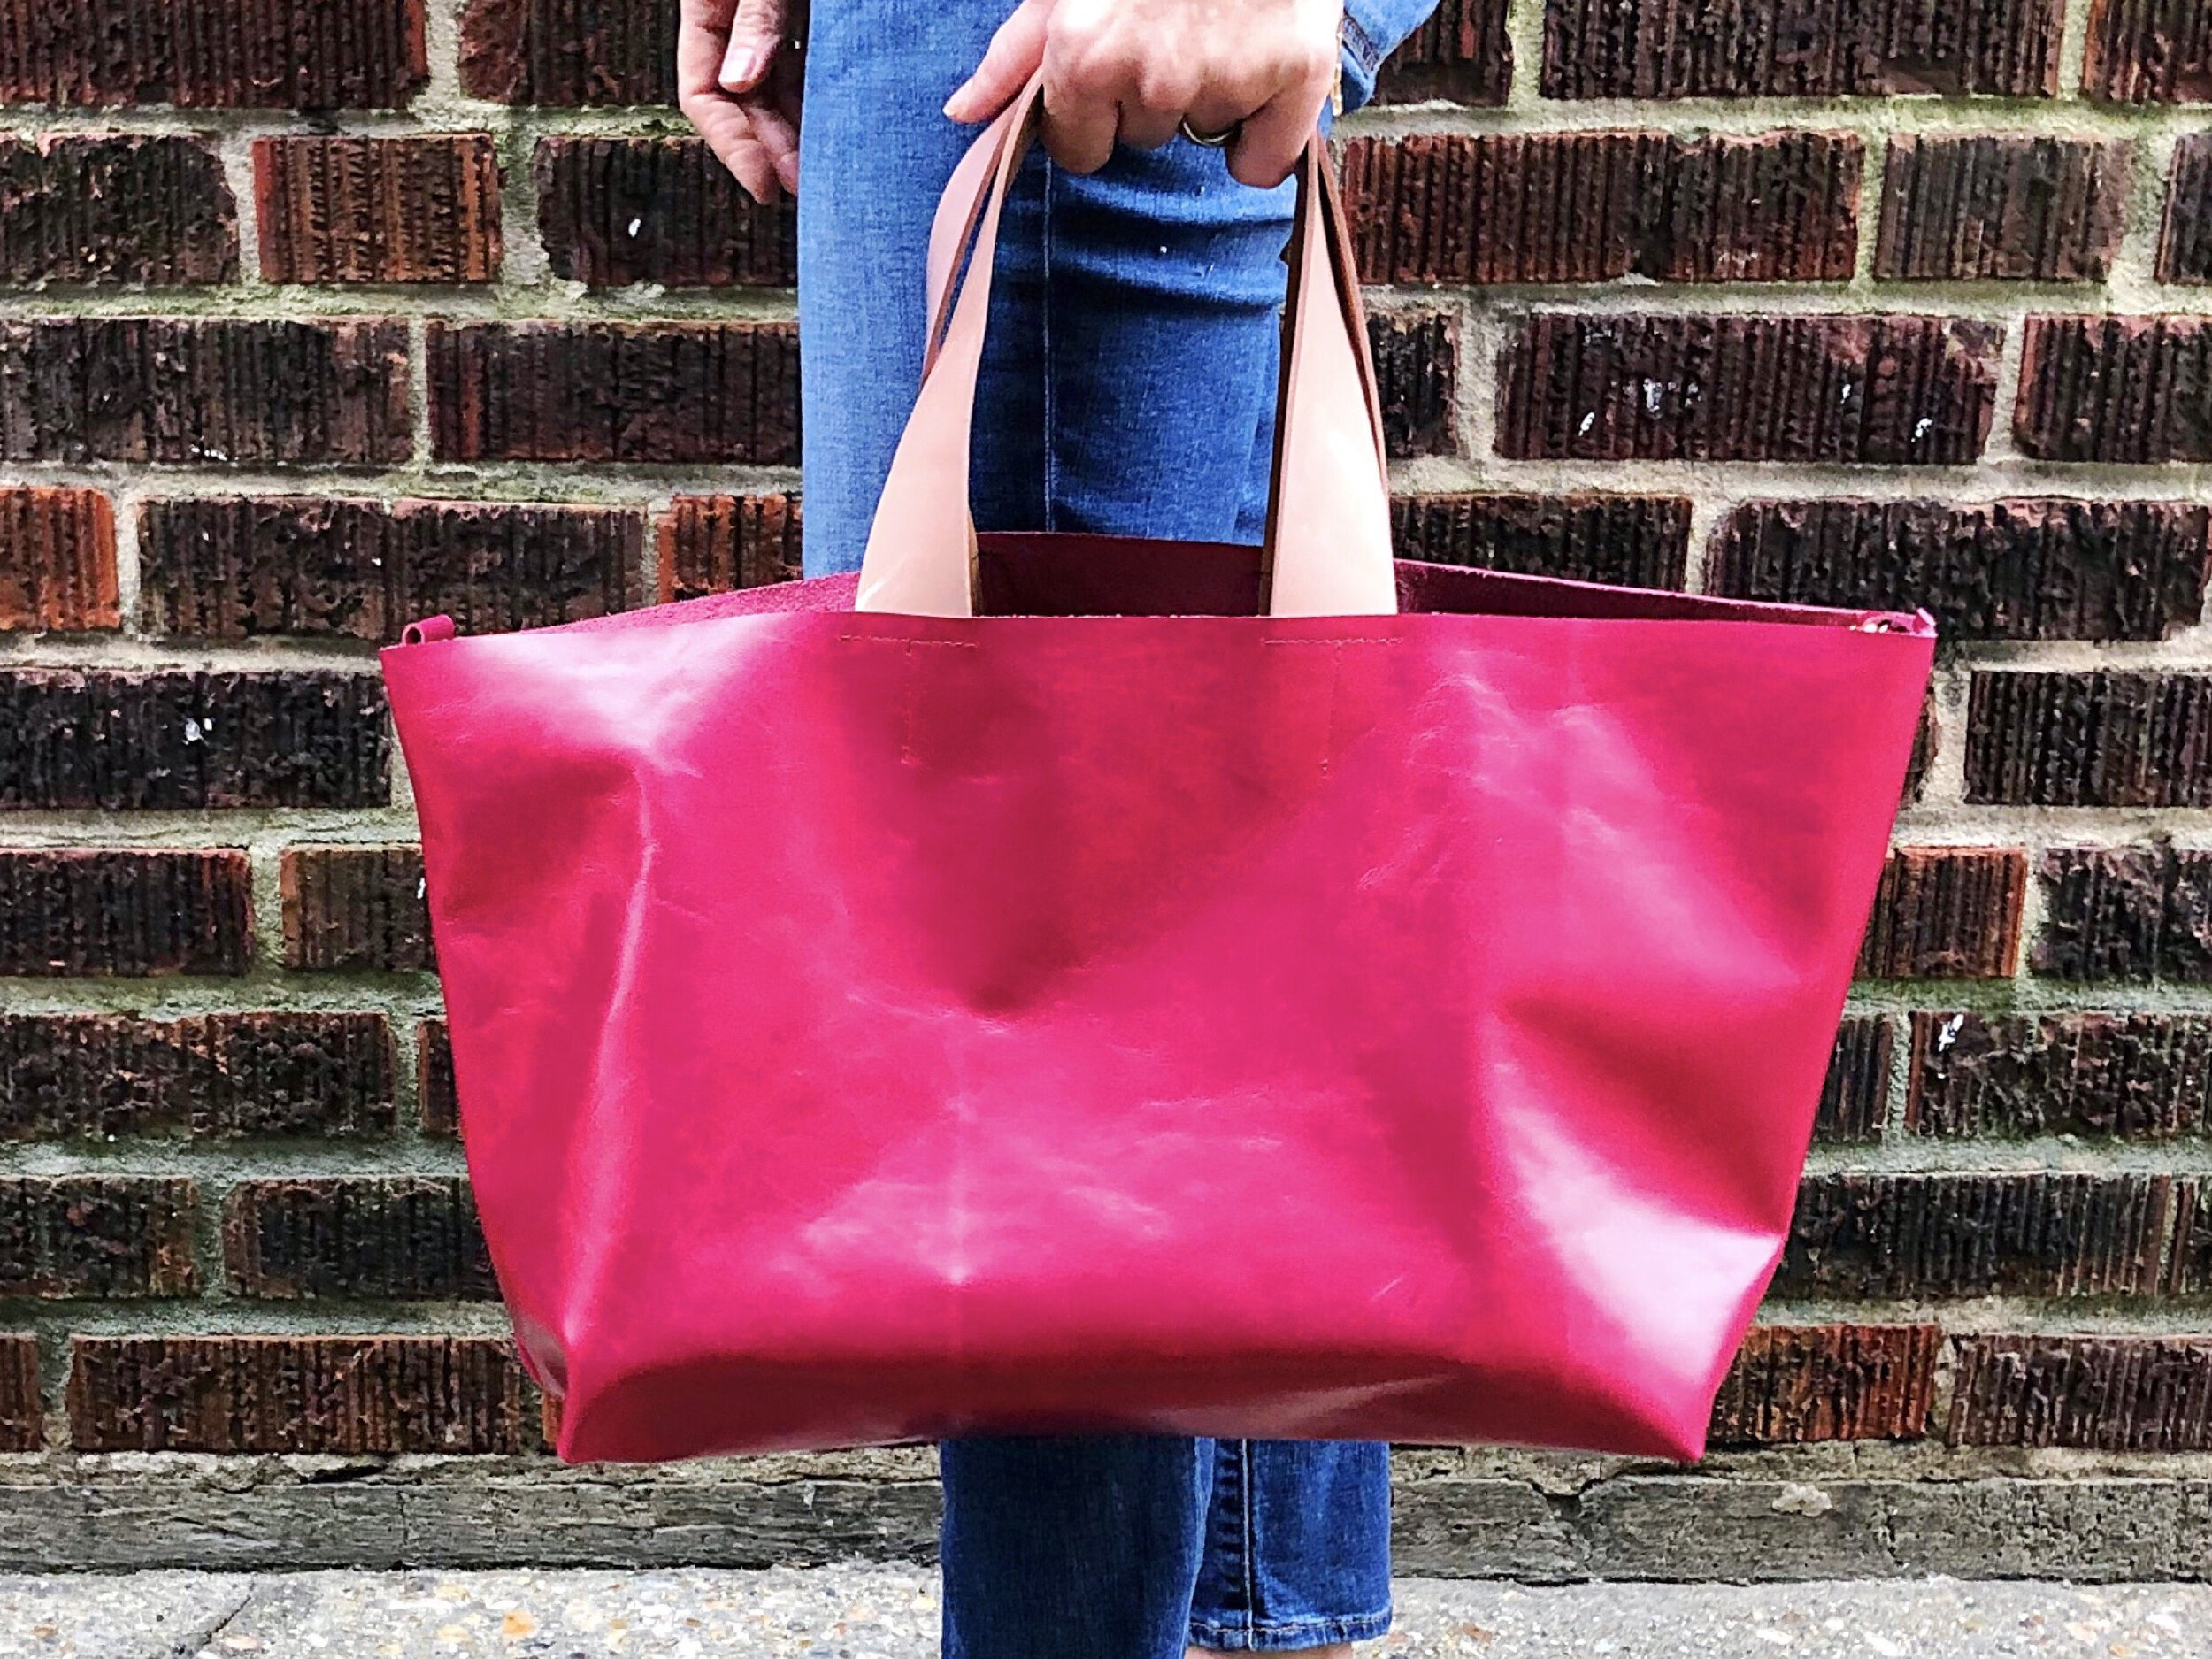
Welcome to my newest pattern, The Poppy Convertible Tote. Poppy is at once classic and modern. A beautiful leather tote that easily cinches to a classic shoulder bag. Featuring comfortable cotton webbing straps, an interior pocket plus hardware that functions as both clasp and optional cross-body strap holder.
Poppy is the perfect bag for learning to sew with leather. It has few seams and best of all- it doesn’t require fitting!
Introducing Poppy!
Welcome to my newest pattern, The Poppy Convertible Tote. Poppy is at once classic and modern. A beautiful leather tote that easily cinches to a classic shoulder bag. Featuring comfortable cotton webbing straps, an interior pocket plus hardware that functions as both clasp and optional cross-body strap holder.
LEARN TO SEW A LEATHER BAG
Poppy is the perfect bag for learning to sew with leather. It has few seams and best of all- it doesn’t require fitting! Speaking of leather, it is time that you start shopping so that you can get started on your bag. You will need about 7.5 square feet (0.7 m2) of cow hide with an approximate weight of 2-3 ounces for this bag. Cow hide is much stiffer than some other skins such as lamb or goat. That stiffness is needed to hold the shape. The leather for my bags is from Leather Suede Skins, Inc. in NYC. Call and ask for Faina. She will help you select the ideal leather for your bag. Alternately, you can find leather online or a local specialty store.
FREE PDF PATTERN DOWNLOAD AND TUTORIAL
The PDF Version of the Poppy Convertible Tote is available now for instant downloading. It is formatted for printing at home on standard 8.5 x 11” or A5 paper. The PDF is 31 pages, 9 of which include the pattern. The rest is all instruction, tips and techniques. This pattern was designed to be made along with my book, Sew Bags: The Practical Guide to Making Purses, Totes, Clutches & More; 13 Skill-Building Projects.

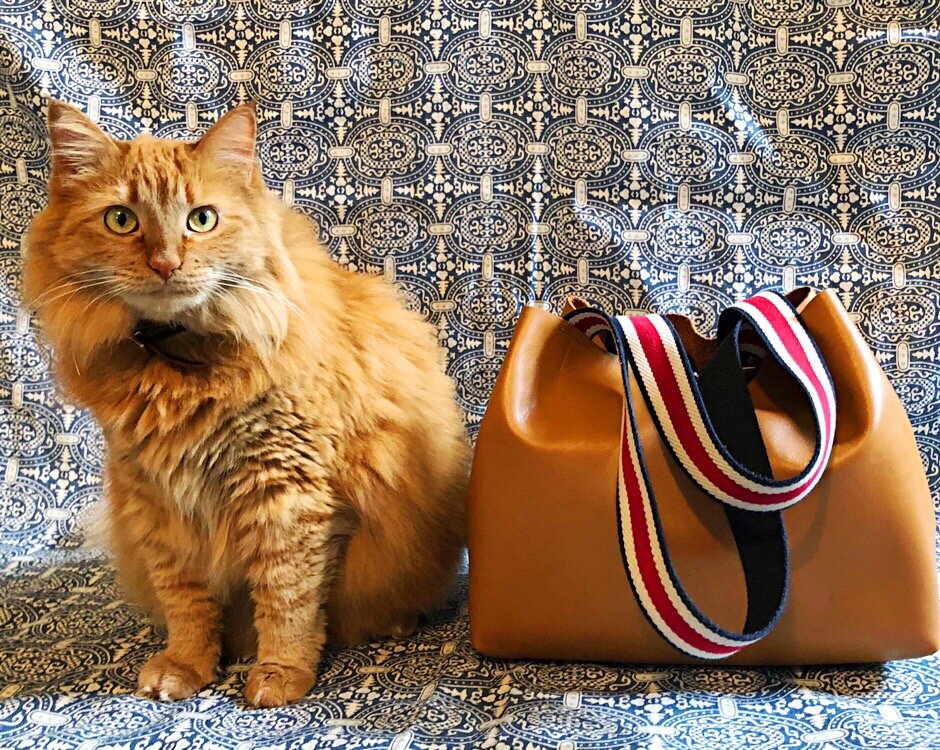
Poppy, my sweet kitty with her bag.
This pattern is a long time coming, and I am so happy to finally be launching it. You can look forward to a sew along in the coming weeks.
I hope that you enjoy this pattern and learn a new skill or two. Please share your pictures- I can’t wait to see your finished bag.
XOXO, Hilarie
#poppyconvertibletote #sewbags

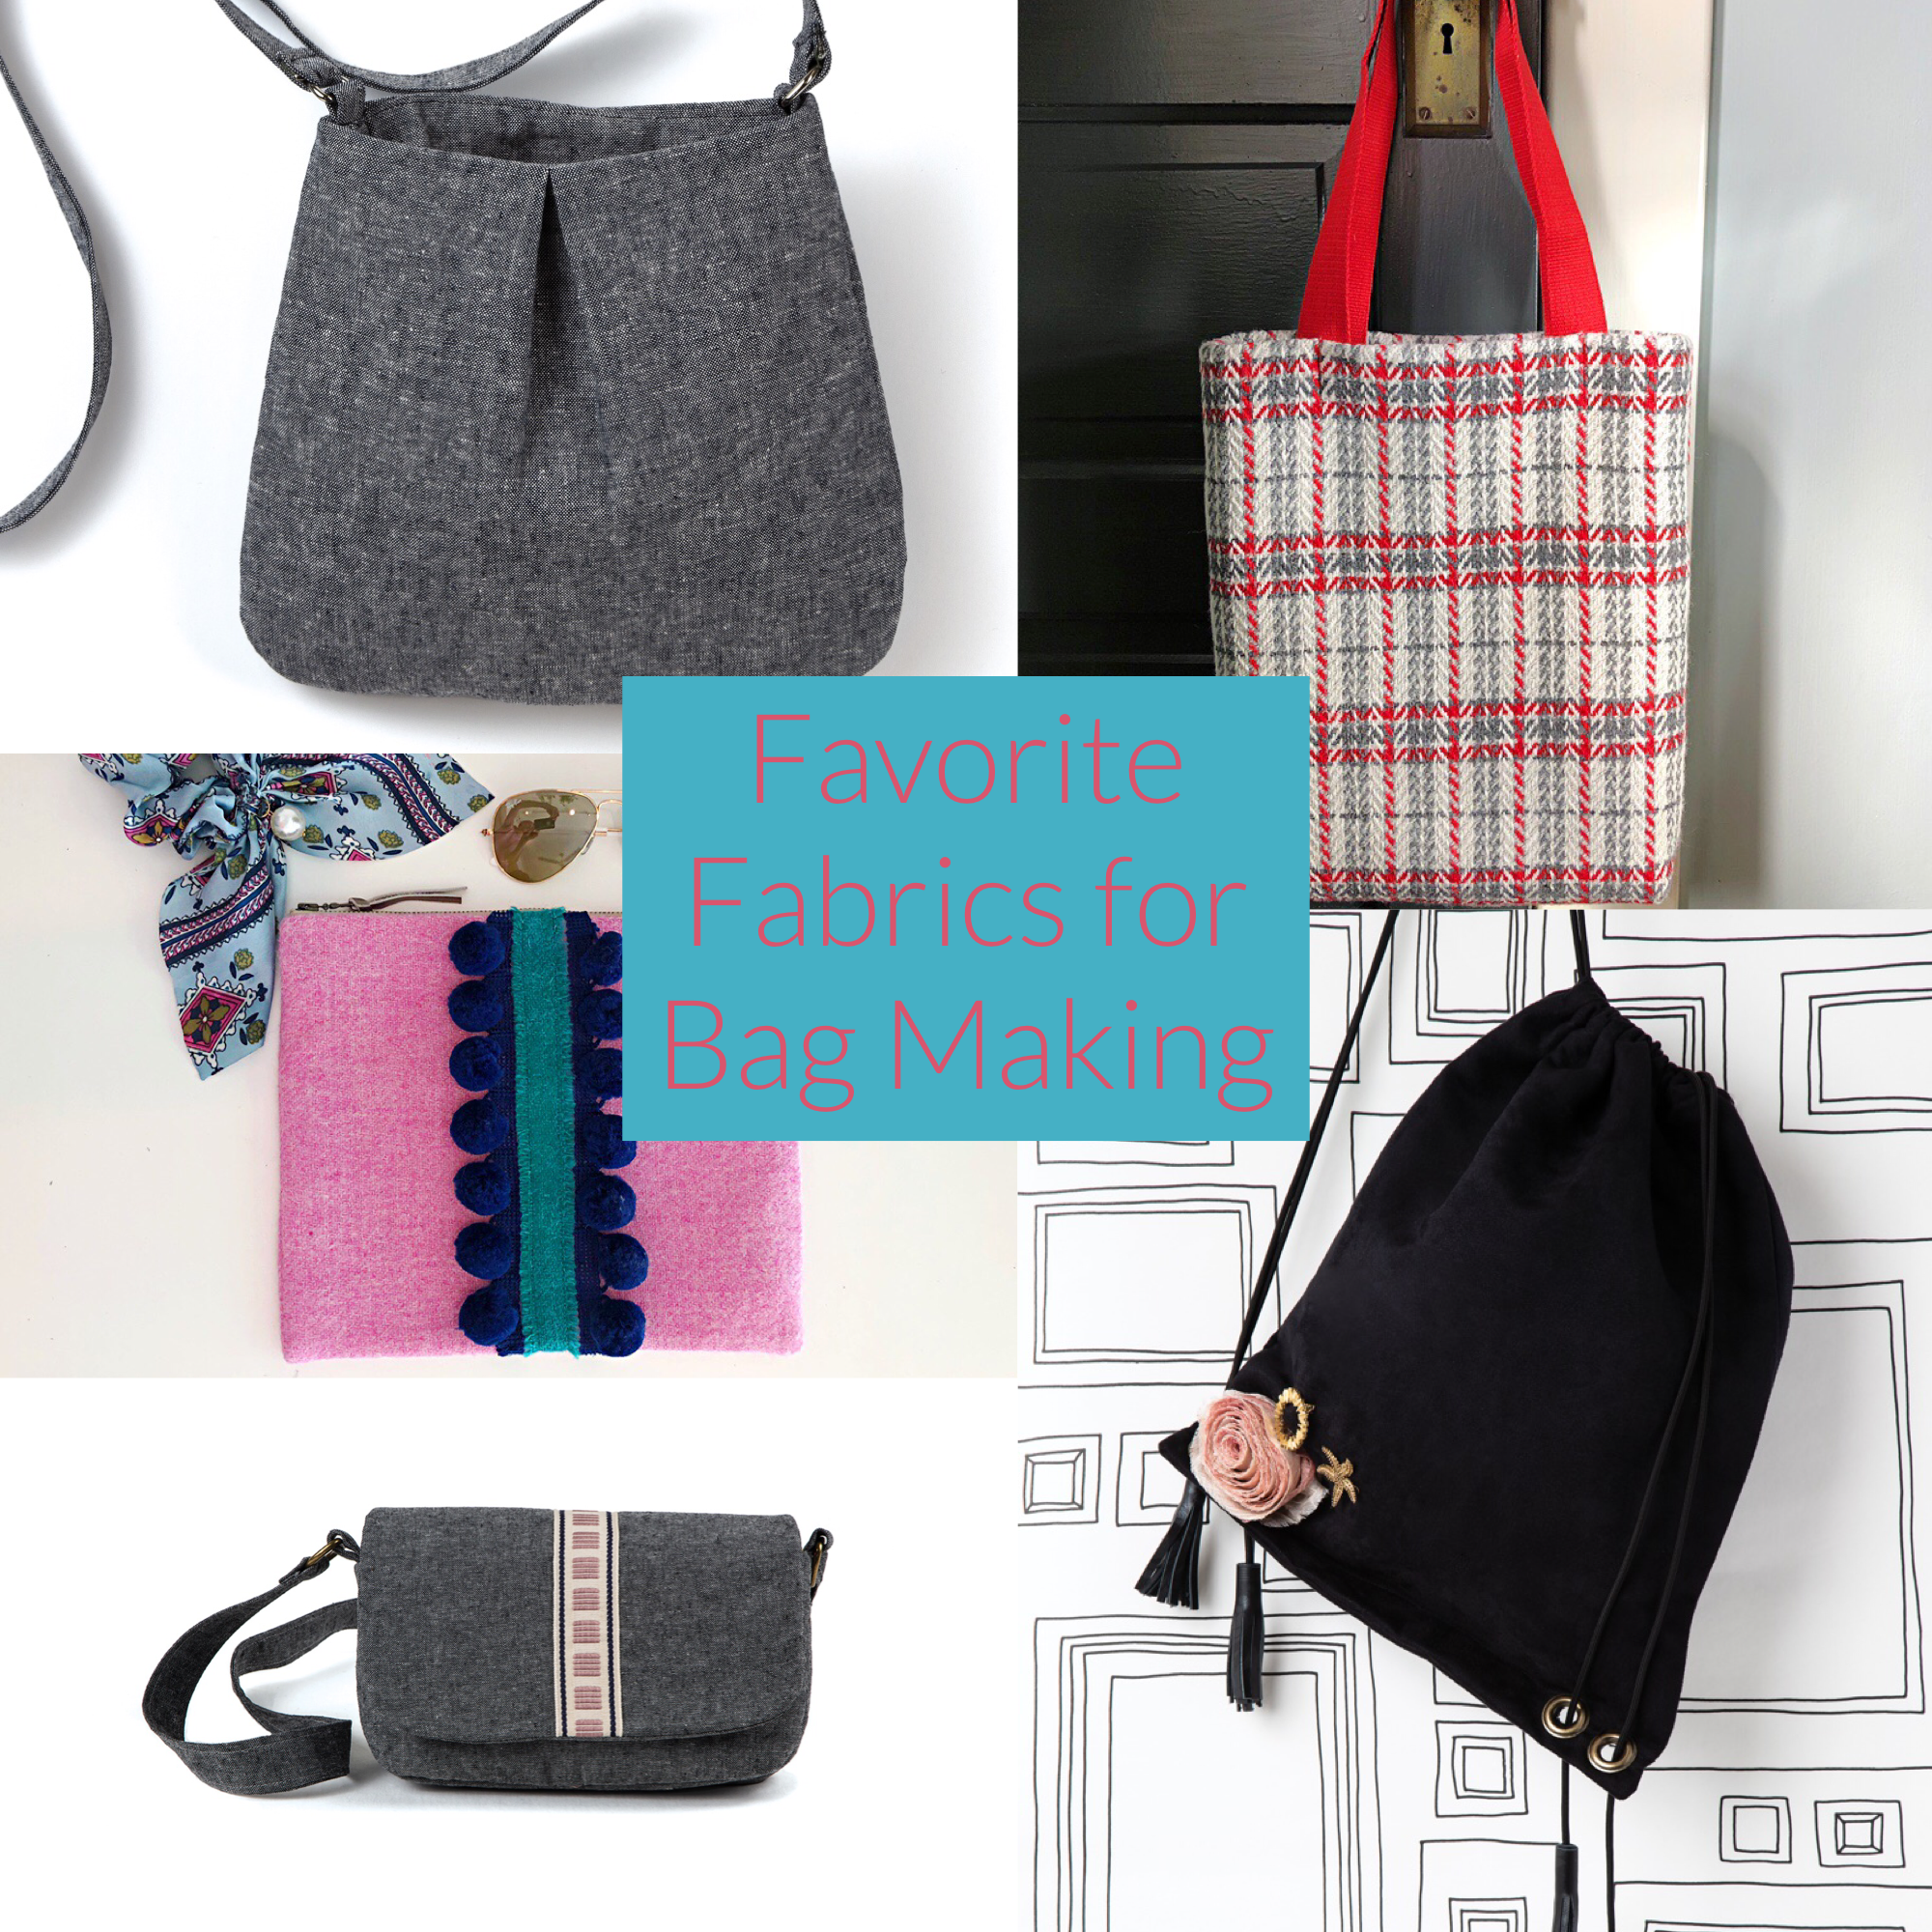
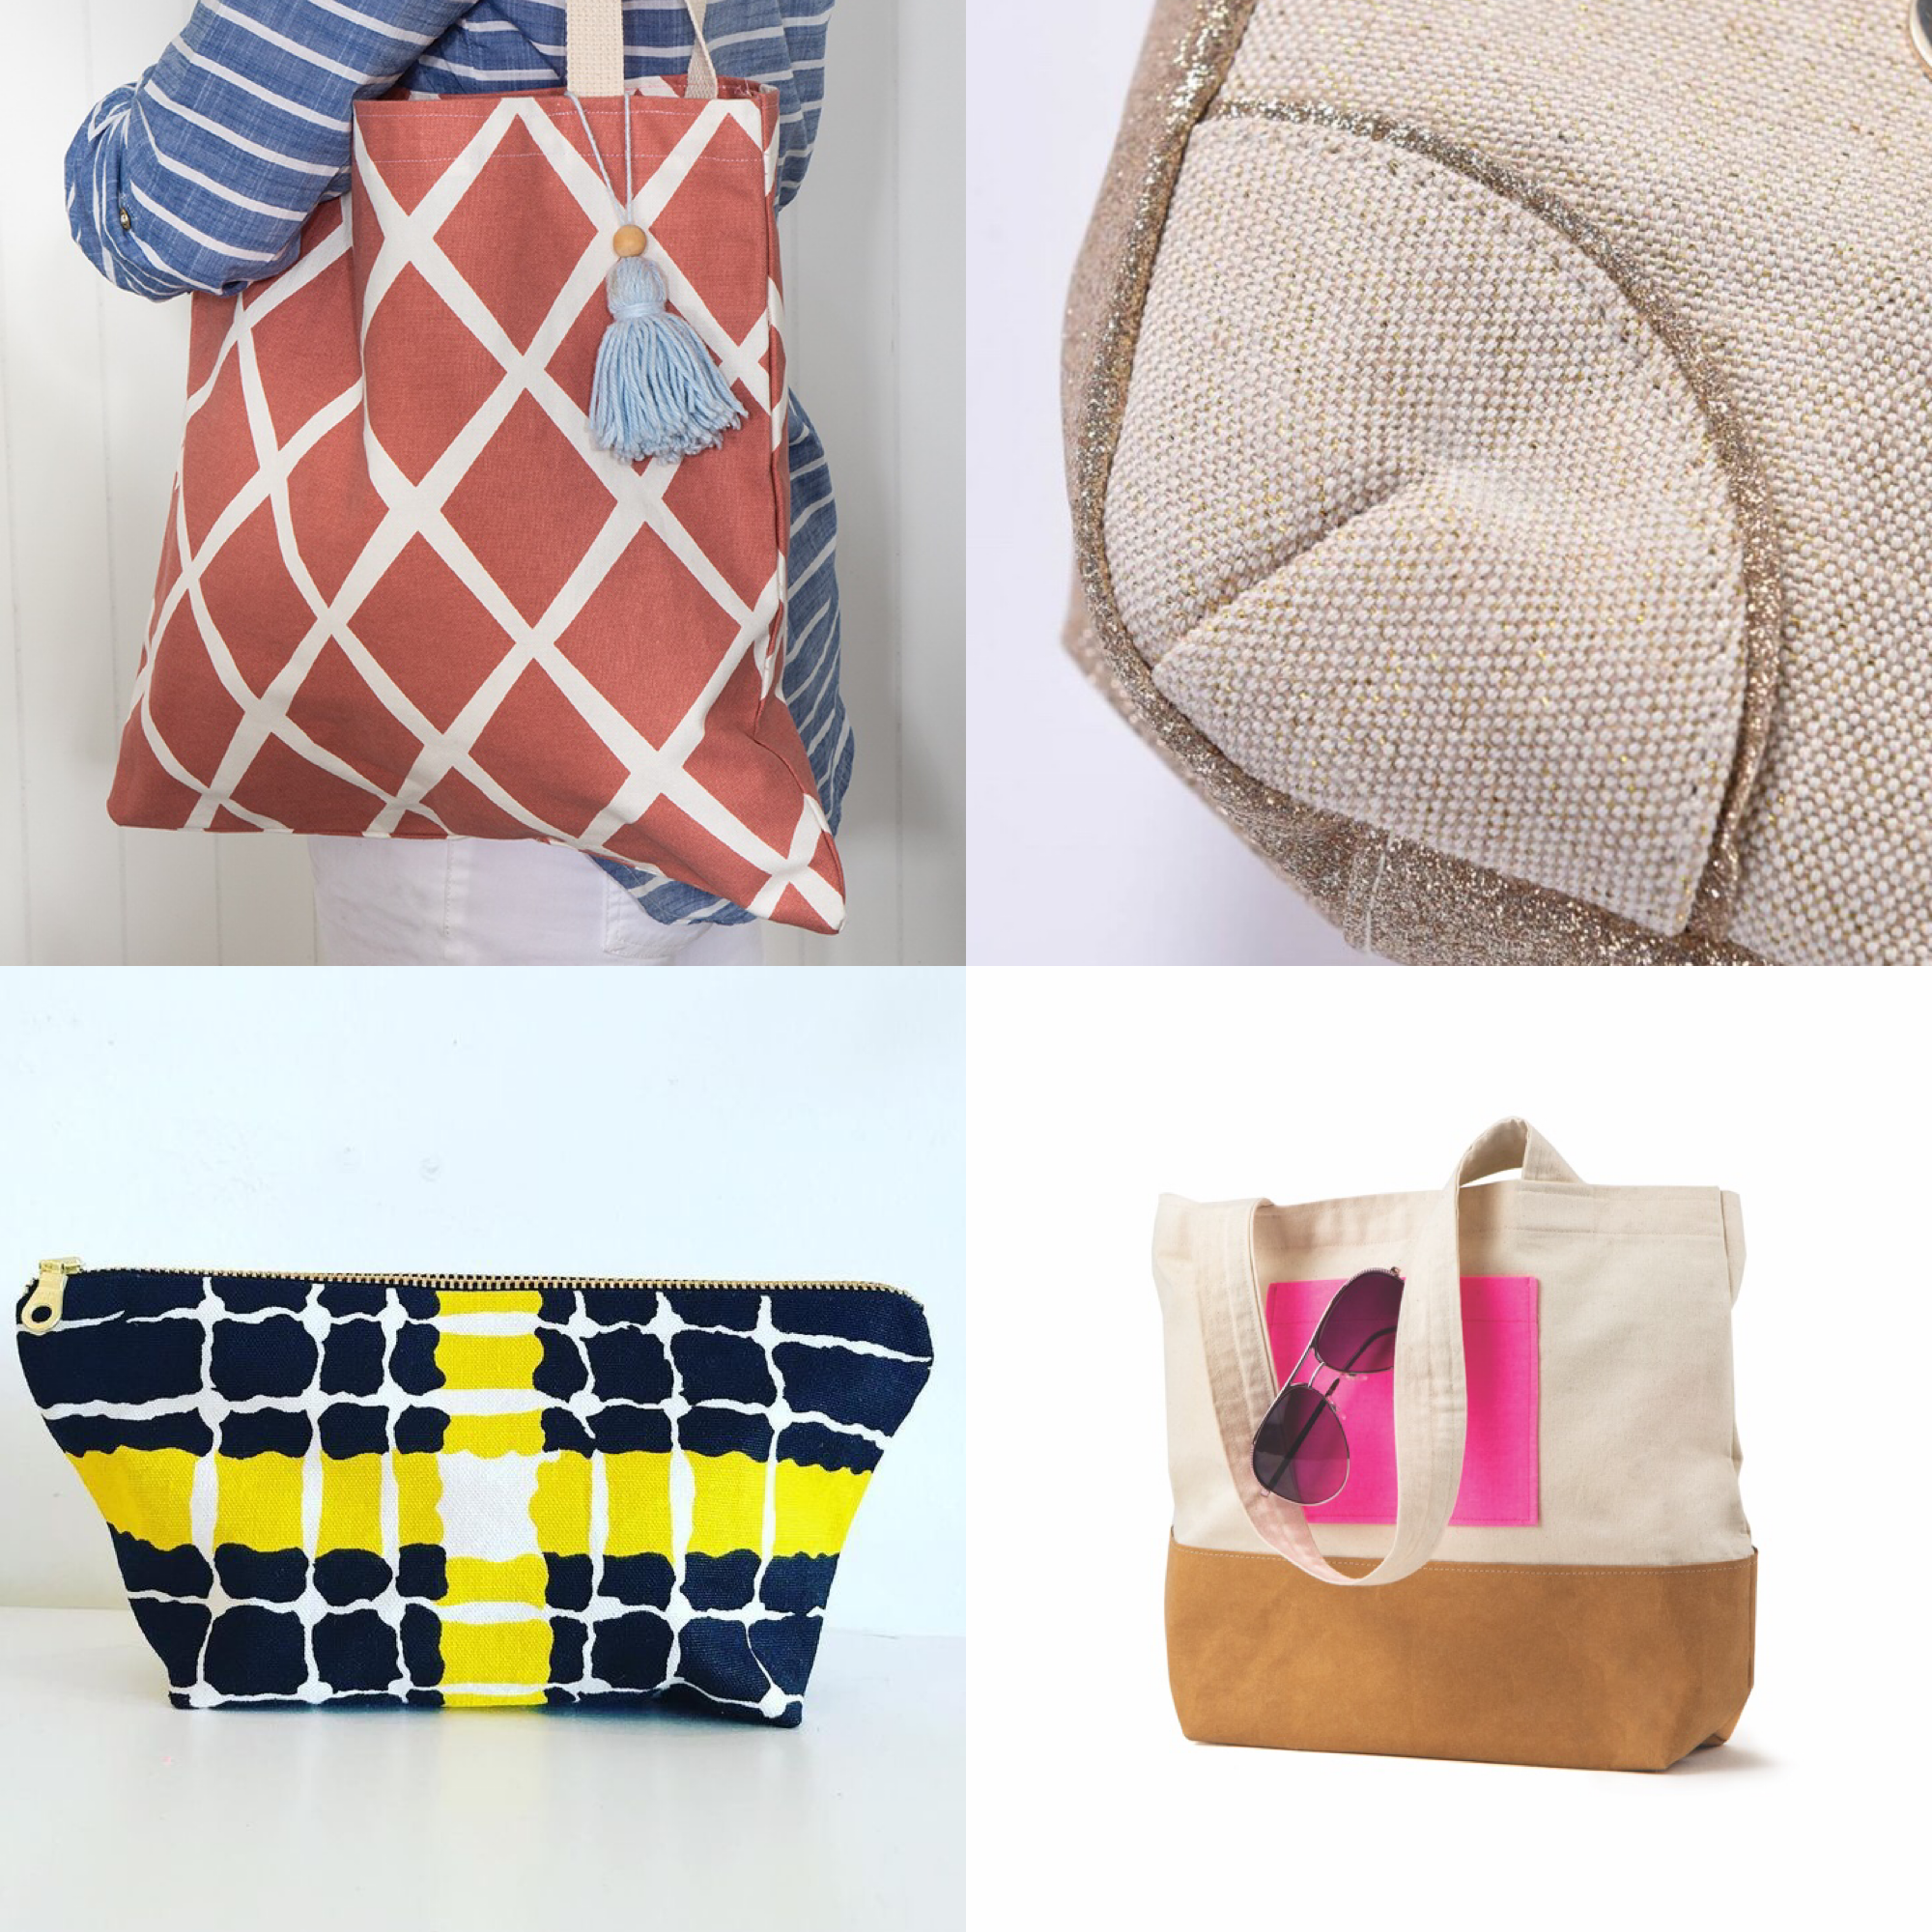
5 Best Fabrics for Sewing Bags and Purses
Choosing fabric for a bag is always a balance between form and function. Functionality is key! Assessing the level of use the bag will endure over its lifetime is critical in determining the right type of fabric. You can begin by asking yourself, when will the bag be used? What will it carry? Is it for day or evening? Is it for a child? Once the functionality question is answered, then it is time to consider weight.
5 Best Fabrics for Sewing Bags and Purses
Choosing fabric for a bag is always a careful balance between form and function. With functionality being key! Assessing the level of use the bag will endure over its lifetime is critical in determining the right type of fabric. You can begin to determine this by asking yourself, when will the bag be used? What will it carry? Is it for day or evening? Is it for a grownup, teenager or child? Once the functionality question is answered, then it is time to consider weight.
Generally speaking, fabric falls into a couple of main categories, apparel weight, quilt weight and home décor or upholstery weight. Bags are unlike clothes though, and as such, you can mix and match weights from various categories, keeping in mind of course overall function.
Most of the bags that I make are for day and evening use. As such, I do layer interfacing and linings for structure and try to find a mid-weight fabric that will support all that I am carrying around. To that end, it is time for the fun stuff: color, texture and pattern!
Pattern or solid? Bold color or neutral? Fabric or leather? What about mixing it up and combining leather with fabric or a print and solid with a neon strap? Just consider the possibilities……..
MY FAVORITE BAG-MAKING FABRICS
LEATHER
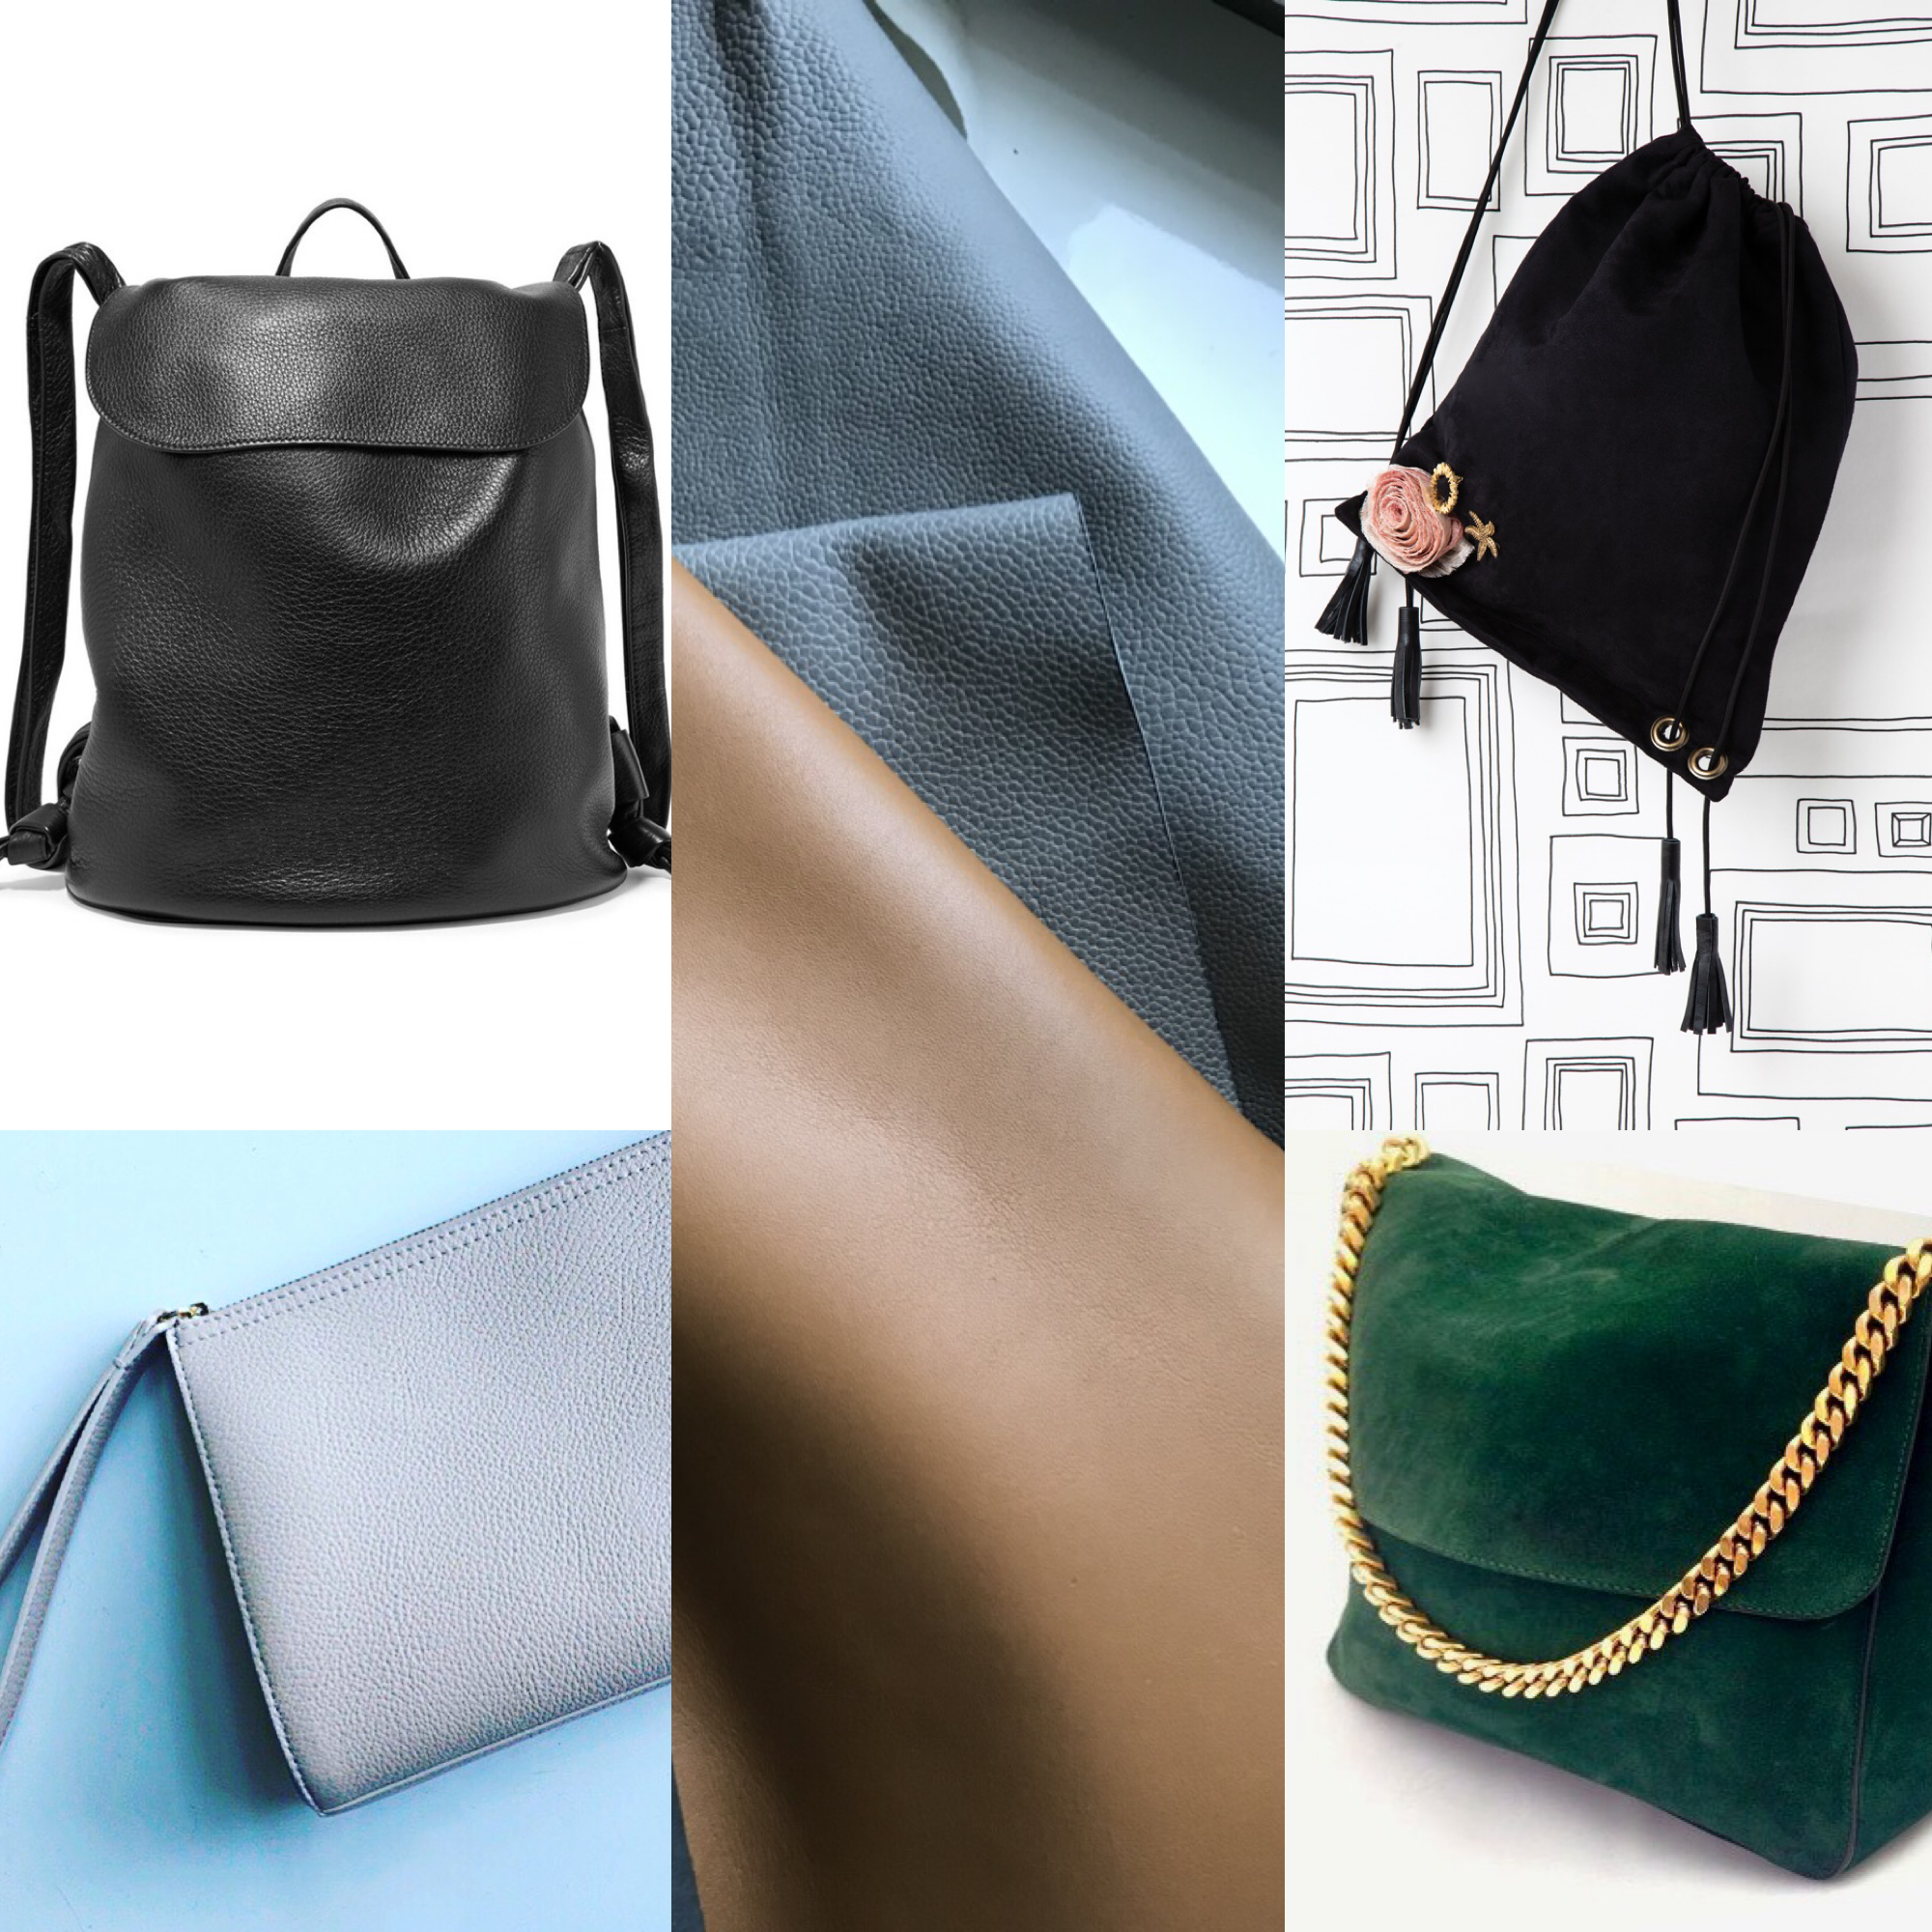
Nothing beats the durability of a genuine leather bag. The leather doesn’t even have to be new. Thrift stores, eBay, even your own closet likely offer a plethora of options. Most conventional home sewing machines, fitted with a leather needle and a teflon foot can handle leather up to about 3-ounce weight. Thrift stores and eBay are my go-to sources for purchasing leather.
DECORATOR WEIGHT
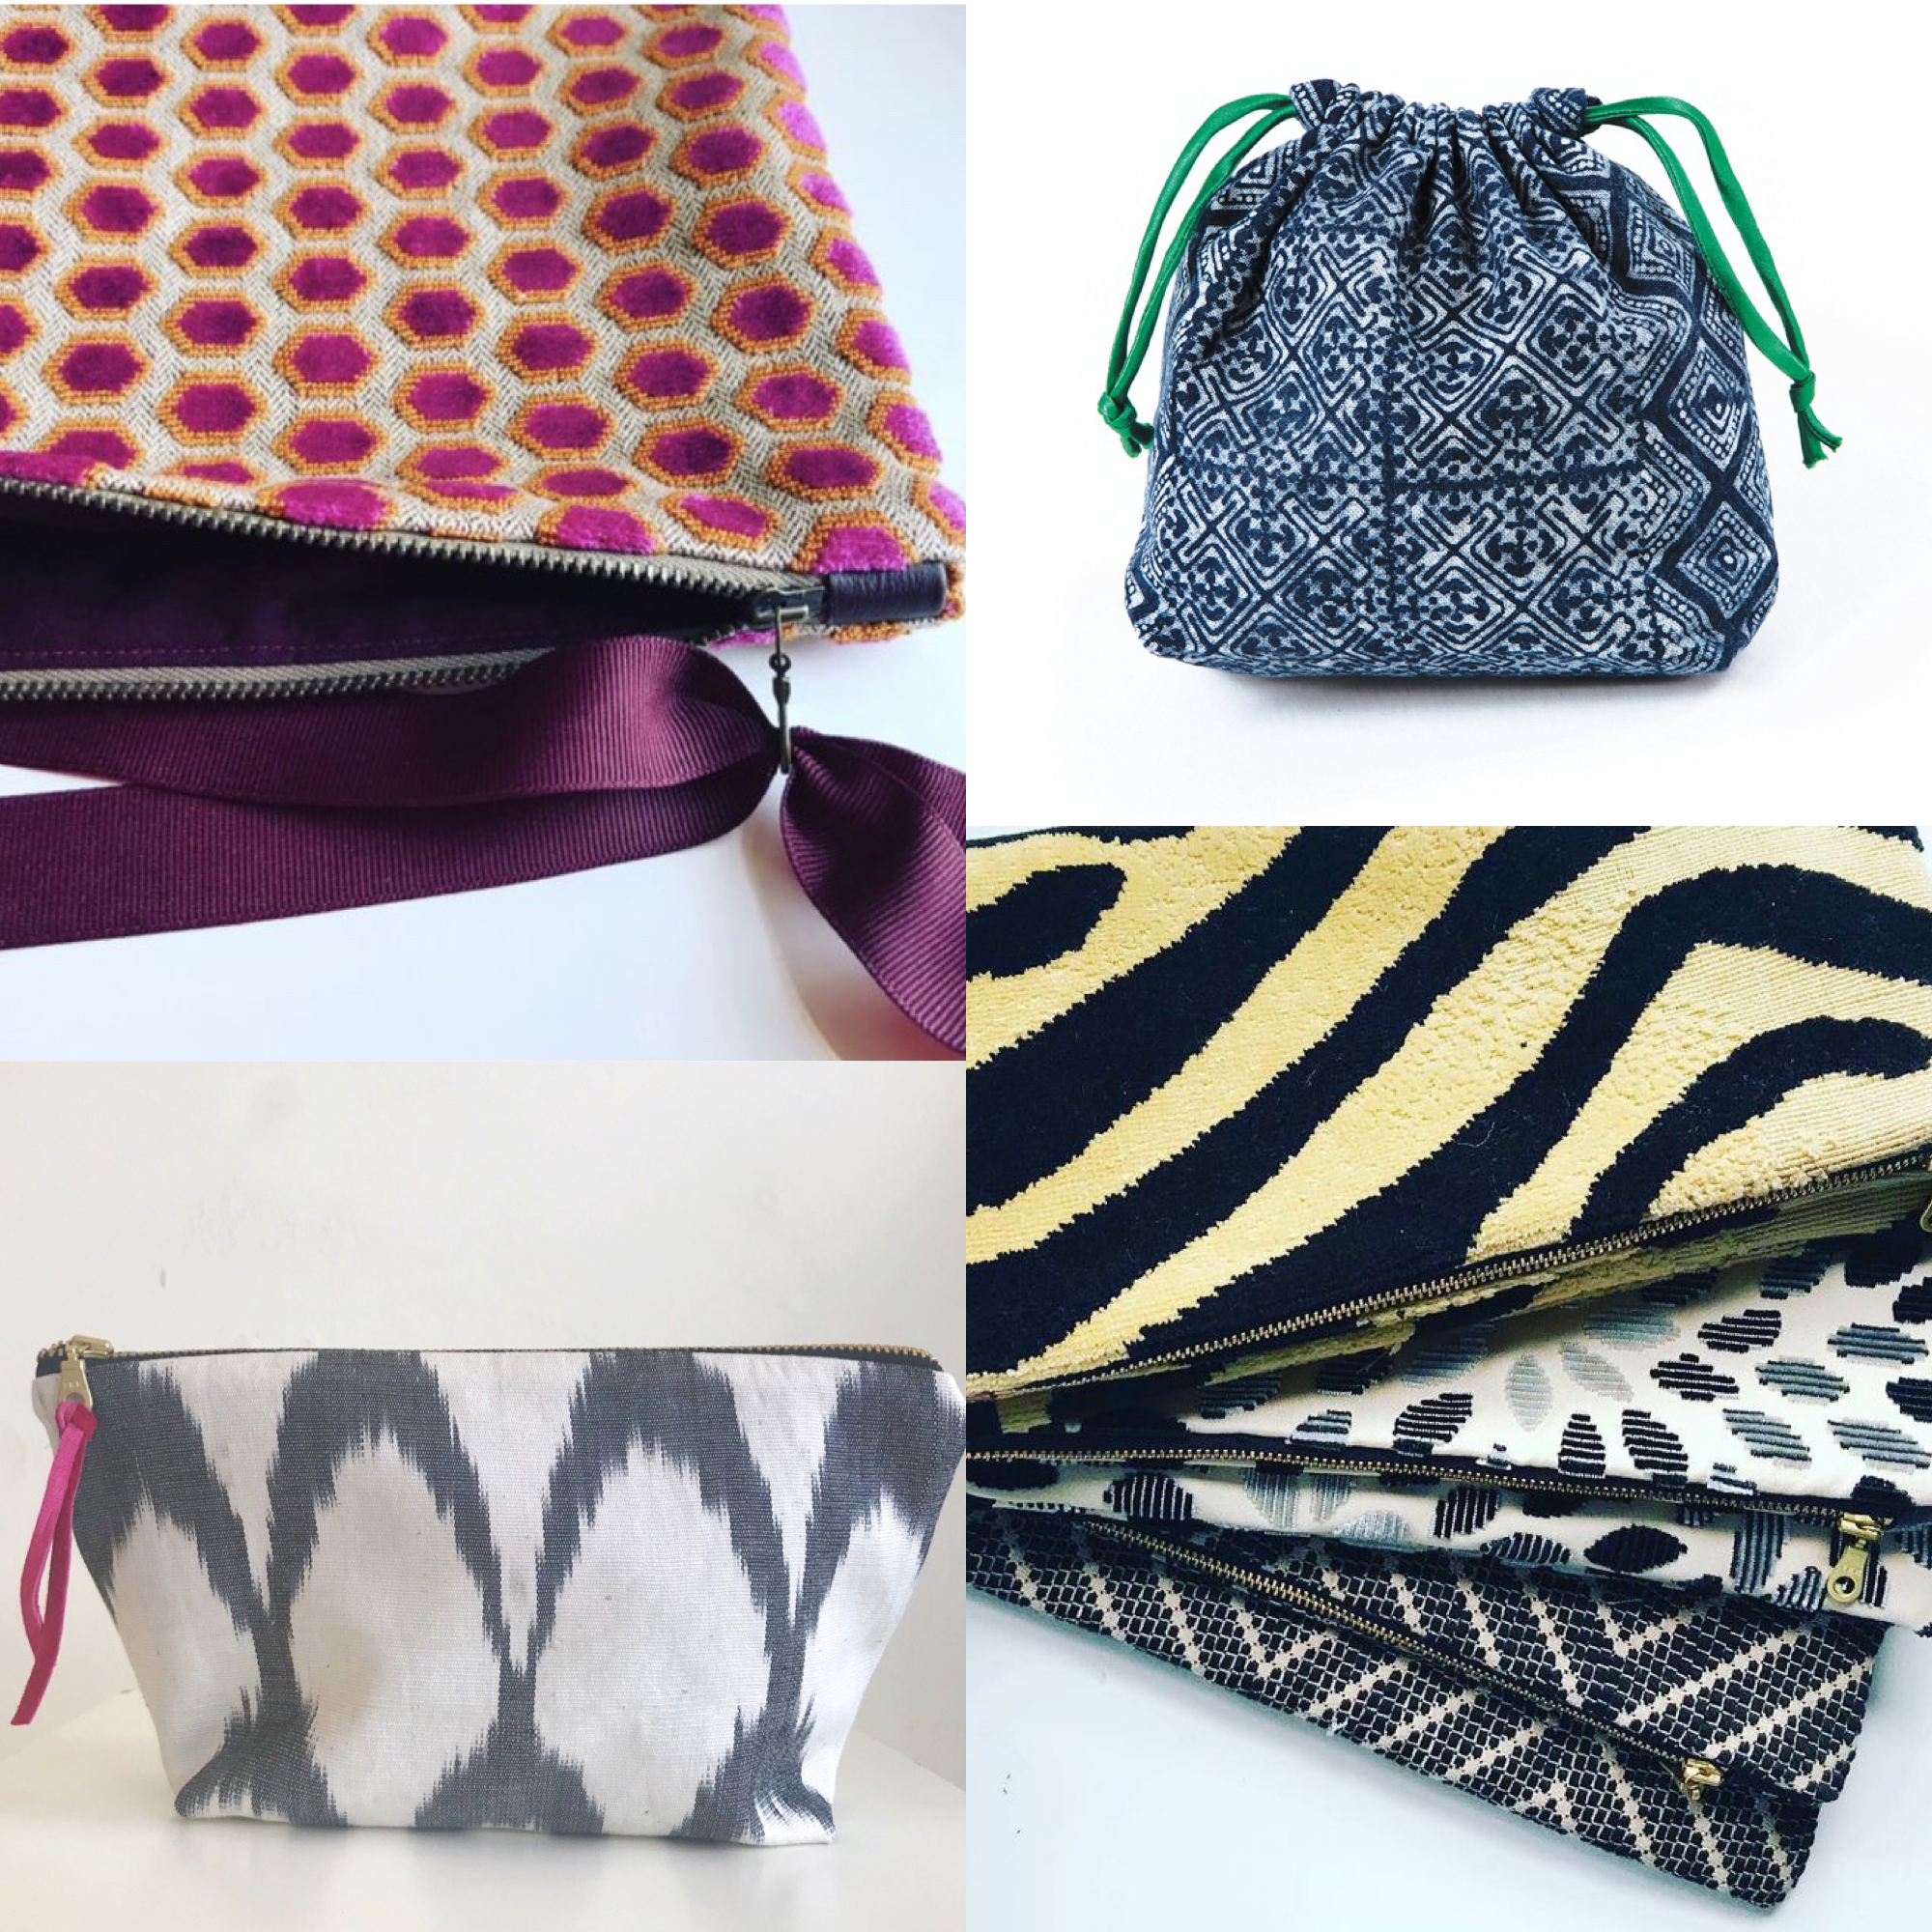
Decorator Weight, or home decor fabric is a bit of a deceptive term as it encompasses fabric that is suitable for upholstery as well as drapery and pillow weight fabric. So, there are as many options here as there are fabrics. Somewhere in the mid-weight is likely best. What can your machine handle? The bags above were created from a variety of weights. The heavier weight fabric would be great for bags that have fewer seam lines and therefore fewer bulky layers to stitch through.
TWEED
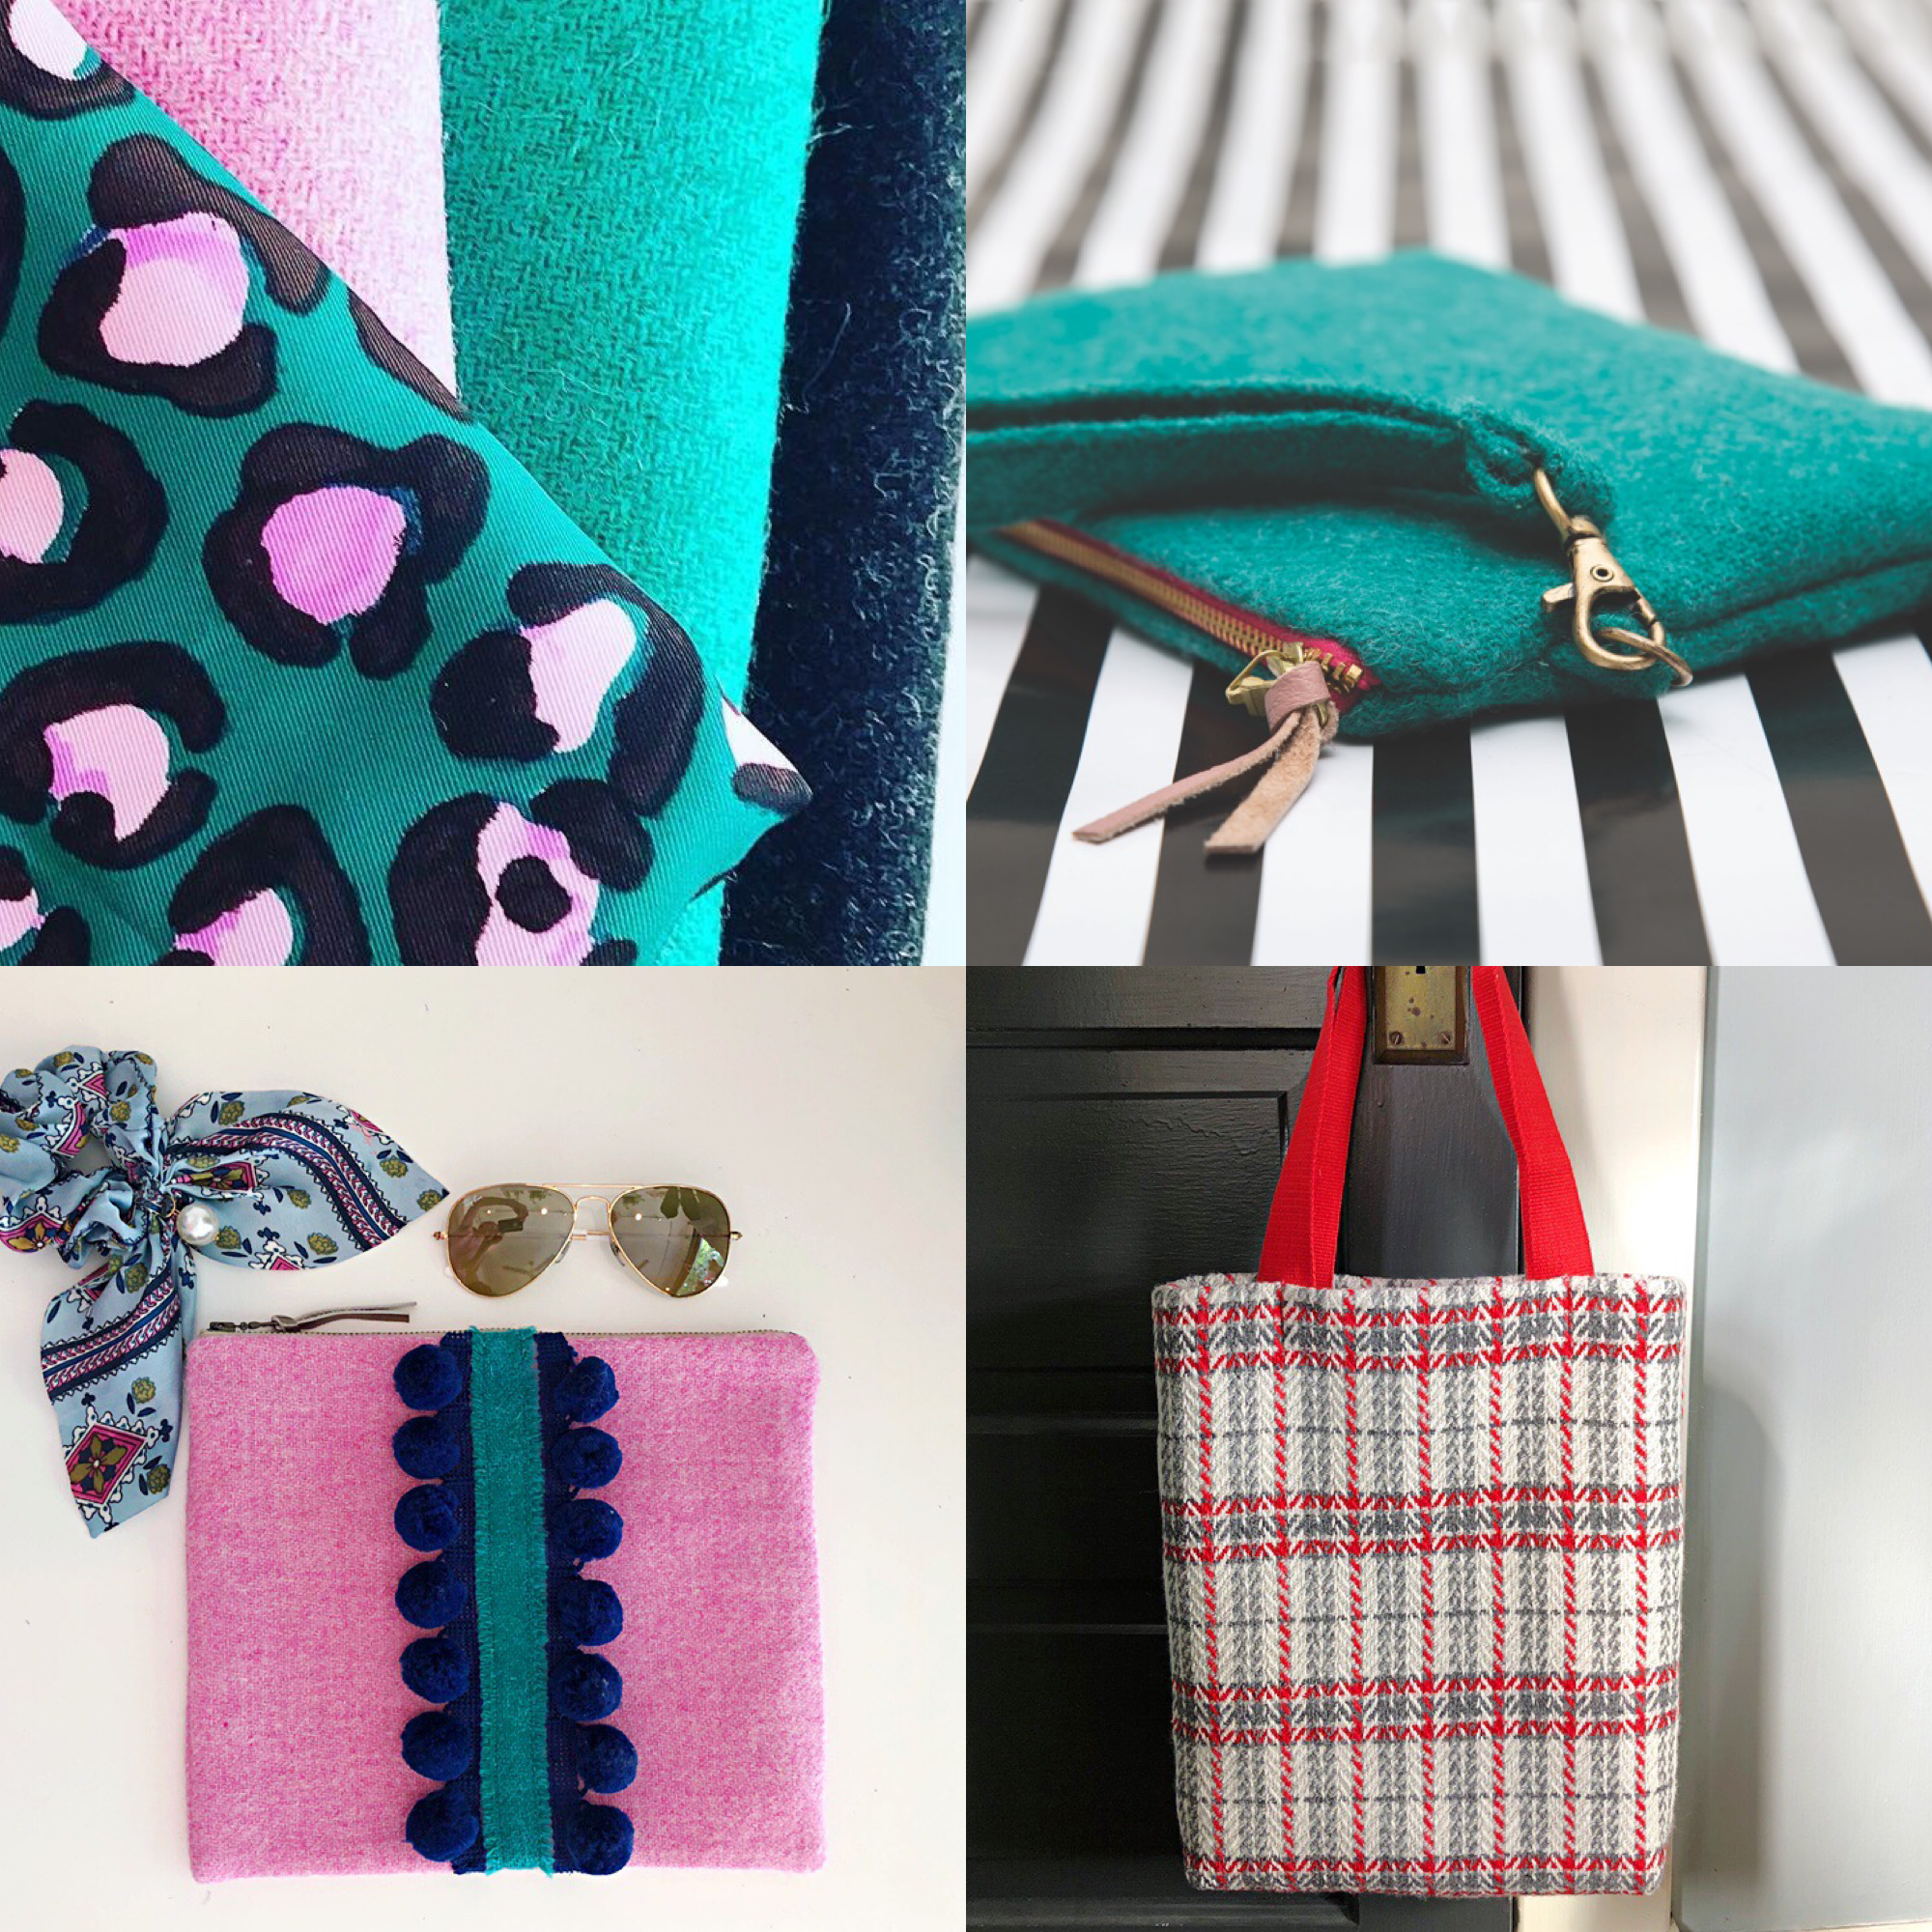
To me, Harris Tweed is the standard of bag making fabric. It is gorgeous, drapes beautifully, feels sumptuous and the depth of color is unparralled. However, true Harris Tweed is expensive- and if that isn’t enough, the shipping (from the UK) adds even more. So, a conventional tweed looks pretty great in comparison. Fortunately, tweed is found in all sorts of fabric stores at any price point and in old clothes too. (Carbon footprint reminder!)
CANVAS
Canvas Fabric is generally inexpensive, sturdy, easy to find and available in color and pattern. It is truly ideal and such a great substrate with which to create a durable and stylish bag. Like with so many other fabrics, there is a range of weights available. You will want to look for a medium weight canvas, in the range of 5-10 ounces per yard.
Here are a few cotton canvas fabric that I like to use when making bags.
Rifle Paper Co makes some really dreamy floral patterns.
MID-WEIGHT WOVEN
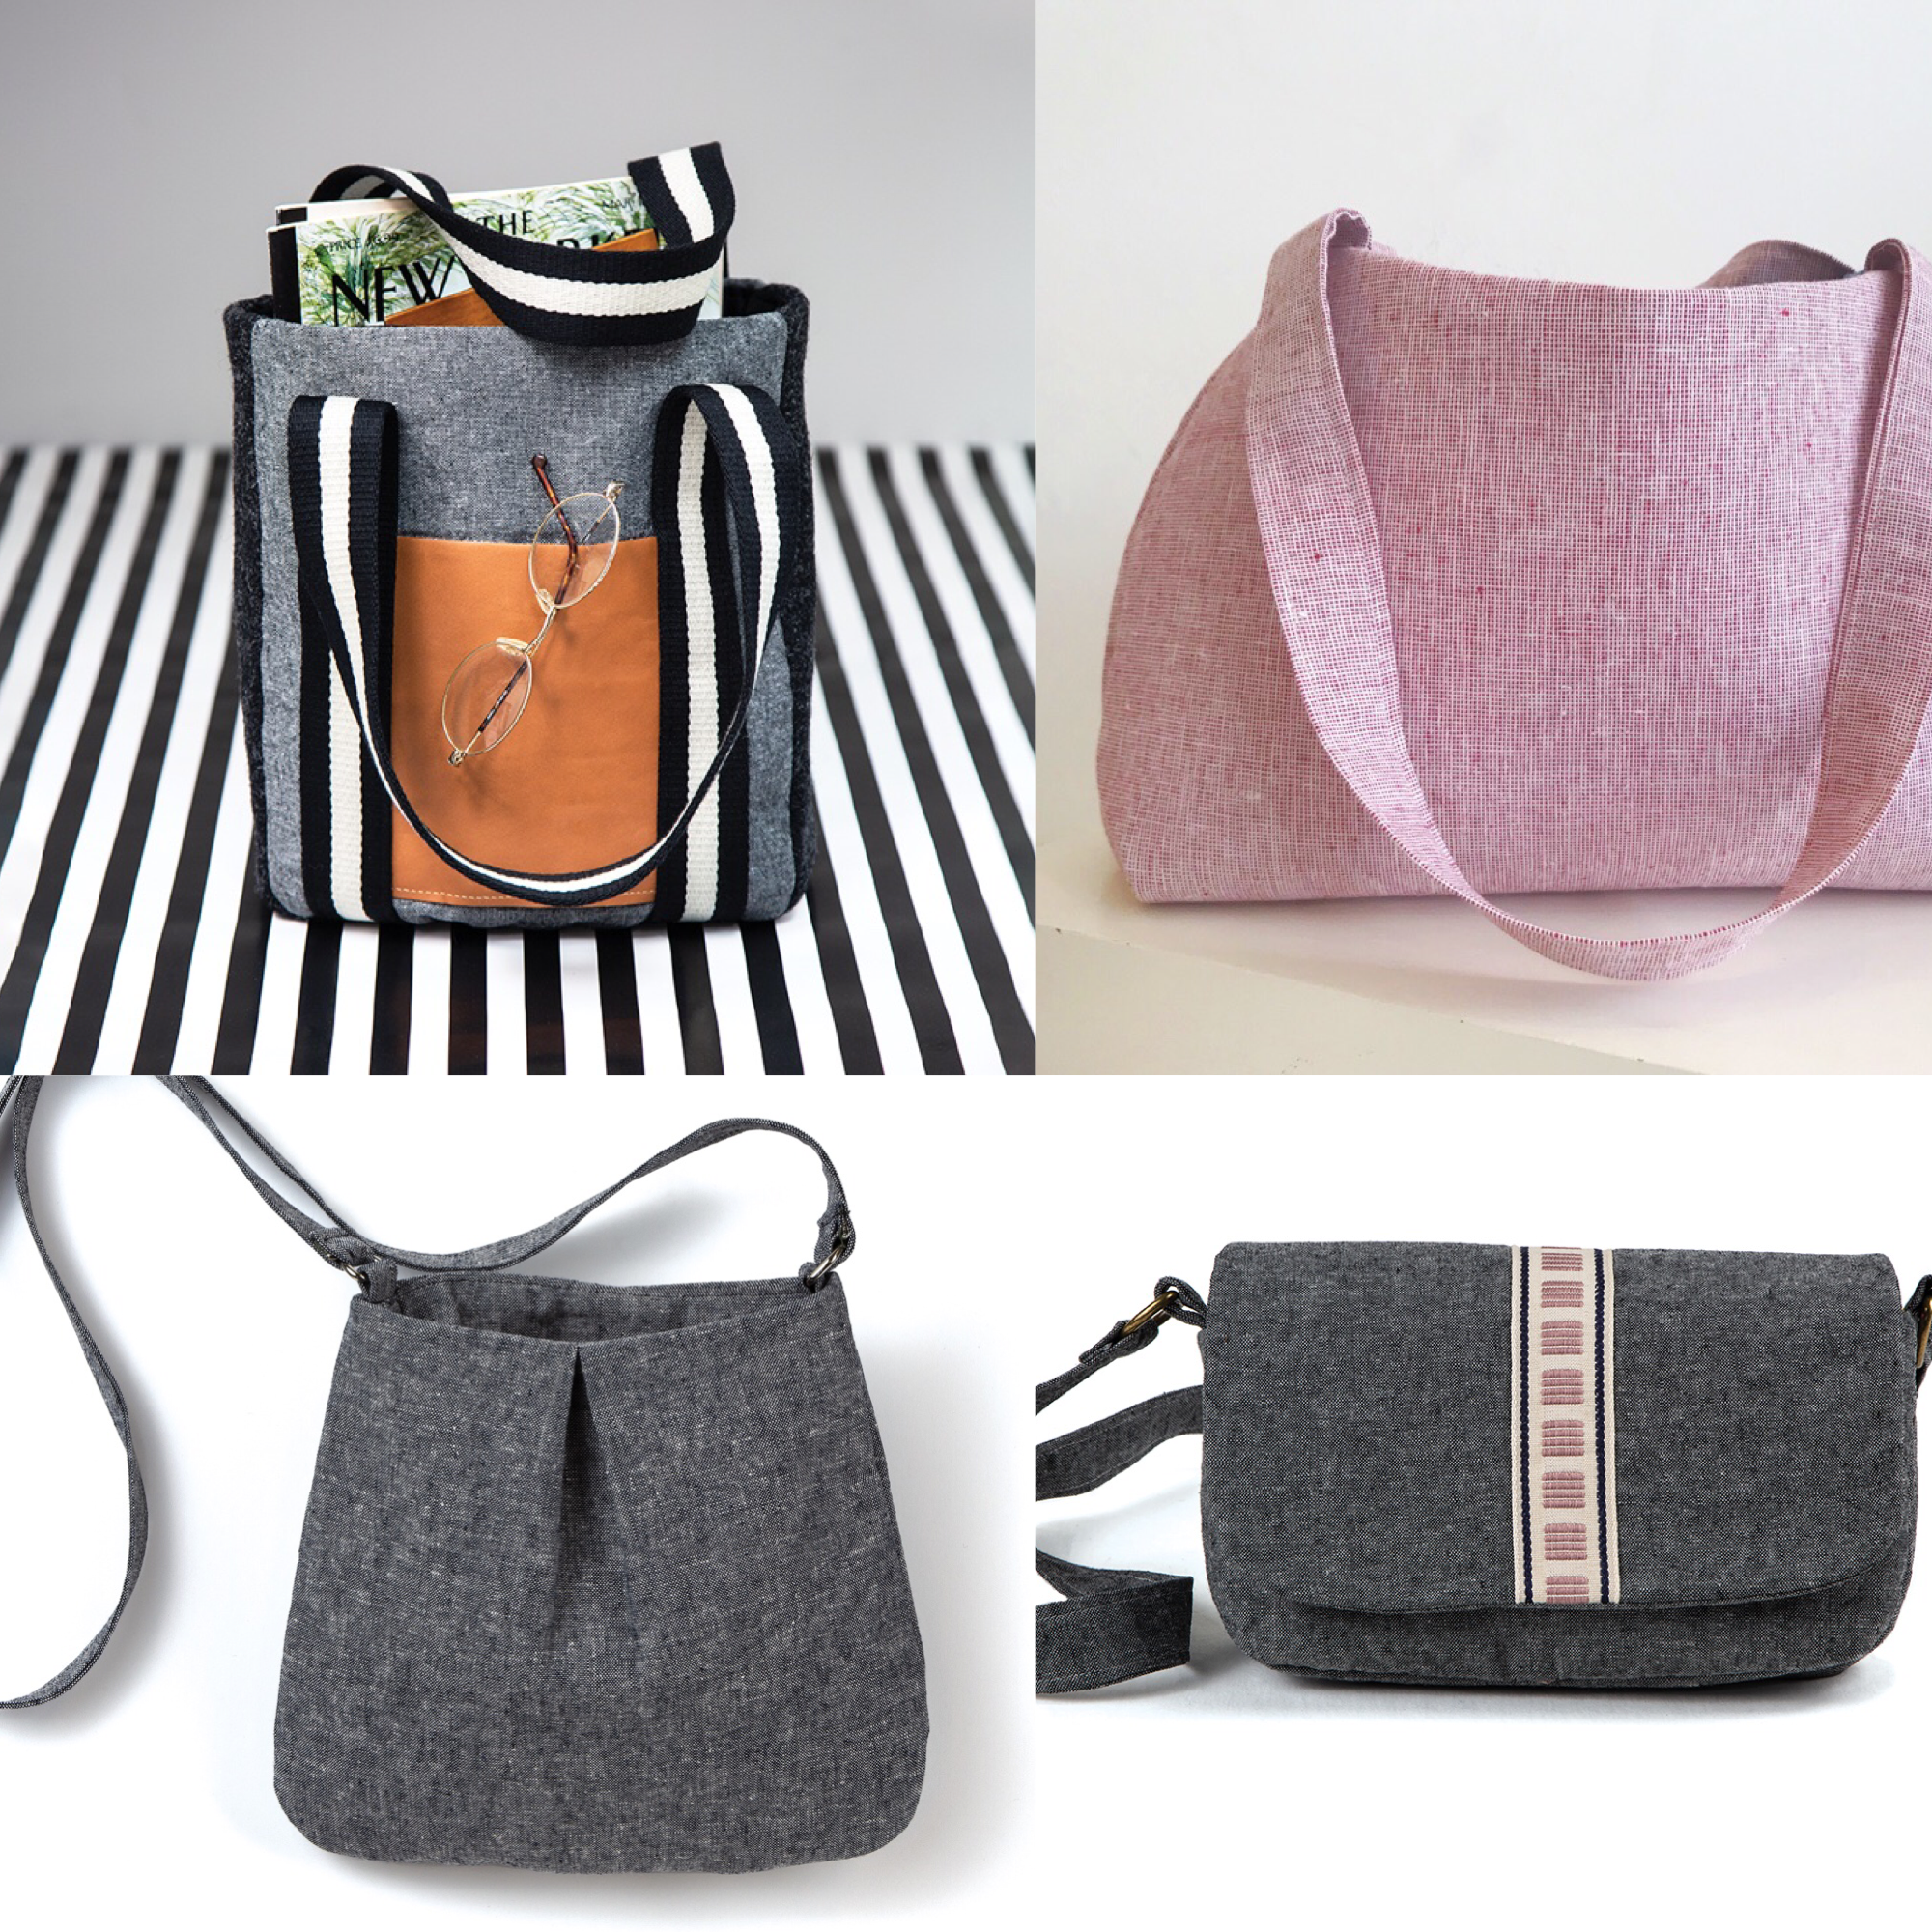
Hands down, Robert Kaufman Essex Linen is one of my favorite bag making fabrics. It is truly beautiful and available in so many colors. Though at the lighter weight for bag making, adding layers of interfacing and/or interlining or even quilting goes a long way toward adding shape and body.
If you would like to gain a deeper understanding of fabric and fibers, I’ve written a guide to help you. You can get it by clicking the link below.
The featured bags are projects from my new book, Sew Bags: The Practical Guide to Making Purses, Totes, Clutches & More; 13 Skill-Building Projects, available at book stores nationwide.
What are your favorite fabrics to make bags out of?
XOXO, Hilarie

How to make an adjustable purse strap
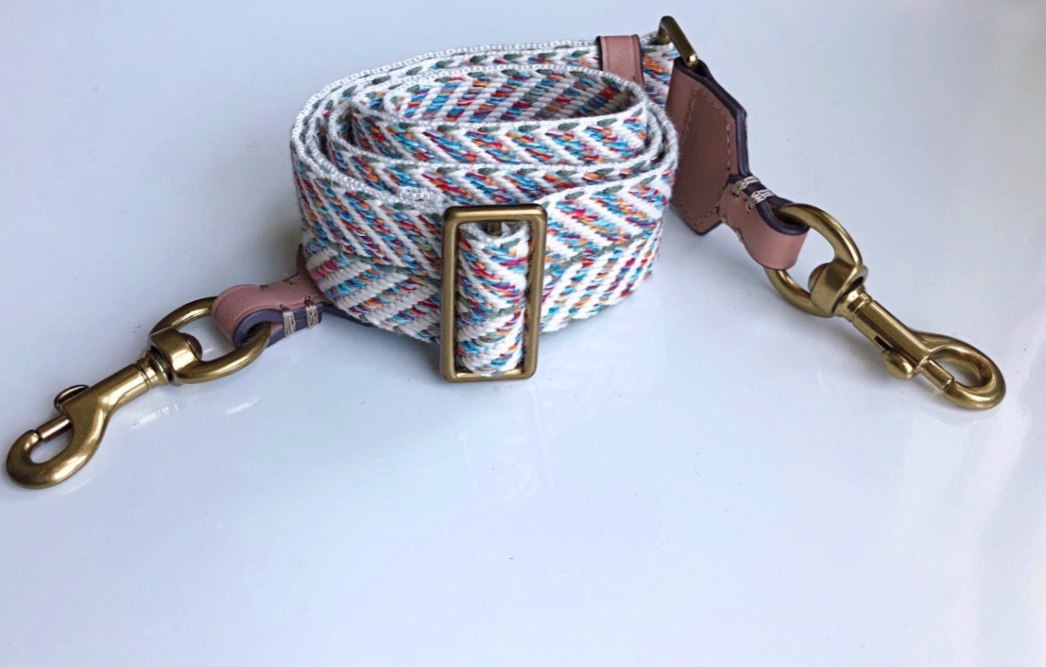
An over-the-shoulder bag doesn’t always work so great when you have kids or say, you need your hands to hold something else- or nothing. Years ago, the cross-body bag made a strong comeback as has the more recent resurgence of the “belt bag” (formally known as the fanny pack). What makes these bags so great is the ability to adjust the length of the strap. Whether you want to adjust it to fit your outing, outfit or just personal strap length preference, with a quick slide of the hardware, you are ready to turn any silhouette into a cross-body and reinvigorate your bag carrying game.
An over-the-shoulder bag doesn’t always work so great when you have kids or say, you need your hands to hold something else- or nothing. Years ago, the cross-body bag made a strong comeback as has the more recent resurgence of the “belt bag” (formally known as the fanny pack). What makes these bags so great is the ability to adjust the length of the strap. Whether you want to adjust it to fit your outing, outfit or just personal strap-length preference, with a quick slide of the hardware, you are ready to turn any silhouette into a cross-body style and reinvigorate your bag-carrying game.
Here’s a quick tutorial to show you how to make an adjustable purse strap!
How to make an adjustable purse strap
Commitment-free straps, for when you can't decide.
The double-fold strap and Savannah Cross-body bag used in this tutorial are projects from my book, Sew Bags: The Practical Guide to Making Purses, Totes, Clutches & More.
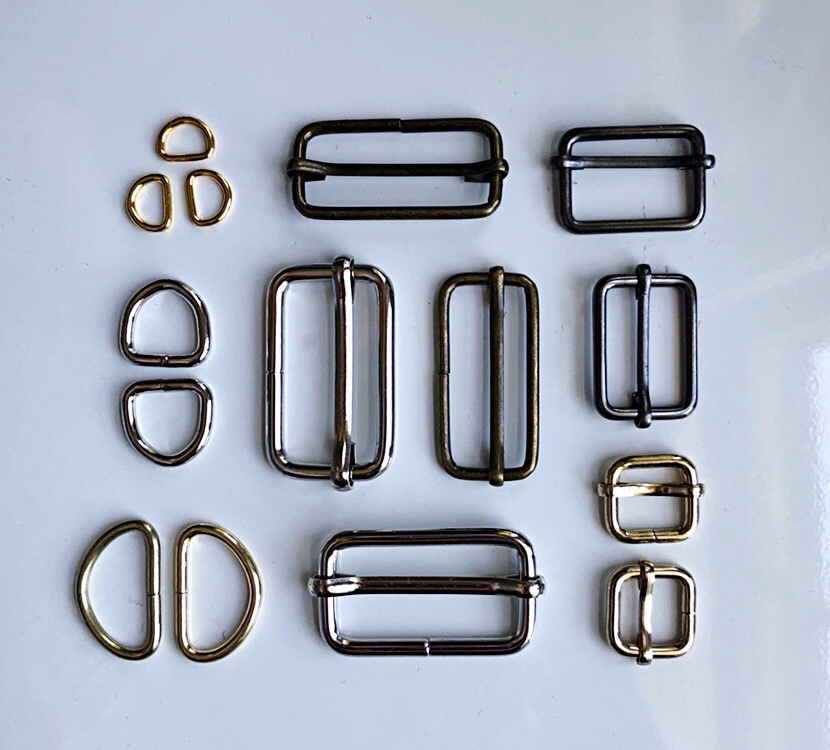
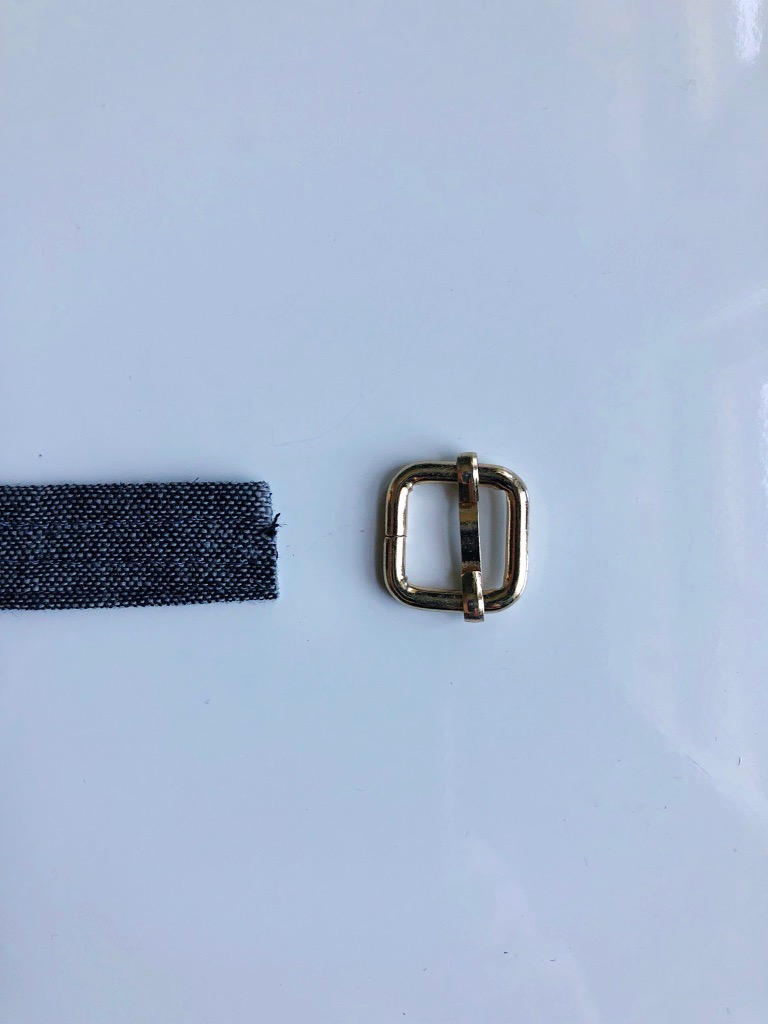
Supplies needed:
Strapping plus two 3” long tabs of strapping (to connect a D ring to each side of the bag) I’ll explain:) You can always use leather or cotton webbing straps in the same length and width as an alternative to fabric straps.
2 D-Rings *
1 Strap slider adjuster
The strap, tabs, D-rings and Slider all need to be the same width. In this tutorial, mine are 1/2”.
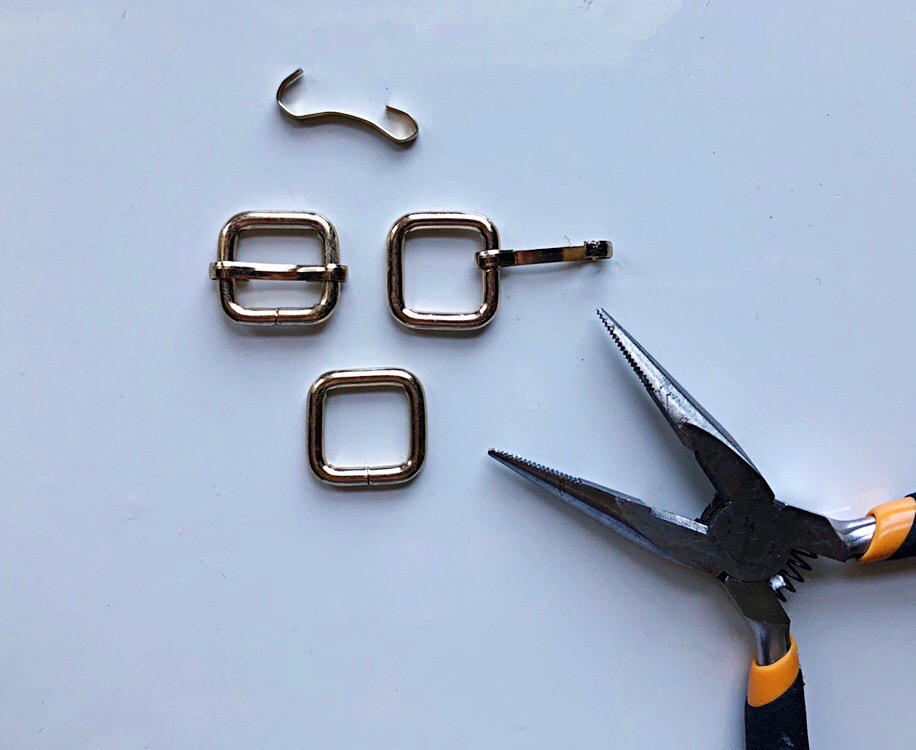
*If you are unable to find a D-ring the same size and color as your slider, you can always make some after-market improvements. For this tutorial, I used a pair of pliers to remove the center slide and made a set of D-ish (square, actually!) rings. Let’s call them a D+ pair.
Adjustable Straps
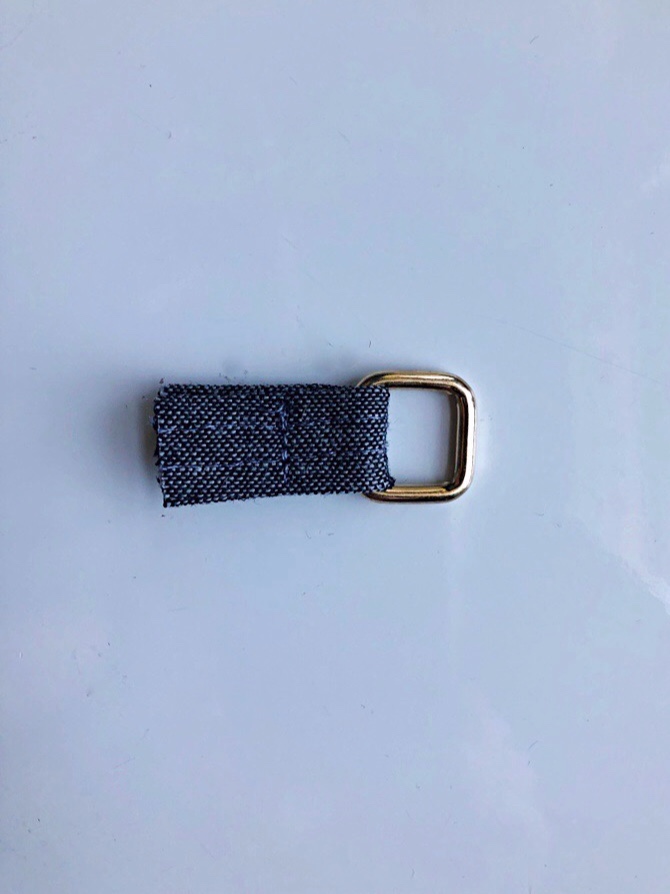
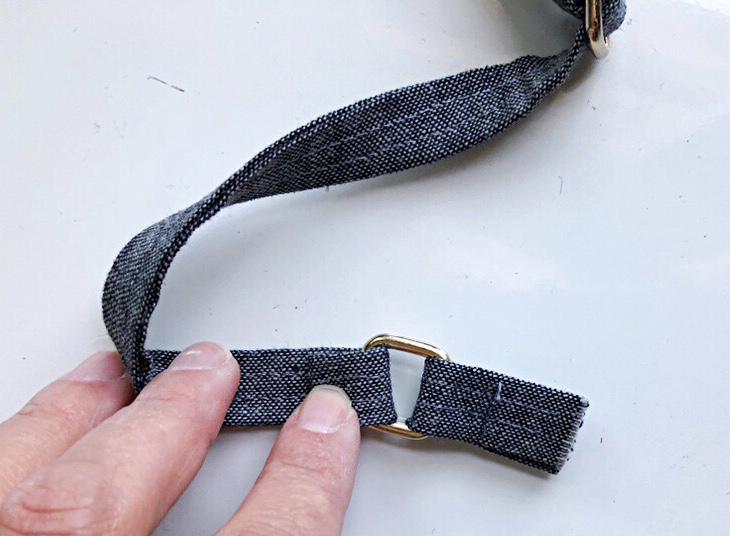
Take one of the 3” tabs and slide over the D-ring, folding in half so that the raw edges align. Pin and stitch in place about 3/4- 1” below the hardware. Repeat for the second tab.
Place the slide adjuster right side down, with the strap placed with the outer side facing down, too. Thread the long piece of strap (the tail) through the slide adjuster’s center bar.
Set your sewing machine to a narrow stitch, (around the 2.0 range). Stitch across the raw edge. Before you do this, grab both your top and bobbin thread and wrap around your finger while sewing to guide your machine and ensure that it sews smoothly along the strap’s end and you won’t get a “birds nest”.
Do you see how the edge of the strap is just slightly narrower than the rest of the strap? Depending on your choice of fabric, you could use an iron to spot shrink it, but that is another lesson. By shrinking the end just a bit, it will allow the tab to fold in and the edges to be concealed within the fold.
Fold the end of the strap under about 1” and tuck the raw edge inside that fold about 1/2” and pin.
Stitch in place. Make sure to reinforce with a back stitch to secure.
For a wider strap, I would likely stitch the width of the strap in a rectangular box but for a 1/2” width, one line of stitching should do.

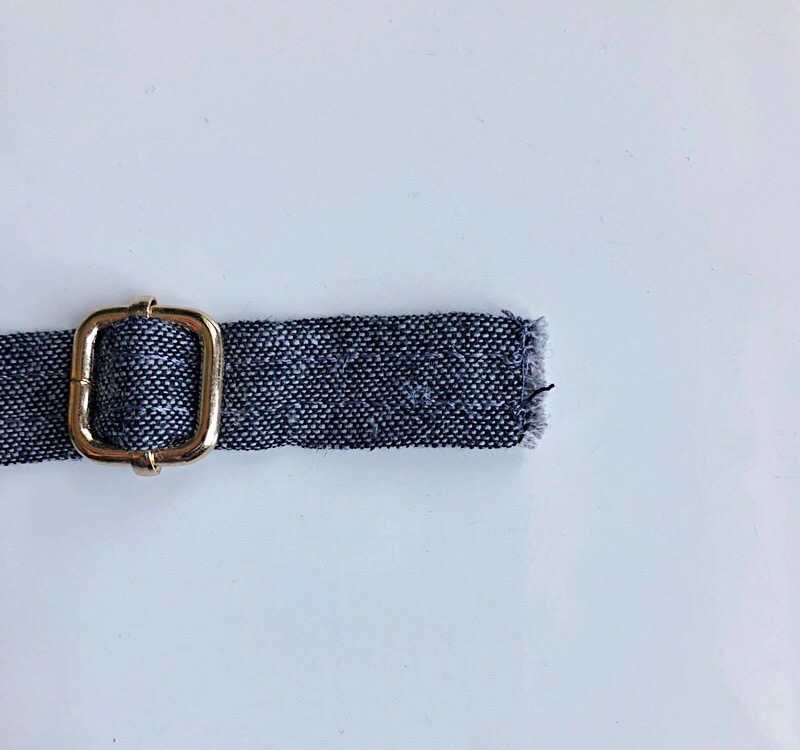
The raw edges are completely concealed. No visible threads!
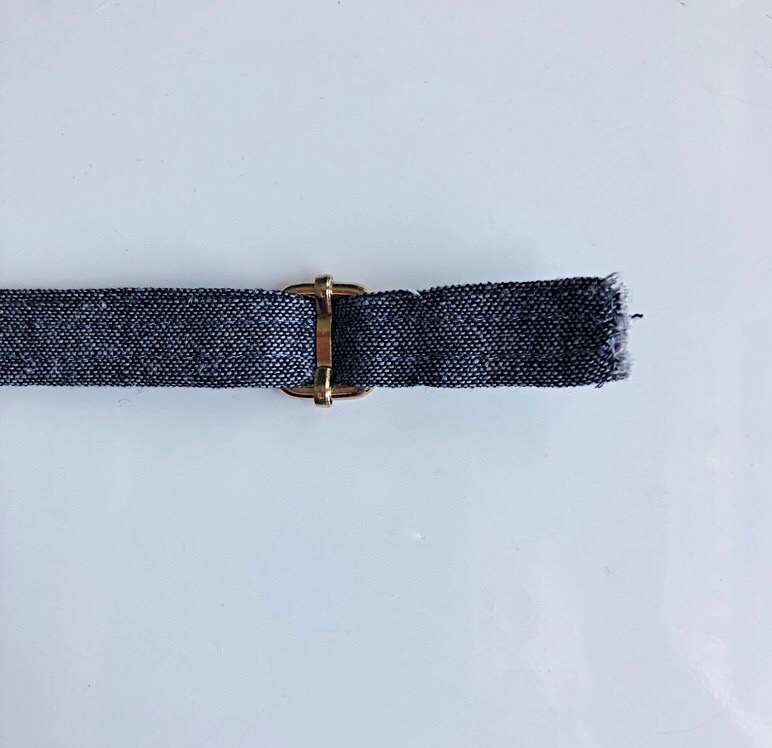
Threading the Slide Bar
This part is a little bit tricky the first time. Here is a picture and a drawing to help you visualize the steps. First, locate the slider with the center bar. We are going to take the “tail” of the strap and thread it through D-ring (number 1), over the center slide (number 2) and through the opposite D-ring (number 3).
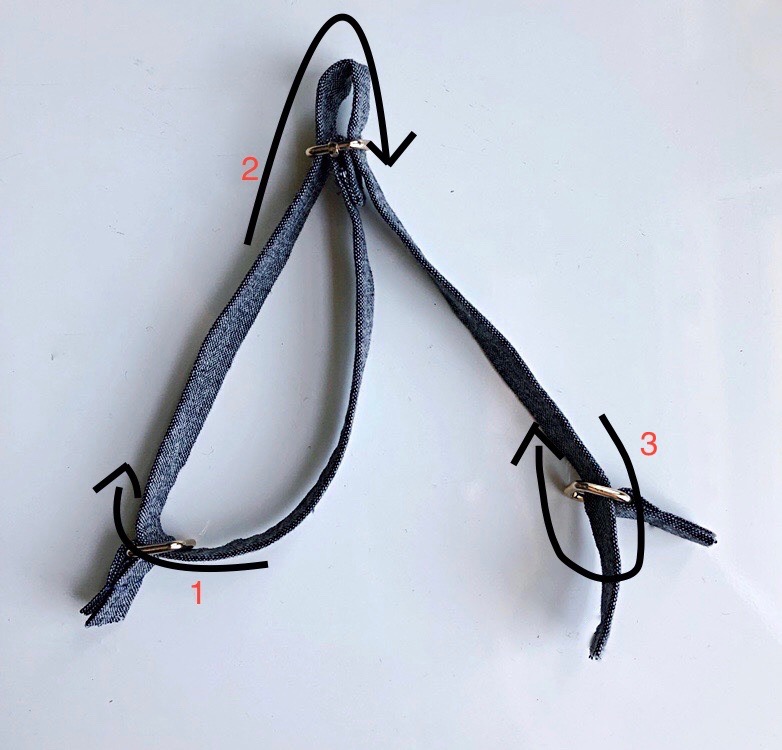
Tabs one and three will be sewn into the side seams of the bag.
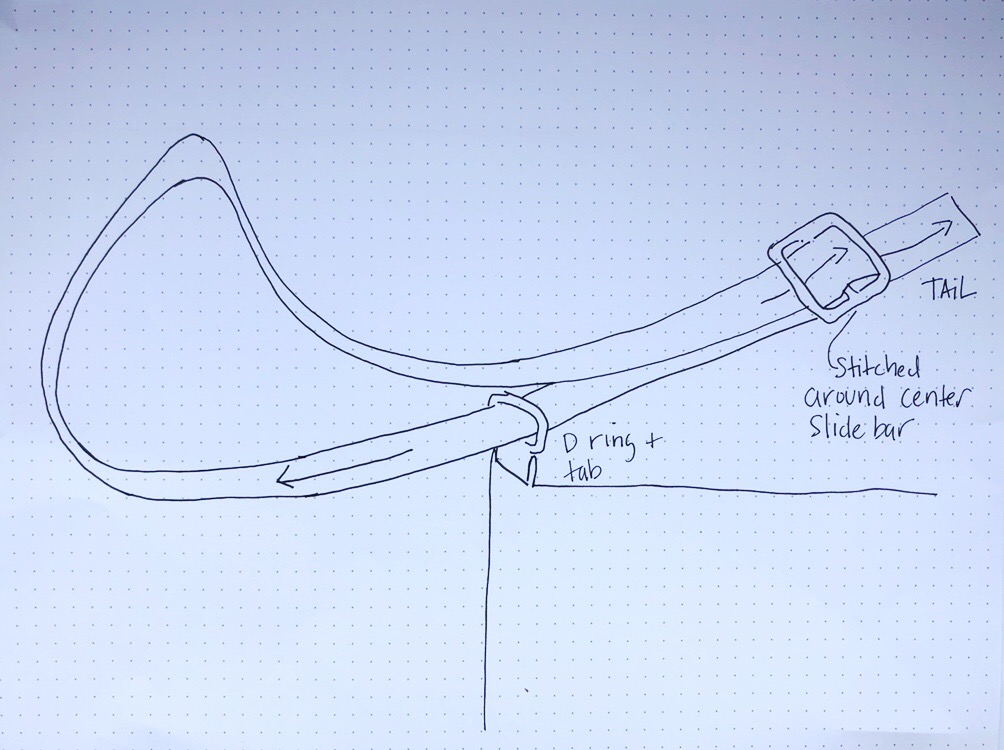
This picture is to illustrate the strap in relation to the bag.
In any bag making venture, (generally!) this strap will be added way before the bag is complete. This picture is to give you the general idea (and for you to go get my book:) for a more complete lesson.
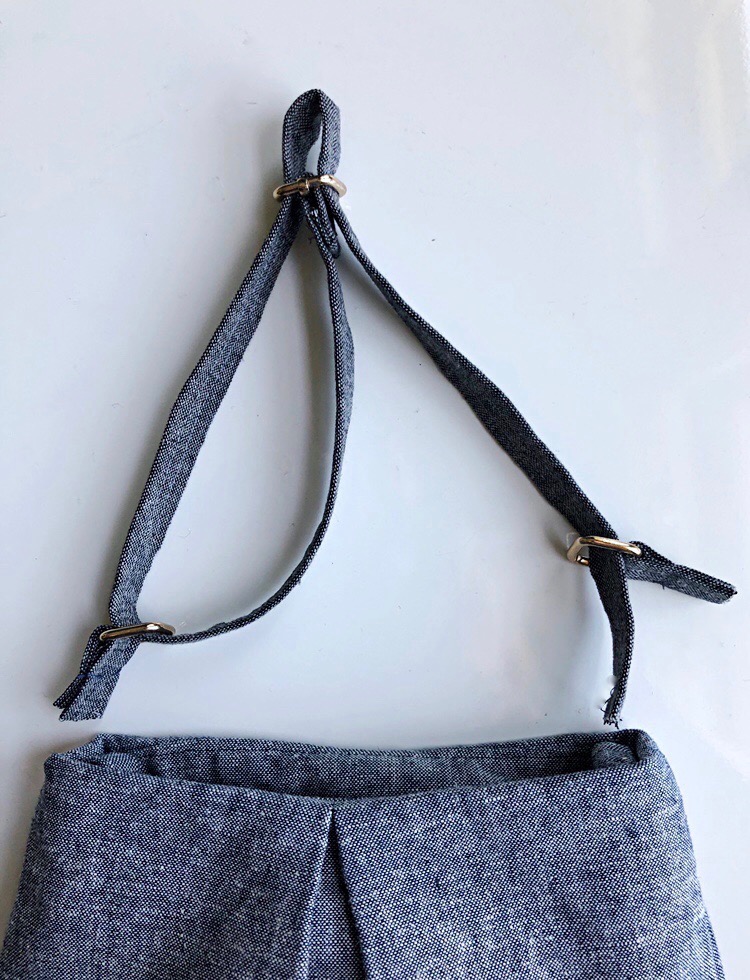
Feed the “tail” through the other D-ring tab on the opposite side of the bag. Before you sew - make sure that the strap is facing the correct way and has not twisted in the threading process. Fold and stitch the raw edge of the “tail” to the second side tab.
An adjustable strap can be used with any bag that has a removable strap. Imagine for a moment how this might change your bag carrying experience. One bag, thoughtfully designed with the right hardware and removable straps- could at once be a handbag, crossbody bag, clutch, tote or shoulder bag with the quick switch of a strap. Think about it.
Consider adding an additional “guitar style” strap to elevate your everyday bag.
Straps are such a fun way to introduce an individual approach to a handbag, distinguishing it as its own distinctive piece. I am so excited to see the bags that you are going to make. Please use the hashtag #sewbags on social media- and be sure to tag me @littlestitchstudio.
Are there any specific techniques that you would like to learn? In my next post, I am going to share my favorite bag making fabrics.
XO, Hilarie

Sew Bags; The Blog Tour Re-cap
I teach sewing and design because I believe that everyone possesses some innate creative ability and once you tap into that and discover your passion, it can build confidence that flows into all aspects of life.
These past few weeks, I have had to take a deep dive into my confidence reserve.
As the publication of my book drew near, I knew that it was time to begin to organize a promotional book blog tour. In order for the book to sell, people have to know about it - right? By May, sheer panic set in. Besides the fact that I am terribly introverted and likely would never own a phone, let alone leave the house given the chance, I had to ask complete strangers to read my book and to (PLEASE!) make something from it and share it with the world.

I teach sewing and design because I believe that everyone possesses some innate creative ability and once you tap into that and discover your passion, it can build confidence that flows into all aspects of life.
These past few weeks, I have had to take a deep dive into my own confidence reserve.
As the publication of my book drew near, I knew that it was time to begin to organize a promotional book blog tour. In order for the book to sell, people have to know about it - right? By May, sheer panic set in. Besides the fact that I am terribly introverted and likely would never own a phone, let alone leave the house given the chance, I had to ask complete strangers to read my book and to (PLEASE!) make something from it and share it with the world.
At first, I thought, who am I going to ask? Fabric companies? maybe. Celebrities? nah. Some sewing blogging superstars with comanding audiences? (well…..) Then I began to scroll through my Instagram feed and consider who’s posts I always look forward to reading. Who seems approachable enough to ask? Who would even recognize my name if I did message them? Finally- who has a similar philophsy to teaching and style and would “get” my message. Well- that certainly narrowed down the possibilities considerably. Since I teach sewing, who better to ask then other fashion-forward sewing teachers too.
As it turns out, sewing teachers might just be among the nicest and most approachable people ever! Each of the following women are incredibly busy with a business, projects and families of their own. I owe them a huge thank you for the kindness that they have shown me by generously sharing their time and talents. I hope that each of you will read their posts and draw inspiration from their interpretation of my bag patterns.
Jesy, Needle, Ink and Thread
In a conversation with a friend who is also a sewing teacher, she asked me if I know Jesy. I answered that I didn’t. She told me to check out her work and mentioned that she is exceptionally talented and super nice! As it turns out, besides teaching sewing, Jesy was a former co-owner of Sew Dayton, has contributed a project to a new book as well as sewing custom projects and alterations. If she can pull that off, maybe a small bag wouldn’t be too much to ask:) Jesy agreed and was in!

Jesy made the Bunny Backpack from Sew Bags.

Adorable, right? I love her smile.

Jesy’s Tooth Fairy Pillow project is featured in this book, 50 Little Gifts.
Julia, Old Spool Sewing
Several months ago while looking through Instagram, a friendly smiling face appeared in my feed. I clicked on her post and woah! Another fun sewing studio for kids. Her studio looked bright and filled with lots of smiling kids. Then I saw this cute, cute red wrap top. Well, I do love a wrap top so I commented. She wrote back and then BAMN! #insta-friends:) As it turns out, Julia went to Parson’s and has a degree in Fashion Design which she now uses in her efforts to inspire and cultivate creative talent. So…. I asked Julia too- And she said yes!

Julia made the Abigail Boxed- Bottom tote - complete with hand dyed shibori!

The red wrap-top

Julia was a contestant on Slice TV’s Stitched.
Katie of Katie Kortman
Last summer I saw on Facebook that a new sewing and art studio for kids had opened in a neighboring city. Intrigued, I clicked to find out more. It turns out, Katie had moved in like the week before. I guess as a military mom of 4, she was well practiced in the art of moving and managing kids and projects. I reached out to introduce myself and see if she was taking on new students as I was maxed out at the time and know that families would be thrilled to hear that there was another place to send their kids. This was before Katie blew up Instgram with her hashtag game and spinning color wheel of fun. So- is it safe to say I “knew” Katie before she was famous?? Somehow she fit my project in with everything else she is juggling. Hello- new Spoonflower collection!!

Katie’s handprinted suede Savannah Cross-body bag.

Katie’s fabric collection with Spoonflower.

More fabric and color inspiration!
Tree, Stitchless TV
A few years ago during Makers for Fashion Revolution, #makersforfashrev, I discovered both Tree of Stitchless TV and Kate of Sewing with Kate. Tree had posted a picture of a bathing suit that she had made with a custom printed fabric. I commented that years ago, I worked with a swimwear designer and had made many, many suits over the years. She immediately wrote back and we have followed each other’s feed since. While we have never met in person, I do feel a strong creative connection with Tree. She is absolutely fearless in her approach to both teaching and sewing. And, as many of you know, I loathe TV and YouTube but make a special point of sharing her videos and tutorials with my students. They are that good!
One thing that Tree always emphasizes is her belief that with a bit of experience, anyone can learn to design a bag or garment and experience the absolute thrill of using and wearing something that you made yourself.

When you see something like this, it is an immediate signifier that the person both knows what they are doing and is fearless in her approach.

How beautiful is this coat that the wearer made in one of Tree’s workshops?

Ribbon embroidery on mohair. Seriously.
Kate, Sewing with Kate
Kate had me at first glance of her Sashiko. Anyone who spends that much time sewing by hand is someone who really understands the importance of attention to detail. Hand sewing allows a much finer degree of control over the fabric and fit, compared with using a machine. Kate understands that. Also- perhaps since she is a mom of a bunch of kids, hand sewing is portable and thus, gets done and is a great way to keep your hands busy while endless waiting for kid sports and activities.
After gushing over her sashiko samplers and bags (she has an etsy shop with patterns too! ) I then saw her clothes. That was it- I was a fan for life. Come on now, how freaking fantastic are these next two dresses? The embellishment and that leather. So I had to ask….would you make one of my bags?

Kate made the Rachel Drawstring Pouch- and hand stitched the sashiko pattern before sewing the bag.

This proves that there is nothing better than a well- fitting garment with one stand out feature.

Leather shoulder inset of my dreams.
I just love how each of these ladies took the original pattern and spun it to create something that is unique to their style. That is my ultimate goal as a pattern maker, sewing teacher and now author. To impart the lesson that you don’t have to just follow the pattern; treat the suggestions in your pattern as starting points and use your own imagination and skills to make the bag that suits you.
Happy Sewing!
XOXO, Hilarie
Please remember to tag me on social media with your makes using the hashtag #sewbags. I can’t wait to see what you share.
Understanding Purse Straps and Handles
I am so thrilled that my blog tour week is finally here! My new book: Sew Bags: The Practical Guide to Making Purses, Totes, Clutches & More; 13 Skill-Building Projects is written as a guide, complete with patterns and step by step instructions ,to help you create the bag of your dreams. This week, a few gracious sewing friends from across the globe are generously giving us their time and sharing their thoughts and projects from my book. I just can’t wait to see what they have made.
After a lovely introduction from my friends at C&T yesterday, I thought that I would follow up today by sharing my thoughts on creating a bag that suits you as the wearer. A purse is an opportunity to show the world your personal style and the silhouette that best represents you. Which means: any old bag just won’t do. Like it or not, your purse says a lot about you. Are you a mom that has to carry everything for everyone? Are you a just the basics and cut it to the essentials? Are you out for friends with the night and carrying a fun clutch? Besides toting the essentials, a purse is also an accessory-a blank canvases that can project your mood, your favorite trend, or your aesthetic of the moment.
Since everyone is different, there are also adjustments you can make to a sewing pattern that will customize the bag perfectly to your body and individual needs to ensure that your bag is useful as well as beautiful. I’m all about customization and straps and handles are a great way to both customize and accessorize.

I am so thrilled that my blog tour week is finally here! My new book: Sew Bags: The Practical Guide to Making Purses, Totes, Clutches & More; 13 Skill-Building Projects is written as a guide, complete with patterns and step by step instructions ,to help you create the bag of your dreams. This week, a few gracious sewing friends from across the globe are generously giving us their time and sharing their thoughts and projects from my book. I just can’t wait to see what they have made.
I hope that you follow along to check out their take on the projects and enter to win a copy of Sew Bags at each stop! You can enter the C&T giveaway HERE.
Tuesday, 7/1: C&T Publishing
Wednesday, 7/2: Hilarie Wakefield Dayton of Little Stitch Studio Norfolk
Thursday, 7/3: Katie Kortman
Julia of Old Spool Sewing
Friday, 7/4: Jessy of Needle, Ink and Thread
StitchlessTV (YouTube video)
Monday, 7/8: Sewing with Kate
This week on Instagram, look for TopStitch Atlantas Instagram story .
After a lovely introduction from my friends at C&T yesterday, I thought that I would follow up today by sharing my thoughts on creating a bag that suits you as the wearer. A purse is an opportunity to show the world your personal style and the silhouette that best represents you. Which means: any old bag just won’t do. Like it or not, your purse says a lot about you. Are you a mom that has to carry everything for everyone? Are you a just the basics and cut it to the essentials? Are you out for friends with the night and carrying a fun clutch? Besides toting the essentials, a purse is also an accessory-a blank canvases that can project your mood, your favorite trend, or your aesthetic of the moment.
Since everyone is different, there are also adjustments you can make to a sewing pattern that will customize the bag perfectly to your body and individual needs to ensure that your bag is useful as well as beautiful. I’m all about customization and straps and handles are a great way to both customize and accessorize.
STRAPS AND HANDLES
Bag straps and handles are so much more than a mere function of convenience. They are exciting design features on their own. Not to mention, major considerations in determining the usefulness of any given bag.
We all have fallen in love with a bag that had handles that just weren’t right: Too thin and they cut into your arm or shoulder or too wide and they slide off. It is important to consider how you will carry your bag as well as what it can fit. Do you wear it on your shoulder? Over a coat? On the crook of your arm? In your hand? Keep in mind that smaller bags use thinner straps and larger bags use wider straps.
The most challenging part of sewing a bag is that you can't try it on until after it’s finished. And, if it doesn't fit right, you can't just exchange it for another size. Finding the right fit before you start sewing can solve this problem. I suggest that before you make any bag, stop and consider the strap length before cutting into your fabric. This is such an easy way to begin to customize the pattern and make the finished bag comfortable and fit you.
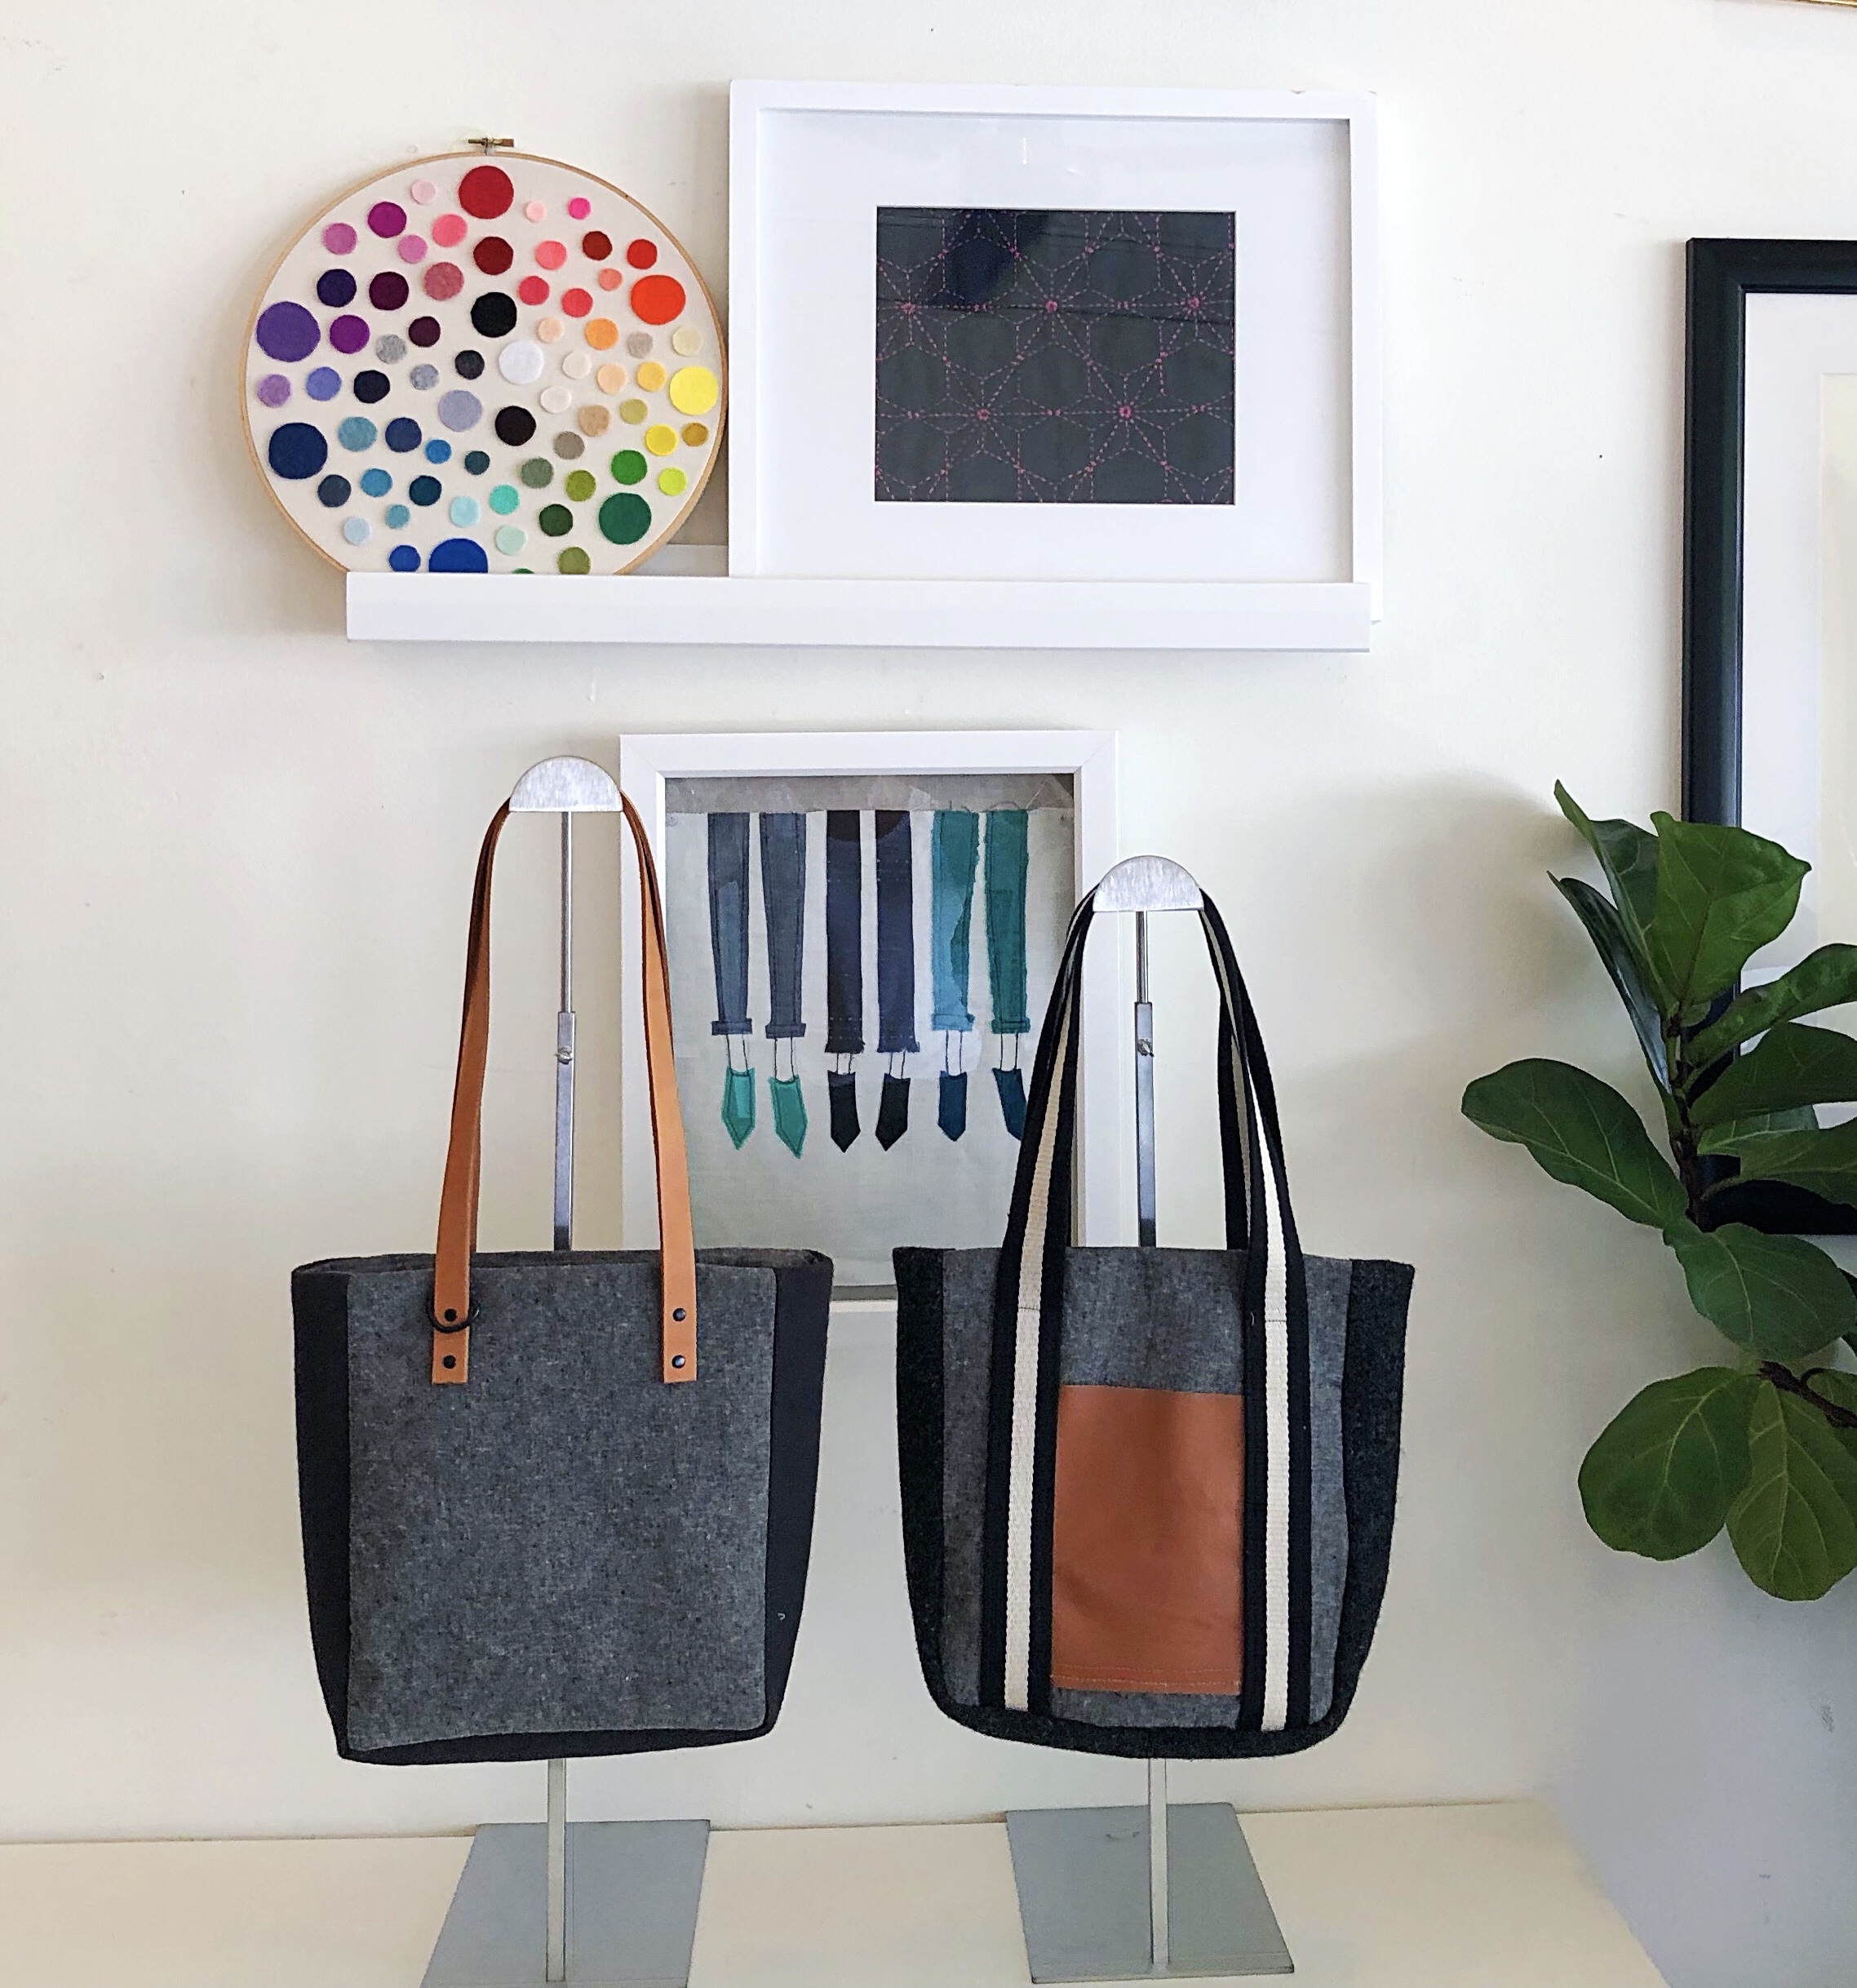
The Heidi Side Panel tote from my book, Sew Bags: The Practical Guide to Making Purses, Totes, Clutches and More, in two ways. The first, with leather straps set with rivets and extra handy D-ring detail, the second with cotton webbing strap detail and leather front patch pocket.
Strap Length and Drop
There are a couple of ways to determine the overall size and fit of a bag before you begin. One way is to measure a bag that you already own and know it fits just the way you like. (This is also a great trick when making someone else a bag as a surprise. You can simply borrow their bag for minute and take a quick measurement.) The second way is to make a paper mock-up of your bag and using a ribbon and clips or pins, play with the straps length and width until you find the one that is the most flattering and comfortable. Then measure that ribbon from end to end to determine the length. Write that number down- because it may need to be adjusted depending on the strap placement on the bag, the hardware used and what material the strap is made out of.
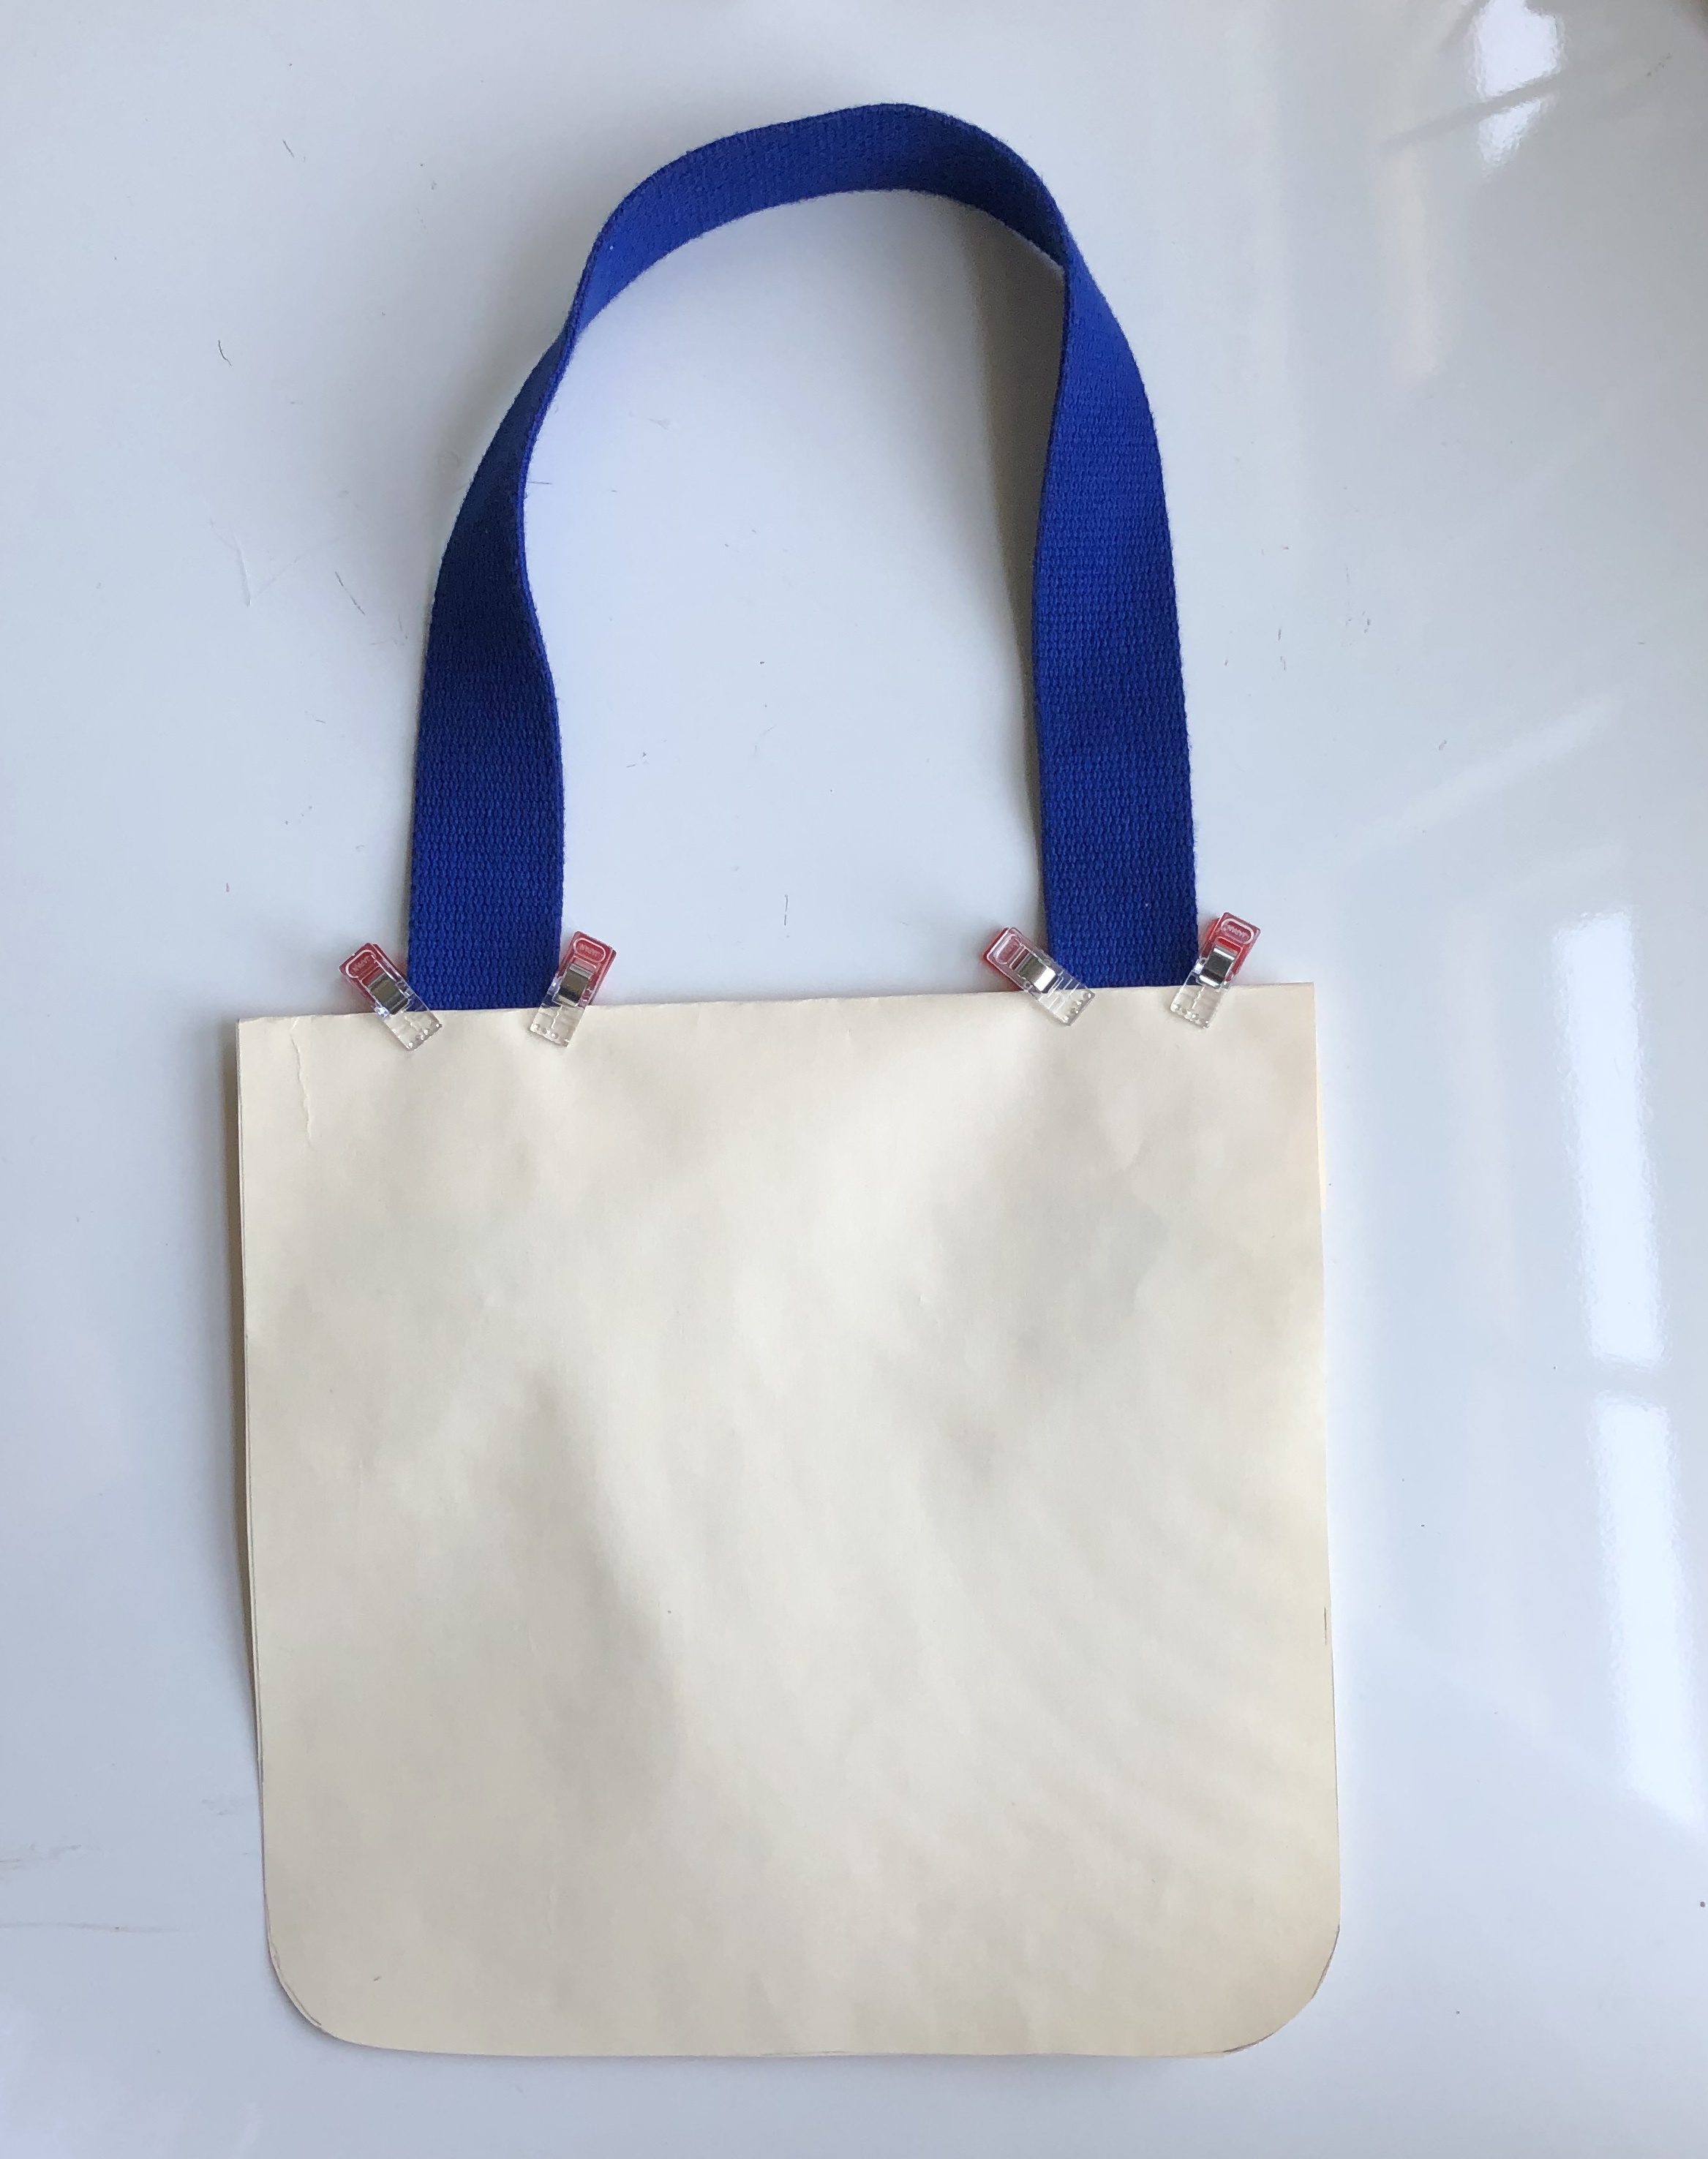
A tote mock-up made of oaktag. Handles are clipped to the top to test for fit.
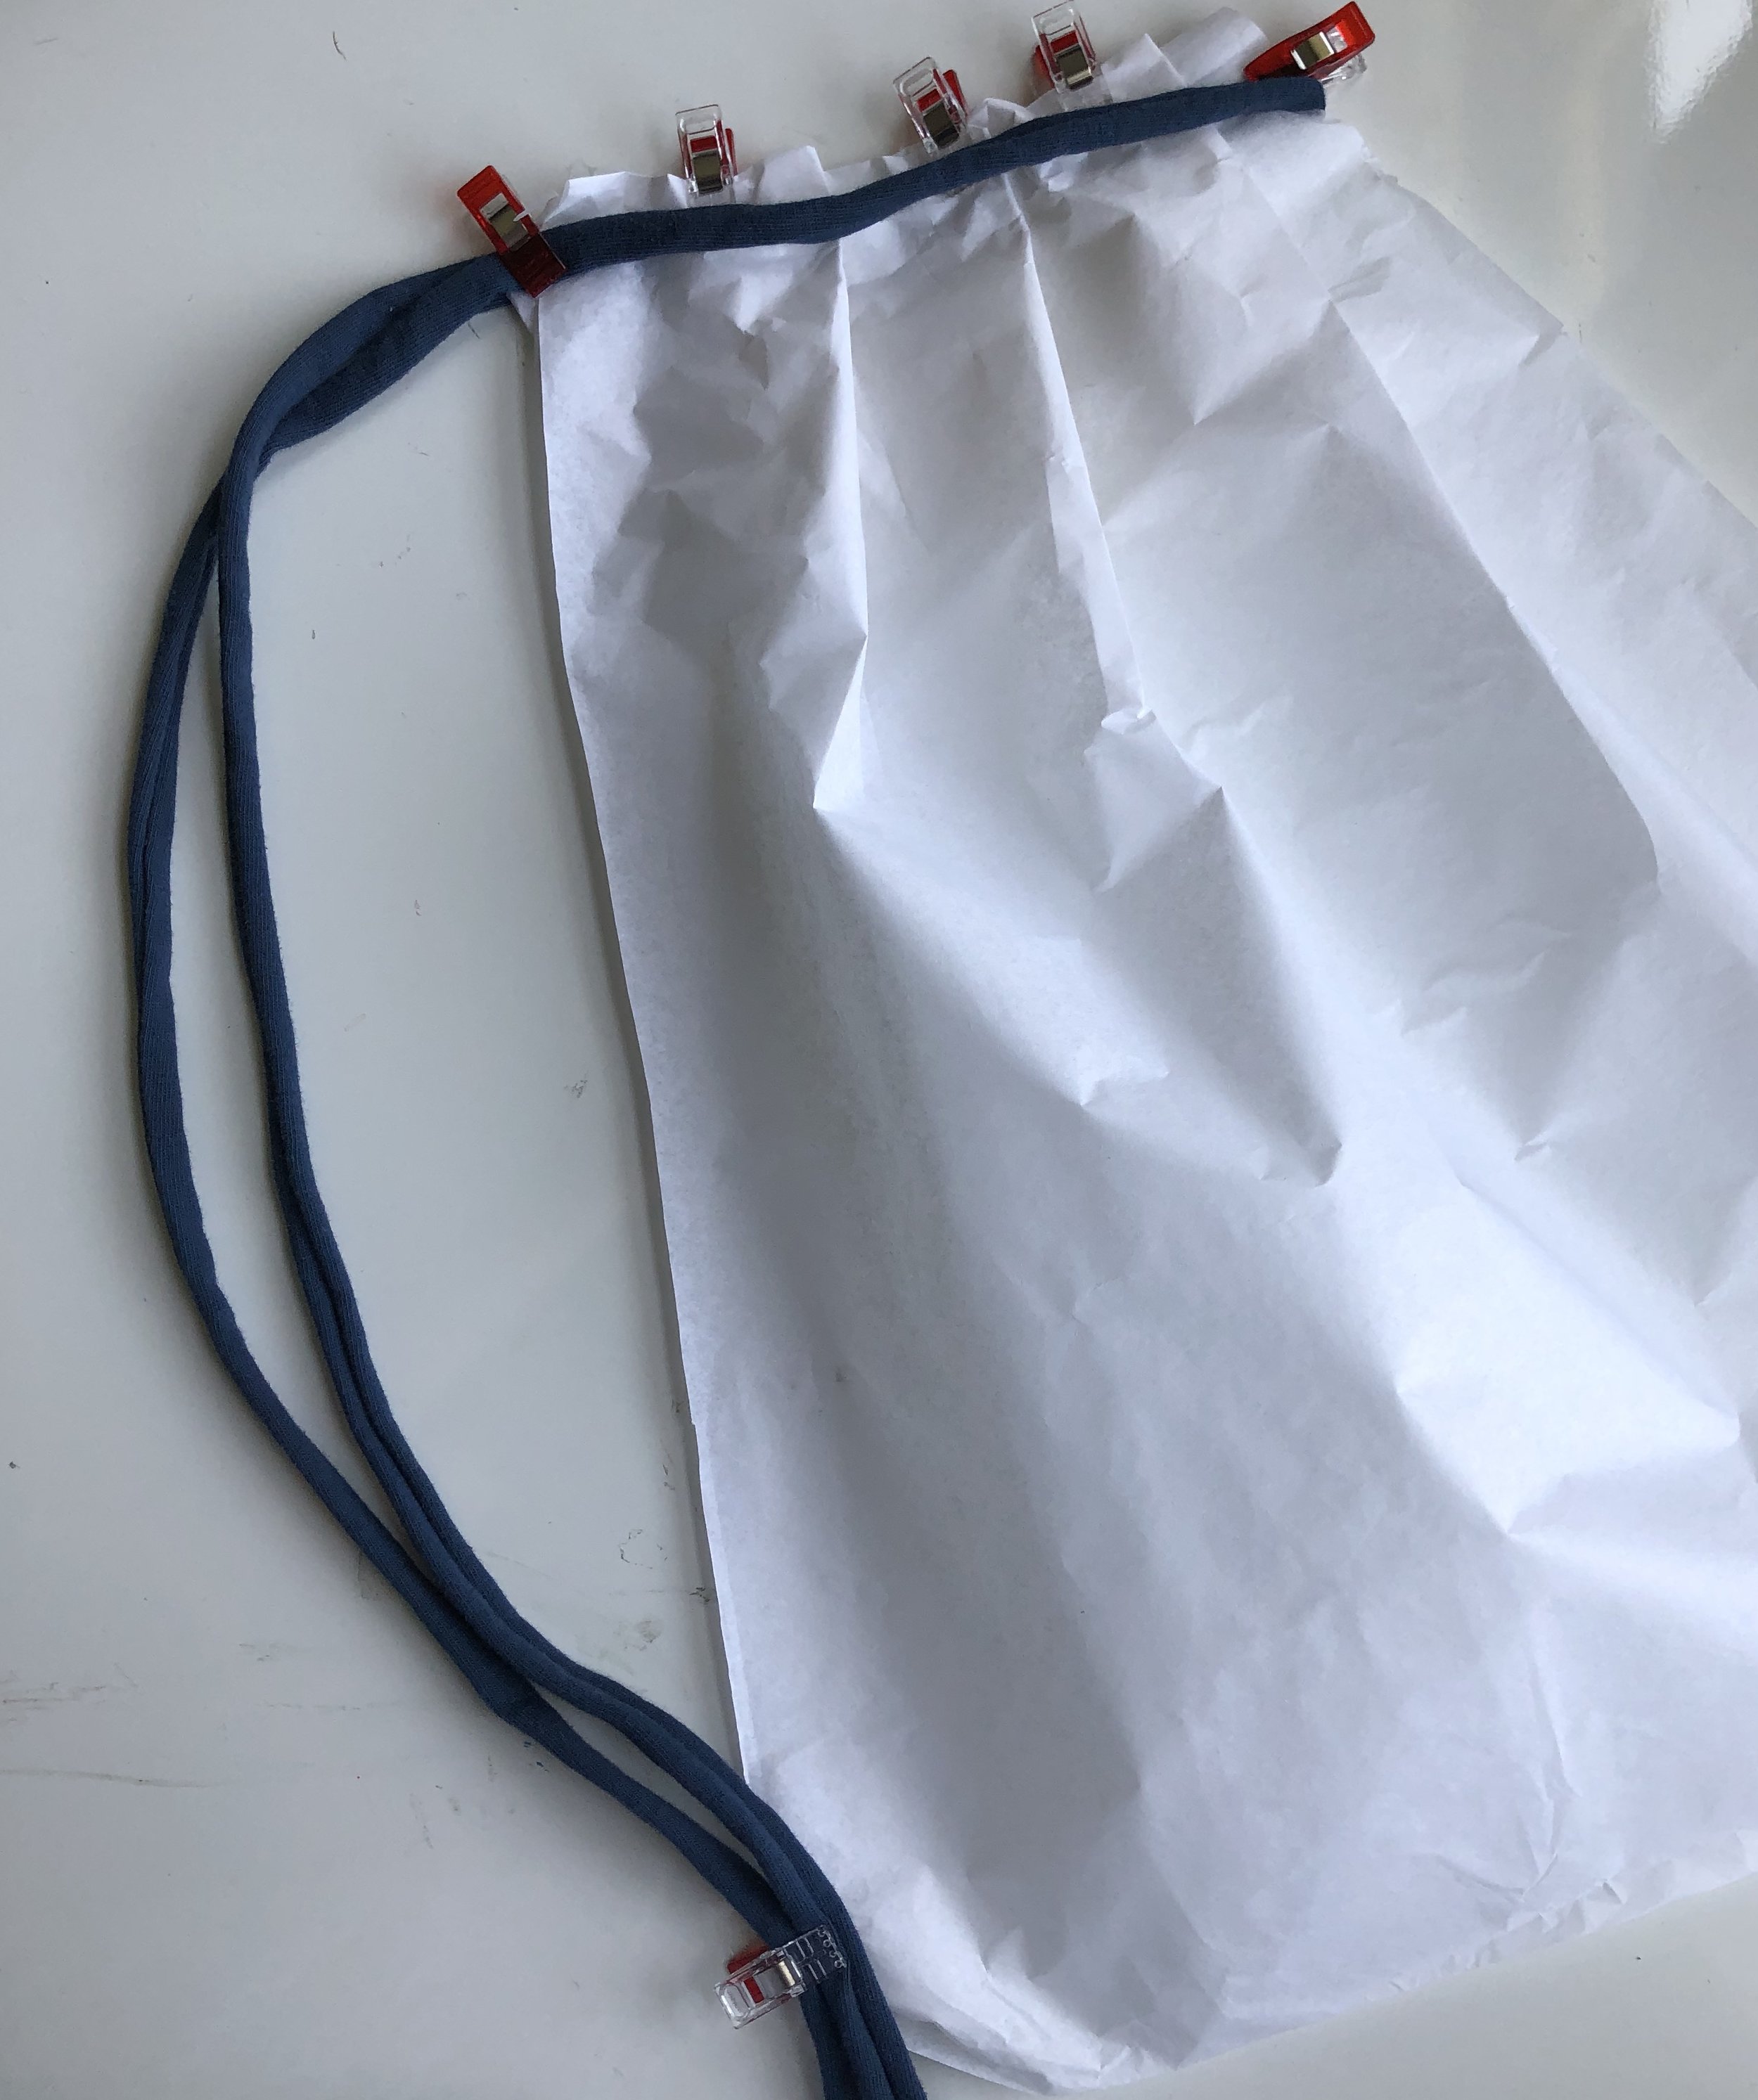
In this drawstring backpack mock-up, I used tissue paper so that it would better hold a “cinched effect”. The cord is wrapped around the cinched opening and pulled to the bottom. Once I was happy with the way that it fit, I measured the cord and recorded that as my strap length.
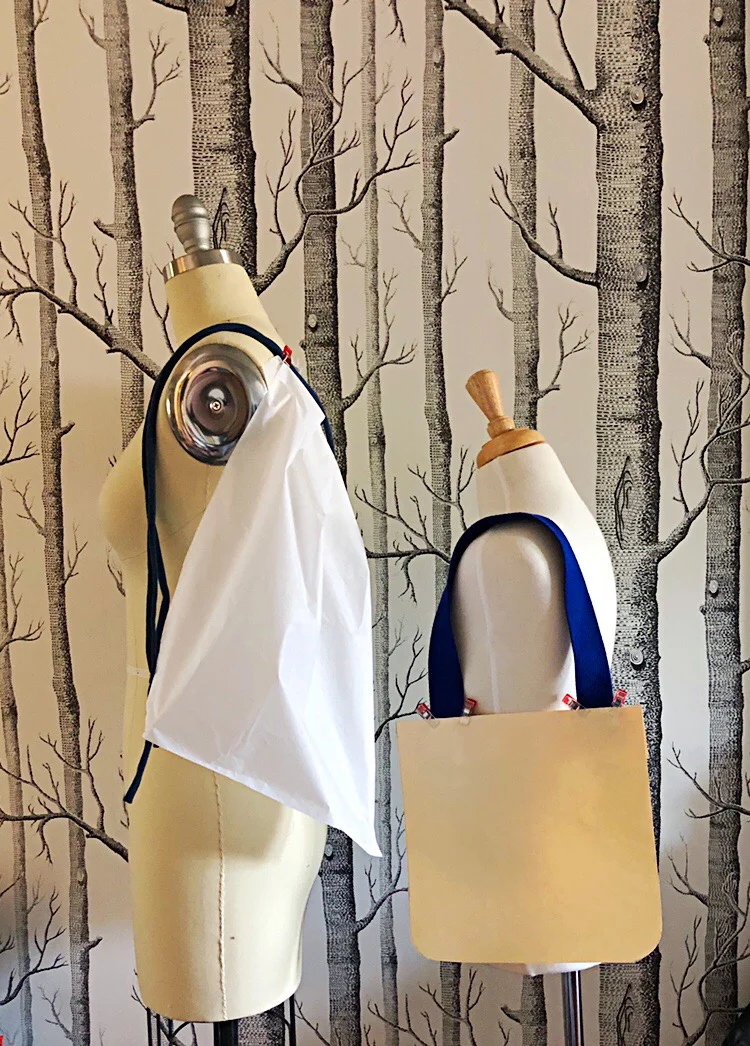
Dress forms playing dress-up with the bags.
This is a good time to refer to the bag pattern. Where is the strap placed? It is aligned at the top of the bag or a few inches down, if you are making out of fabric, you’ll need to account for the seam allowance. Would you prefer the added polish and flexibility of a D-ring? If so, then you will need to consider the diameter of the ring to the overall length.
Here is a handy guide to use as a general rule of thumb in determining the appropriate strap length for each style of bag. Remember- this is just for reference, make the length that suits you.
1. Wristlet (6 to 10 inches)
2. Short Handle (12 to 20 inches)
3. Shoulder (30 inches)
4. Long Shoulder (40 inches)
5. Crossbody (50 inches)
6. Extra Long (60 inches)
7. Adjustable (22 to 60 inches)
Drop Length
After you determine the optimal length for your strap, we need to talk about the drop length. Drop length is defined as the distance between the top of the bag and the top of the handles.
The Wesley Shoulder Bag from my book, Sew Bags: The Practical Guide to Making Purses, Totes, Clutches and More. Compare the drop of the bag to the length of the arm. Would that be comfortable for you to carry?
How do you like to wear your bag? Some people like their tote to sit close to their body, while others want a little more room. Thinking about which one you'd prefer can help you decide on the perfect drop length. Choosing a longer drop length can make a big difference in giving you more space to maneuver. (Like when you are standing at the door holding onto a kid and reaching into the bag that is on your shoulder and trying not to break your wrist.)
If you're unsure about the right length, the easiest way to get an idea of which drop length would work best for you is again, measuring a bag that you already own and find comfortable to carry. Even if your current bag is a little snug for your taste, measuring the drop length of the handles can still give you an idea of what would work best for you.
The drop length of a bag strap may be altered by an adjustable slide. *blog post coming soon!
Fabric and Materials
Once you have the length, width and drop determined- now it is time to consider what fabric or material you are going to make your straps or handles out of. Lately designers are shedding a new light on handles as the primary design feature of a handbag. Take cotton webbing for example. It is the new design detail that’s been featured on bags of every price point. Inspired by the logo-mania trend of recent seasons, these woven wonders are giving our everyday bags a whole new lease on life, lending them a high-fashion feel. But the excitement doesn’t end there. You can also make the strap with a chain, leather (genuine or imitation), Kraft-tex, fabric or any combination of the bunch.
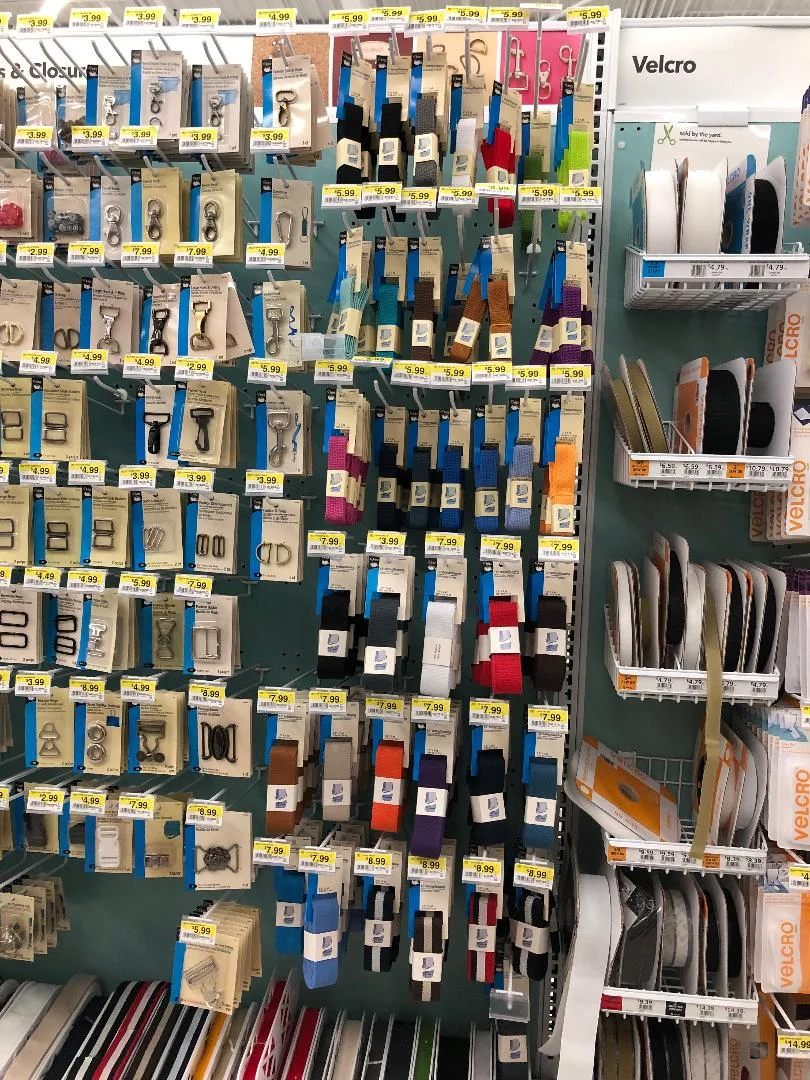
A recent visit to JoAnn’s Fabric confirmed the webbing strap trend!
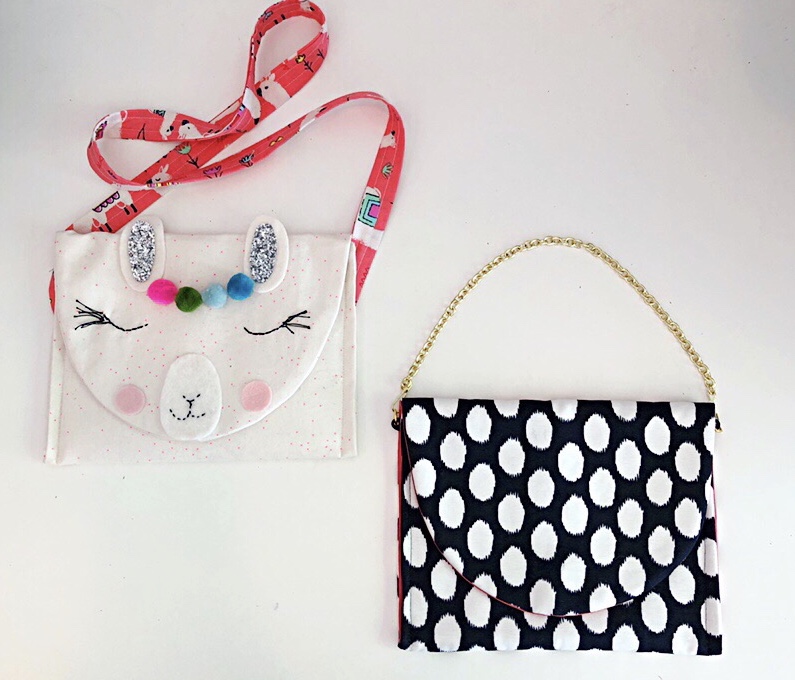
See how a strap can change the entire look and function of a bag? This bag is the Morganne bag in my book. Made in quilting cotton with a contrast cross-body strap, it is the perfect bag for a child. In silk with a gold chain, you are ready to go out on the town.
Straps are such a fun way to introduce an individual approach to a handbag, distinguishing it as its own distinctive piece. I am so excited to see the bags that you are going to make. Please use the hashtag #sewbags on social media- and be sure to tag me @littlestitchstudio.
In my next post, I am going to explore some essential bag making hardware: swivel hooks, slide adjusters, and rings.
XO, Hilarie
One Size Does Not Fit All
The ultimate expression of my obsession with customization, begins with a beautiful, simple everyday bag. Each bag in my book, Sew Bags: The Practical Guide to Making Purses, Totes, Clutches & More was designed with this in mind. The clean lines and thoughtful details invite you, the reader, to be the designer. While you can certainly make a bag exactly as the pattern directs, if you can manage a little extra time, in addition to a small stroke of creativity, the ability to make handbags totally your own could be a serious game changer.
The fun begins when you start to break the design down to the component parts. Fabric, hardware, handles, straps and decorative accessories can be mixed and matched to create a bag that’s uniquely yours.
Perfect design is a matter of personal expression and preference. What would your dream handbag look like? For me, it is almost always some kind of tote-style bag. I carry a lot of stuff around and need a sturdy bag that looks great but is also comfortable to carry and functional. Often times though when I see a great bag that I love, it is missing some essential requirement. More often than not, it doesn’t have enough pockets or the strap length is just not right. Since my overall goal is to encourage you to be a part of the design process, I intentionally left out interior pockets in the bags. This allows you, as the designer to make those decisions yourself.
I encourage you as you work through a pattern to consider the overall size and function of the project as well as the fabric and color. (Being involved in the design process can be just as fulfilling as actually cutting and sewing your bag.) To that end, you can look forward to future posts that will help to enrich your experience. First up- Straps and Handles.
XO, Hilarie

Publishers Weekly Calls Sew Bags "enthusiastic as well as informative".
My first book review- can you imagine the angst? Thank you Publishers Weekly for your balanced and flattering review.
As a reader of reviews, I do want to know if the book is worth purchasing or not. I buy books to inspire me, to learn from and if it is a how-to, then how to make the project. Understanding the scope of the book and projects helps me to make a choice. I particularly appreciate knowing the level of education and experience that the author of the book has and who the book is intended for. As an author, my perspective is just as curious. Being in the hot-seat, so to speak though, is new territory!

The Harley Wristlet
My first book review- can you imagine the angst? Thank you Publishers Weekly for your balanced and flattering review.
As a reader of reviews, I do want to know if the book that I am considering is worth purchasing or not. I buy books to inspire me, to learn from and if it is a how-to, then how to make the project. Understanding the scope of the book and projects helps to inform my choice. I particularly appreciate knowing the level of education and experience that the author of the book has and who the book is intended for. As an author, my perspective is just as curious. Being in the hot-seat, so to speak though, is new territory!
“Dayton, who owns the Little Stitch Studio for children in Norfolk, Va., teaches both kids and adults the joy of sewing in this attractive workbook. Dayton starts with how to think like a designer, discussing being open to different sources of inspiration and visualizing using a mood board. She goes over color values, from primary to tertiary, and describes the design principles of scale, harmony, and proportion. Dayton also defines pattern marking terms, which are “kind of like... another language—but an easy language!” She offers fabric-shopping hints, lists of needed tools, and explanations of how to thread a needle and sew a running stitch; however, her machine-sewing lessons stick close to “know your manual.” The book’s 13 “skill-building” projects are grouped into four categories: shoulder-strap bags, tote bags, zipper clutches, and drawstring bags. Dayton’s instructions for these, with tips throughout (including a text box titled “all about zippers”) are enthusiastic as well as informative. Applicable to a variety of projects despite the handbag focus, this spirited primer will leave readers feeling well-prepared and ready to start sewing.” Publishers Weekly (July)

5 Best Places To Shop For Fabric on the Web
I am frequently asked where the best places to shop for fabric are both locally and of course on the web. Locally, there isn’t a huge selection. You can go to Fabric Hut which is where I go and to Joanne’s. Both will have you covered for pretty much all-purpose sewing. But sometimes you have a vision for the perfect dress and you just can’t find the fabric. Here is what you need to know!

I am frequently asked where I shop for fabric. Locally, we don’t have a huge selection of fabric stores. You can go to Fabric Hut and Joann’s. Both will have you covered for pretty much all-purpose sewing. But sometimes you have a vision for the perfect dress and you just can’t find the fabric. Here is what you need to know!

I primarily sew clothing and accessories and always use natural fibers, as such, I mostly order my fabric. You will pay a bit more, but the quality and look are worth it. Cotton quilting fabric which is available widely, is not designed for clothing. Often times the plain weave is just too heavy and stiff for clothing and doesn’t drape. Additionally, it is printed after the weaving process. This means that the print can actually be off-grain which will make it tricky to sew with.
Apparel fabric is generally much lighter in weight and is designed for making clothing. It drapes beautifully, is more comfortable to wear and comes in endless varieties of weave, knit and texture. No matter what type of fabric you are looking for, have fun exploring.
Here are my top five fabric shopping sites:
Mood Fabrics Yes, there is a reason this shop makes every designers top list. Endless aisles of inspiration abound. Fabric, lace, notions, trim, leather, it is heaven.
Hawthorne Supply Company Hawthorne has excellent customer service and a large selection of contemporary designer cotton fabrics. Before I had wholesale accounts of my own, much of the fabric I bought for my classes was purchased here.
Purl Soho Besides yarn, purl has an excellent selection of fabrics by Robert Kaufman, Michael Miller and Liberty of London.
Britex Like Mood, Britex has a legendary array of fine fabric and supplies for fashion sewing.
Etsy and Ebay Etsy and Ebay are my go to sites when I am looking for something fairly specific. You will need to type in a search term, but you will be surprised what you can find. Vintage silk, Hmong indigo, Indian Block Print, Black Cotton Eyelet, Organic Cotton Jersey.
I know that I promised you five shops- but I like to over deliver:) Topstitch Atlanta has been open for a few years. I have enjoyed watching them grow on Instagram and am always impressed by their pattern selection and fabric. And of course, no list would be complete without mentioning the ability to go the custom route and design your own fabric on Spoonflower.
Sewing Fundamentals: Fabric Grain
When learning to sew, there are so many things to try to keep in mind. Adults, in my experience, are really focused on trying to sew a straight line and make their project perfect- even the first time. While I do appreciate the impulse, I try to explain that sewing is just so much more than straight stitching. That will come with time, I promise! Instead, what I like to emphasize is the importance of taking your time to prepare your work. By learning to slow down and focus on the fabric grain, cutting and pinning, you will end up with a vastly superior finished product than one that might be stitched “straight” but sloppily prepared.

When learning to sew, there are so many things to try to keep in mind. Adults, in my experience, are really focused on trying to sew a straight line and make their project perfect- even the first time. While I do appreciate the impulse, I try to explain that sewing is just so much more than straight stitching. That will come with time, I promise! Instead, what I like to emphasize is the importance of taking your time to prepare your work. By learning to slow down and focus on the fabric grain, cutting and pinning, you will end up with a vastly superior finished product than one that might be stitched “straight” but sloppily prepared.
To that end, I am beginning a blog series on Sewing Fundamentals. Grain, Fabric, pattern markings, pinning, basting, measuring, tools. These are the true basics. Also- for those of you that are local, I am offering this in a hands-on workshop version this coming Saturday, April 13. The actual project is to make cloth napkins, but with that, you will gain so much experience that will help lay a foundation and true understanding of learning to sew.
Broadly speaking, fabric can be organized into three categories. Woven, stretch and non-woven. For this post I am focusing on woven fabric.
Fabric Grain
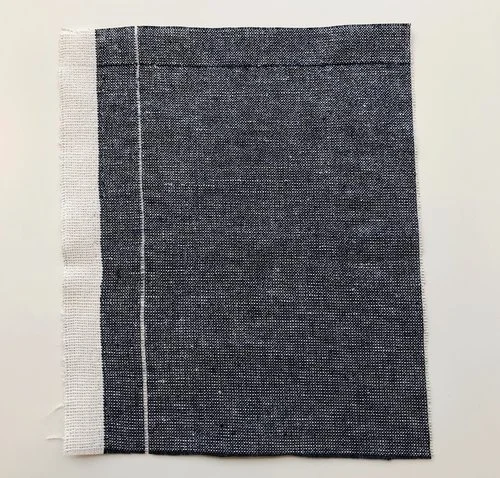
What is grain? Simply put, grain is the direction of the weave in the fabric. Fabric is created by weaving two or more threads at right angles to each other. There is the lengthwise grain and the crosswise grain. The lengthwise grain, called the warp, runs up and down while the crosswise grain, called the weft, is made from threads woven over and under the lengthwise grain from side to side. As the fabric is woven, the selvedge is created by the weft threads turning as they are being woven in the opposite direction. This creates a continuous binding on the length of the fabric.

When you examine a piece of fabric, you can see these two grain lines and selvedge.
The reason why these grain lines are so important is that they react in different ways. The warp thread, or lengthwise grain, is the stronger of the two and therefore less likely to stretch out of shape. There are more warp threads per square inch than there are weft threads. These extra threads create strength. The lengthwise grain is the grain most used in garment construction.
The weft, or crosswise grain, is less dense and therefore has some give because of the over and under weaving. Because of this, it does make for more comfortable garments that have some inherent give where necessary, (think shoulder seams and sleeves).
That bring us to the third grain, the bias. The bias grain refers to fabric that is cut at a 45 degree angle to the crosswise and lengthwise grain. Bias creates softness and a drape that can follow a curve to stunning effect.
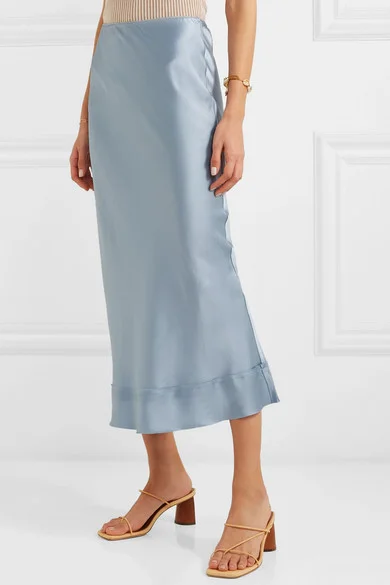
Bias cut skirt, net-a-porter

Spread a little love this Valentine's Day.
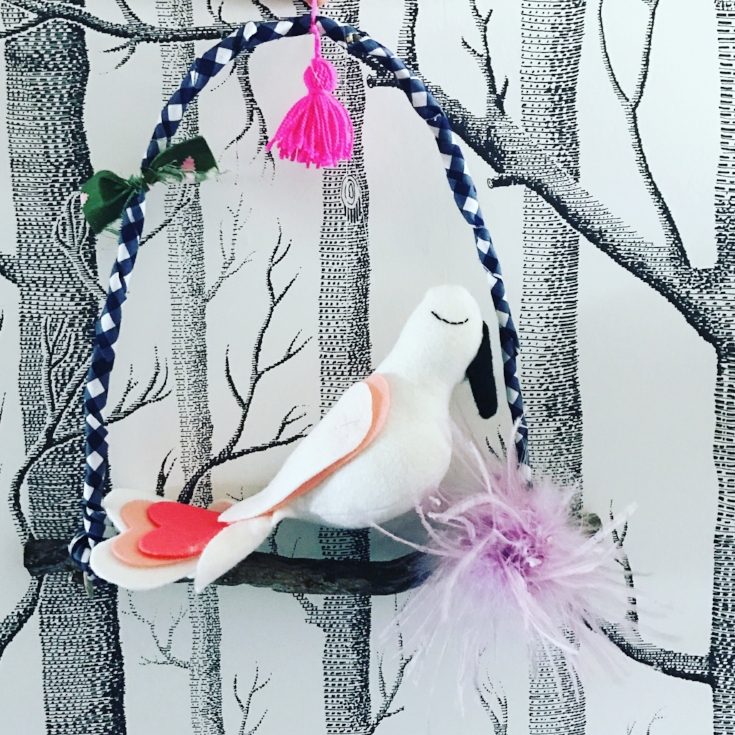
I'm really not a big fan of Valentine's Day. To me it's more of a marker that spring is coming. A few hyacinth are blooming in my yard and the camellia's look like they are draped in a pretty pink garland of pompom blooms. With that in mind, this lovebird and perch bring hope that spring is near.

I'm really not a big fan of Valentine's Day. To me it's more of a marker that spring is coming. A few hyacinth are blooming in my yard and the camellia's look like they are draped in a pretty pink garland of pompom blooms. With that in mind, this lovebird and perch bring hope that spring is near.
SCRAPPY PERCH
MATERIALS NEEDED
Fishing Line
Paper wrapped stem wire, 18 gauge
A stick, approximately 10-12" long
Fabric, 1 1/2" X 40", Folded in half width-wise and pressed.
Fabric Scrap, 1 x 5"
Tassel or pompom (I use the loome to make mine)
Misc. bits of feather, felt or fabric to embellish

ASSEMBLE THE PERCH

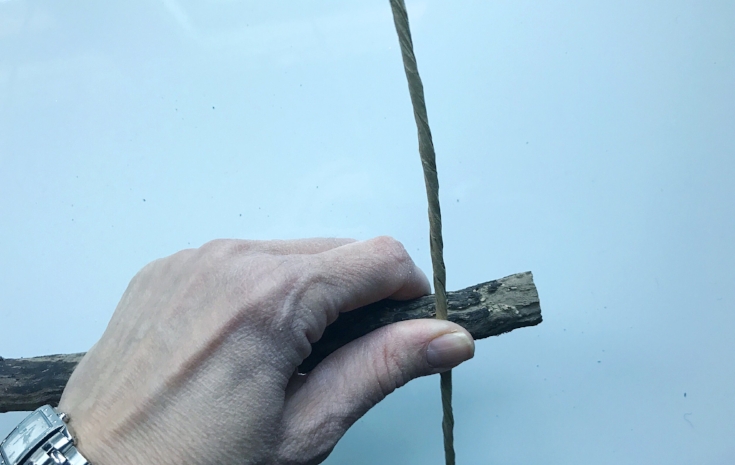
Take one of the paper wrapped stem wires and wrap around one end of the stick.

With the straight end, cross and wrap with the second stem wire at the top.

Bend the wires to make a nice arch. Wrap the end around the other side of the stick.
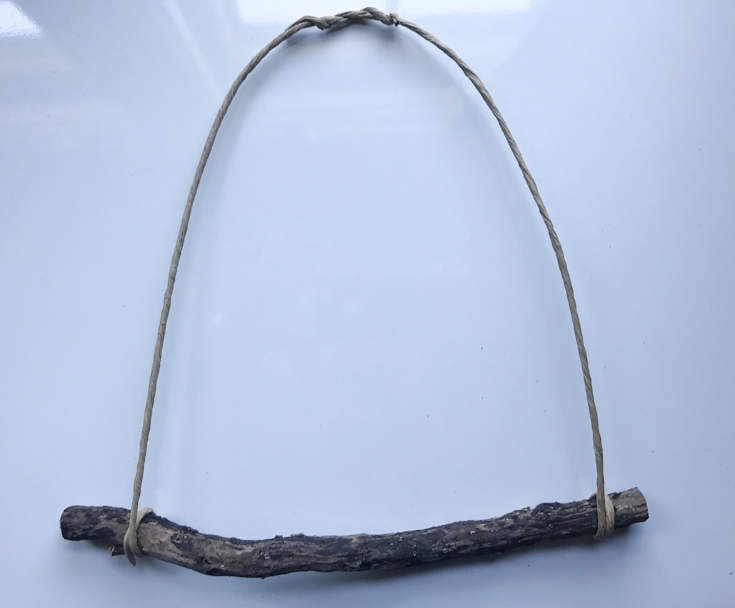
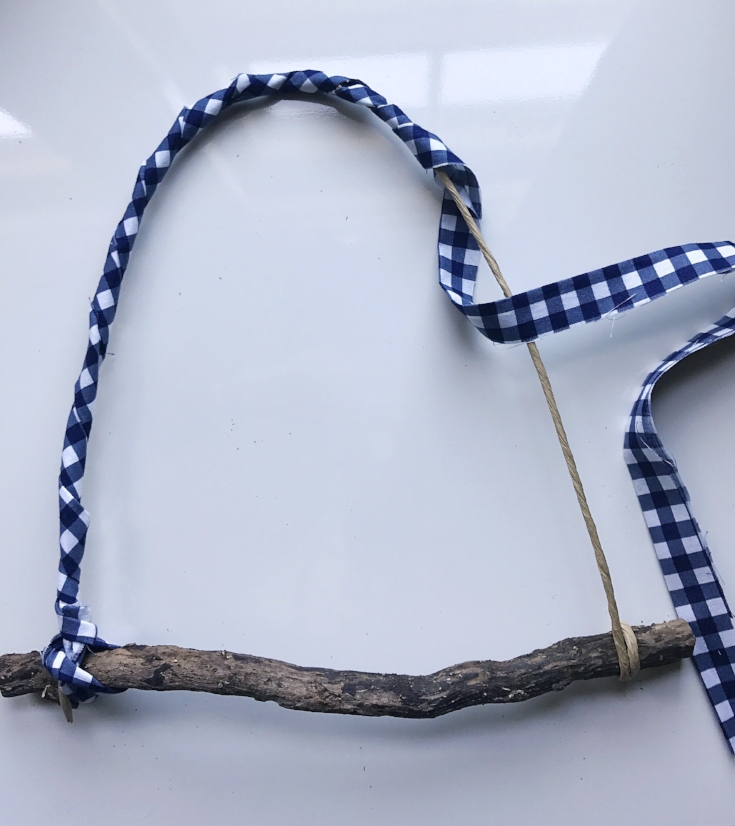
Take the long fabric scrap and tie one end of the stick and wire. Be sure to tuck the fabric tail into the fabric as you begin to wrap the wire.


Continue wrapping around the entire length of the wire, smoothing the fabric so that it is evenly distributed as you go.
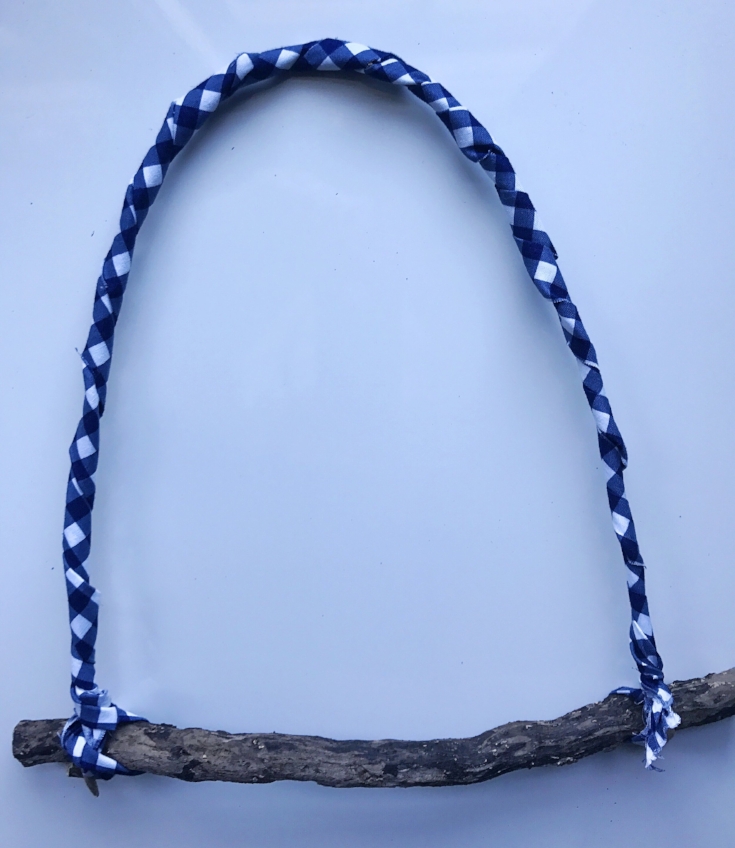
Tie to the opposite end of the stick and tuck in fabric tail.
EMBELLISH (FEATHER ITS NEST)

Tie a tassel or pompom to the top of the arch. Leave a tail that will be long enough for you to use to hang the perch.
Take the small fabric scrap and tie around one side of the perch. You could also use any type of fabric or trim here to further decorate here. A bit of ball trim, some lace, feathers, perhaps a felt flower? I used whatever I found on the floor of my sewing room. Literally scraps.

HANG THE BIRD
To hang the bird from the perch, cut a 18-20" length of fishing line. Thread a needle with the line and run it through the back and neck of the bird.
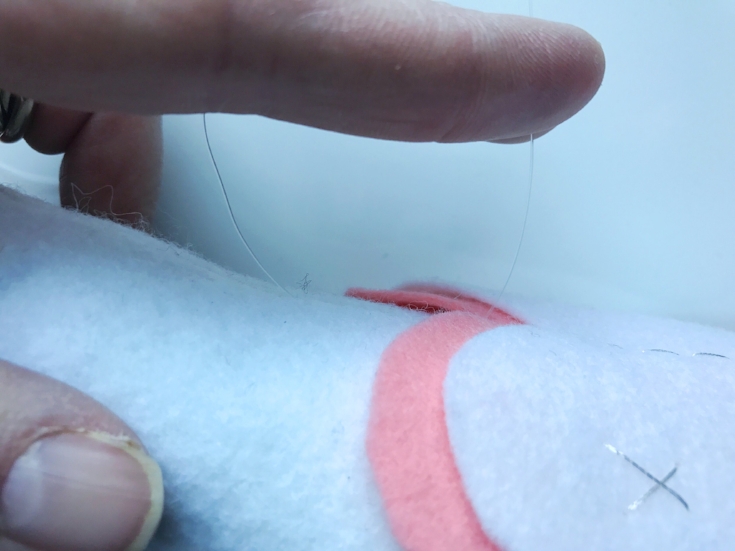
Place the bird in the perch and tie the fishing line to the top of the perch and around the yarn to secure.

If you missed yesterday's post, here is a link to the Lovebird pattern and tutorial:
Happy Valentine's Day!
Hilarie XO